You shouldn’t run NSA-grade Wi-Fi at home. Here’s how to do it

Carl Tashian
If you want a home network that aligns with the US National Security Agency (NSA) criteria for protecting classified and top secret information, then read on fellow traveler, because that’s where we’re headed in this post!
However, if you want a home network that’s simple to configure, easy for your guests to borrow, that supports your Smart Home gadgets, then you should close this tab now, because the most secure Wi-Fi mode available today—WPA3 Enterprise 192-bit mode—is not for you.
Still, it can be fun to try these things. And amazingly, deploying NSA-grade Wi-Fi is possible at home. It’s supported by a lot of modern Wi-Fi access points. It’s supported by Windows 10, Windows 11, macOS, iOS, tvOS, iPads, Apple Watches, and Linux as well.
This tutorial will cover iOS/iPadOS and macOS clients, and we will use a Unifi Dream Machine as our Access Point. You can follow this entire tutorial using “plain” WPA3 Enterprise without 192-bit mode, and you'll still have the most secure Wi-Fi network on your block. The only risk is that you may feel unprepared when the Secretary of Defense swings by for a casual co-working sesh in your living room.
All the reasons you should not do this at home
WPA3 Enterprise is not a good fit for home networks. When setting it up, the first hassle you will encounter is that it requires certificate authentication. There is no username or password option with WPA3 Enterprise 192-bit mode. So, typically, a large organization running WPA3 Enterprise will have many users and devices, and they will use Mobile Device Management (MDM) to issue and configure client certificates to all their devices. With an MDM provider like Jamf or Intune, it's possible to configure and deploy certificate-based Wi-FI on a network in a few minutes. But on a home network, with no MDM provider, you'll need another mechanism for getting certificates to your devices.
For this tutorial, we're going to use a manual process. By doing it this way, we can illuminate a bit more of what's going on under the hood.
The two most common security modes for home Wi-Fi networks are WPA2-PSK and the newer WPA3-Personal. Both use a pre-shared password for authentication that strikes a friendly balance between usability and security. NSA-grade Wi-Fi is different:
- As mentioned earlier, you need certificates. When friends come over, instead of just saying, “The password is MeleKalikimaka”, you will have to issue a precious Wi-Fi certificate for them and transfer it onto their device. A device which, by the way, does not yet have a Wi-Fi connection!
- Because you need certificates, your Smart Home devices won’t support WPA3 Enterprise. Home printers won’t support it. A lot of things won't support it. In fact, it’s a miracle that some consumer-grade routers and access points support it at all.
- Finally, Enterprise Wi-Fi is complex to operate. It requires more than just an access point. At minimum, you also need an external authentication server and, in our case, a Certificate Authority. (For this tutorial, we'll take care of these components for you.)
In short, most people should not run WPA3 Enterprise at home. And if you’re still reading this, you’re not most people.
Requirements
For this project, you will need:
- A Wi-Fi access point that supports WPA2 Enterprise or WPA3 Enterprise security.
- A client device you can test with.
- A Smallstep account for certificates and authentication. We have a free tier for homelabs, so sign up right here to get started.
- Optionally, a USB stick or other means of getting files to a target device with no network access—we’ll use AirDrop in this tutorial.
Background on EAP-TLS and RADIUS
As you know, most home Wi-Fi uses a single shared password. With Enterprise Wi-Fi, however, there’s a dozen or so authentication protocols designed to fit different scenarios. These are all flavors of the Extensible Authentication Protocol (EAP) [RFC 3748], and they allow network authentication to be delegated by the AP to an external server and identity provider. While the wireless security modes (eg. WPA2 Personal or WPA3 Enterprise) define the algorithms and security parameters for the entire Wi-Fi connection, the EAP method defines how a device will authenticate to the network.
Since we love certificates and TLS here at Smallstep, in this post we will zero in on the certificate-authenticated EAP method, called EAP-TLS [RFC 5216]. EAP-TLS is the only EAP that requires mutual certificate authentication. This makes it, in our humble opinion, the most secure EAP out there. It offers some very nice security properties:
- No shared secret for accessing the network
- No usernames or passwords, either
- Instead, every device or user needs a device certificate and private key issued by an internal CA
- Certificates can be issued manually, but are more often issued via Mobile Device Management (MDM), making network authentication and device identity transparent to the user of the device
- Certificates are validated by an external RADIUS authentication server [RFC 2865]—not by the access point itself.
- The private key can be strongly protected from theft
- Certificates expire—passwords don’t!
And, beyond being a fun weekend project, EAP-TLS could have some use at home. If you have a crafty teenager named Mallory who knows how to spoof MAC addresses to circumvent parental controls, you could try EAP-TLS. Once you have established the basic EAP-TLS setup described below, you could extend your configuration to cover your wired Ethernet ports, using IEEE 802.1X features. This is what hospitals are required to do to lock down their networks for HIPAA compliance, so it would offer plenty of protection against a malicious TikTok-obsesseed threat actor. The setup details for 802.1X wired network protection are, however, beyond the scope of this post.
The Setup
Here’s a simplified diagram of an Apple laptop getting a client certificate and joining an EAP-TLS authenticated network. With EAP-TLS, the RADIUS server must complete a mutual TLS handshake with the device before giving the thumbs up to the access point:
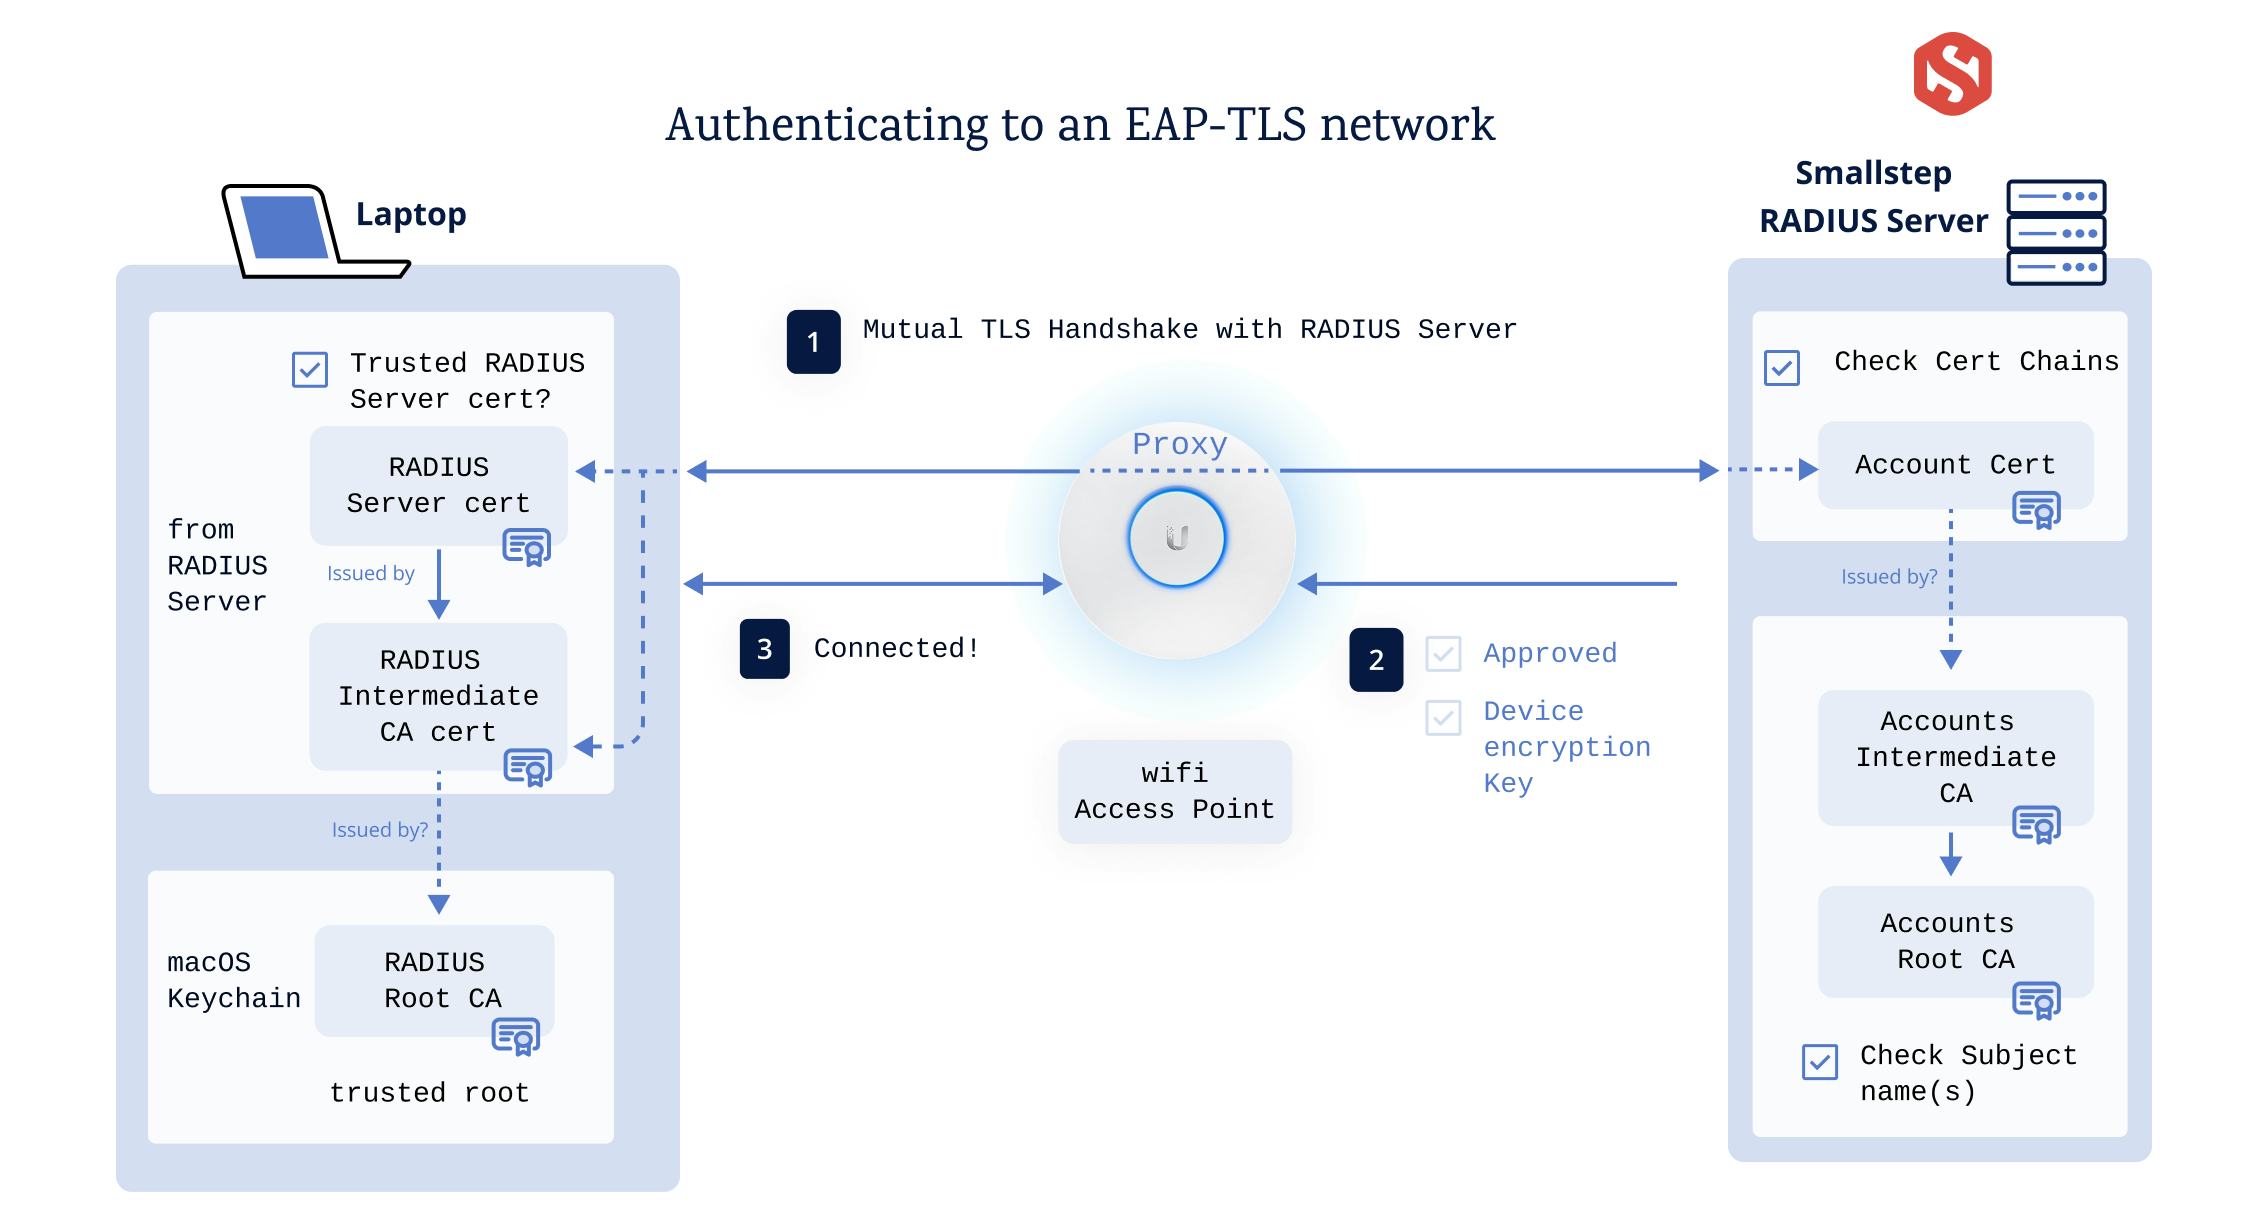
The Certificate Authority
Smallstep will be your Certificate Authority and it will issue certificates for your devices. It uses a two-tiered private PKI, with a Root CA and an Intermediate CA.
The RADIUS Server
Smallstep will host a RADIUS server for you too, so you don’t have to worry about setting that up or configuring it. All you'll do is configure your Access Point to use it.
For context, though, here’s what the RADIUS server is configured to do:
- Require EAP-TLS, which is the only EAP type compatible with NSA-grade Wi-Fi
- Use a valid server certificate from a CA that the device will trust
- When a new device connects, authenticate its client certificate via a TLS handshake that is proxied through the AP. Certificates will be issued by your Smallstep Accounts Authority. To accept clients certificates, the RADIUS server needs to be configured to trust the root and intermediate of your Smallstep Accounts Authority (Smallstep will take care of this for you, too)
1. Create your CA and RADIUS server
Smallstep issues the certificates you'll need for clients to access the network, and we host a RADIUS server for network authentication. The RADIUS server authenticate devices joining the network, and reports back to your Access Point whether they are to be accepted or rejected.
Let’s create a Smallstep Wi-Fi Account and RADIUS server:
-
First, create a Device Collection. Sign into Smallstep, go to the Mobile Devices tab, and choose + Add Collection. Select Any macOS, iPadOS, or iOS device as the platform, and give your device collection a name.
-
Add your test device(s) to the device collection. Use the serial number of the device as the Device Identifier when you create it. You can find the serial number for your device under
Settings > General > About, or inAbout This Mac. Make sure you click "Register Device". -
Create a “Wi-Fi” account in your new Smallstep Device Collection
You’ll need to supply the Wi-Fi SSID you’ll use for WPA3 Enterprise and your public-facing (WAN) IP address, so our RADIUS server can identify requests from your network.
-
When you’re finished, you’ll see your RADIUS server details. Use these when you configure your Access Point.
2. Configure your Access Point
Once you have created your Smallstep Wi-Fi Account, there’s really only three or four bits of configuration needed your Access Point. You’ll probably want to create a separate test network for this project. Each AP is will have a slightly different configuration UI, but these are the network settings that will matter no matter what AP you’re using:
- Security Protocol: WPA-3 Enterprise
- RADIUS server information (provided by Smallstep)
- RADIUS server IP
- RADIUS server port
- RADIUS server shared secret
- High Security 192-bit Mode: On
All we’re doing here is delegating WPA3 Enterprise Wi-Fi authentication to your Smallstep account.
Example: Configuring a UniFi Access Point
In the Unifi Network app, first create a RADIUS Profile:
- Go to Settings → Profiles → RADIUS → Create New
- Give the profile a name
- Under Authentication servers, add the RADIUS server IP address, port, and shared secret you received from Smallstep
- Choose Save
Next, create a Wi-Fi network that you’ll use for testing:
- Go to Settings → WiFi → Create New
- Give your network an SSID
- Under Advanced Configuration, choose Manual
- Go to Security
- For Security Protocol, select WPA-3 Enterprise
- For RADIUS Profile, select the RADIUS profile you created above
- Turn on High Security 192-bit mode
- Go back and choose Save
🚨 Not all APs support multiple SSIDs. If yours only supports a single SSID, and you can’t create a test network, it’s hard to do this project without any Wi-Fi interruptions. At a minimum, you will probably want to connect your device over Ethernet to your AP/router before you proceed to ensure you have uninterrupted access to the internet.
Great! You now have a test network. Let’s test it!
3. Connect a device
Let’s get your test device configured. This is the most complex and annoying part of the process, but I've tried to simplify it. We need to do the following:
- Root distribution: Each device needs the CA that issued the RADIUS server’s certificate installed and marked as trusted.
- Enrollment: Each device needs a valid device certificate from a CA that the RADIUS server trusts. For this project, the device will generate its own private key and get a certificate which is bound to that key and signed by your Smallstep CA.
- Wi-Fi configuration: While not critical, it helps to pre-configure the WPA3 Enterprise network as a known network configuration on the device. This way, the device can immediately connect with a single tap.
- Finally, there’s renewal. The certificate we’ll issue will expire in about 90 days. We need to renew it somehow, before the device loses access to the network. We’ll cover renewal a bit later.
Enrollment on iOS/iPadOS, using AirDrop
In a typical enterprise Wi-Fi deployment, all of the enrollment issues are resolved with an mobile device management (MDM) server. The MDM server pushes configuration profiles down to the device. Configuration profiles configure the device’s settings and, for things like Wi-Fi networks, get certificates from a CA.
But running an MDM server for a home network is a hassle. Instead, today we will do MDM without an MDM server. Also known as a manual enrollment or user enrollment.
Smallstep will generate an Apple configuration profile (a.mobileconfig file) for each of your devices, and you can just AirDrop this file over to the device and install it. This is perfect for testing, or if you only have a few devices and don’t need an MDM server. If you can't use AirDrop, email also works.
Ordinarily, we'd install the root certificate via the .mobileconfig. Unfortunately for us, Apple prevents automatic root certificate installation except via MDM. So we'll need to install our Accounts Root CA separately.
Download and install your Accounts Root CA certificate:
- First, go to your Apple device collection in the Smallstep UI
- Navigate to the Wi-Fi account you created earlier
- Scroll to "Authority Settings" and download your Root Certificate
- AirDrop the root certificate to your test device, and install it there by opening Settings → Profile Downloaded.
Once you’ve installed the root certificate, there’s one more step: with manual enrollment, Apple requires you to explicitly enable Full Trust for the Smallstep Accounts Root CA. This is not true for a full MDM enrollment, but we need to do it:
- Go to Settings → General → About → Certificate Trust Settings
- Toggle the switch on the Smallstep Accounts CA to enable Full Trust
Your Smallstep Accounts Root CA is now trusted.
Now, download and install your.mobileconfig file:
- Return to your Apple device collection in the Smallstep UI
- Click "Devices", find your test device, click "view device", and navigate to the "Accounts" tab on the device profile
- Now, click the "Configuration Profile" link on the Wifi account to download the
.mobileconfig, but don't install it - AirDrop the
.mobileconfigto your test device, and install it there by opening Settings → Profile Downloaded.
Once you’ve installed the profile, we once again need to manually tweak trust settings. This time to explicitly enable Full Trust for the Smallstep RADIUS server’s root CA. Again, this is not true for a full MDM enrollment.
- Go to Settings → General → About → Certificate Trust Settings
- Toggle the switch on the Smallstep RADIUS Root CA to enable Full Trust
The Smallstep RADIUS Root CA is now trusted.
Join the network
The device is now enrolled, and you’re ready to join the network.
- Open Settings → Wi-Fi
- Choose your WPA-3 Enterprise network SSID
If everything is configured correctly, your test device will join the network!
Enrollment on macOS
This is very similar to iOS enrollment.
To install the Smallstep Accounts Root CA, follow the download instructions for iOS then open the downloaded file to install it in your System Keychain. Again, manually installed root certificates aren't trusted by default, so you'll need to open Keychain Access and adjust the trust settings for the certificate to "Always Trusted" (full instructions here).
- Open Keychain Access
- In the System keychain, find the Smallstep Accounts Root CA Certificate, and double-click on it
- Open the Trust section
- In the “When using this certificate” dropdown, select “Always Trust.”
- The CA certificate is now trusted for Wi-Fi RADIUS server connections
.mobileconfig file:
- First, go to your Apple Device Collection in the Smallstep UI
- Click Devices and add macOS device, using the device serial number as the “device identifier” in Smallstep
- Once it’s created, click "view device" and navigate to Accounts
- Choose “download configuration profile” for your macOS device
- Download the
.mobileconfigand open it - Open System Settings → Privacy & Security → Profiles
- Under “Downloaded”, double-click the profile you just added
- Choose “Install…”, and choose Install again.
Once you’ve installed the profile, there’s one more step: return to Keychain Access and explicitly "Always Trust" the Smallstep RADIUS Root CA certificate as we did with the Smallstep Accounts Root CA above.
Join the network
Choose your WPA3 Enterprise SSID from the Wi-Fi menu. If everything is configured correctly, your test device will join the network!
It worked! Now what?
Now you can repeat the process for other devices. Add the device to your Device Collection on Smallstep, download a profile for it, and AirDrop the profile to the device.
What About Renewal?
You need to renew every device’s client certificate. By default, these certificates will have a 90 day validity period. For an MDM-without-MDM setup, you’ll need to renew them manually every 45-60 days. To do this, AirDrop the same.mobileconfig file that you originally downloaded to the device, and install it. The device will get a new certificate for itself from your Smallstep CA.
Enrollment for houseguests
Houseguests with Apple devices don’t need full root distribution. They can just trust the RADIUS server’s certificate the first time they connect to wifi. (Side note: In enterprise networks, this is not okay, because without real server validation, an attacker can create an “evil twin” network with the same SSID and run a RADIUS server that captures credentials from devices attempting to connect.)
A houseguest’s device serial number doesn’t need to be registered with Smallstep, and they don’t need certificate renewal either. We just need to send them a single client certificate and they can join the network manually.
Let’s get a client certificate for your Wi-Fi network onto their device:
-
In the Certificate Manager → Authorities tab, go to your Accounts authority and use the UI to create a certificate for your houseguest. Give it a validity period that matches the duration of your guest’s stay.
-
Download the
.crtand.keyfiles. From here you’ll need to make a.p12bundle for your device. Pop open a Terminal and run the following, using the files you just downloaded as inputs:openssl pkcs12 -export -legacy -inkey wifi.key -in wifi.crt -out wifi.p12
When asked for a password, don’t leave it blank. iOS/iPadOS won’t accept an empty password. This is a temporary password, so you can use something simple.
-
Great, now AirDrop or otherwise transfer
wifi.p12over to your device. -
Accept the AirDrop, then go to Settings → Profile Downloaded
-
Tap Install, type your passcode, and tap Install again. It will say that the profile is not signed. That’s totally fine. Tap install a third time, then enter the password you created earlier. Tap Done.
Now the device can join the network, but since there’s no wifi configuration payload on their device, they will have to supply the certificate manually when they connect to your Wi-Fi:
- Select the network SSID
- Under the Mode menu, select EAP-TLS
- Go back, and under the Identity menu, select the client certificate
- Tap Join
Footnote: How .mobileconfig files work
So, how does the .mobileconfig file work under the hood? Well, Apple’s configuration profiles are grouped by “payloads” that configure certain parts of the device. For our wifi setup, each profile has three payloads:
-
Certificate: This payload is for installing a CA certificate PEM file on the device. In our case, we’re installing the CA that issued our RADIUS server’s certificate.
-
ACME Certificate: The ACME Certificate payload uses the ACME protocol (this is the same protocol Let’s Encrypt uses, just in a different context) to get a Wi-Fi client certificate from your Smallstep Accounts CA.
The ACME Certificate flow uses Apple’s new Managed Device Attestation feature—and the new ACMEdevice-attest-01challenge type—to get a certificate without any credentials stored in the payload. The basic idea is:- The device goes to Apple and gets an Attestation Certificate that includes some identifying information, like its serial number. Note that this certificate uses a private key that is not exportable, offering a third party strong assurances that it is, indeed, talking to the device identified by the attestation certificate.
- The device uses the Attestation Certificate and private key to request a Wi-Fi certificate from the Smallstep CA. Smallstep will only issue certificates to devices with serial numbers shown in your Apple Device Collection.
-
Wi-Fi: This configures the network itself, so you can connect with a single tap.
Footnote: Why is NSA-grade Wi-Fi called "192-bit mode"?
Like many things in the dark art of PKI, this is not at all obvious at first, because none of the cryptographic parameters for this mode mention 192 bits of anything:
- Certificates must be ECC using elliptic curve secp384r1
- Protocol must be TLSV1.2, all others are disabled (in practice, TLS 1.3 seems to work, it just isn’t officially NSA-grade wifi)
- Cipher algorithm must be AES-256
- Key exchange algorithm must be ECDH
- Digital signature algorithm must be ECDSA
- Hashing algorithm must be SHA384
- Cipher suites allowed for NSA Suite B 192 bit are
TLS_ECDHE_ECDSA_W_AES_256_CBC_SHA384TLS_ECDHE_ECDSA_W_AES_256_GCM_SHA384
All of this, as Microsoft puts it, will “provide a minimum of 192 bits of security.” Where “security” means “the amount of effort it would take to gain access.” I’m not sure if that is linear or exponential effort, but I will leave that question alone for now, otherwise this post will never see the light of day.
So, here’s what I think is going on: According to Wikipedia, most cryptographic algorithms are designed to have a level of security equal to their key size. But elliptic curve algorithms are different. They have an effective security of roughly half of the key size. So, “192-bits of security” requires at least a 384 bit key size. And, as you can see above, 192-bit mode wifi uses secp384r1, a 384-bit prime field Weierstrass elliptic curve.
How did this project go? Did you deploy EAP-TLS on your home network? Tell Us! We’d love to hear from you. And if you run into issues with this setup, feel free to jump in to our Discord community.
Carl Tashian (Website, LinkedIn) is an engineer, writer, exec coach, and startup all-rounder. He's currently an Offroad Engineer at Smallstep. He co-founded and built the engineering team at Trove, and he wrote the code that opens your Zipcar. He lives in San Francisco with his wife Siobhan and he loves to play the modular synthesizer 🎛️🎚️