Secure SSH Connection From Windows PC to Ubuntu on Azure With Short Lived Certificates

Ted Malone
This is the first article in a series of blog posts from me, a newbie to Smallstep. In this series, I will explore the benefits of the Smallstep platform and discuss various ways to use it for establishing better secure connections, whether through SSH or mTLS, between devices, workloads, and people within your organization's infrastructure. As Smallstep has recently been accepted into the Microsoft for Startups program, I will primarily focus on using Azure as the cloud platform of choice for this series.
Securing SSH connections can be challenging, particularly when connecting to cloud servers. We’ve published articles that discuss the usability, operability, and security loopholes created by both password and public key-based SSH authentication, while highlighting how and why SSH certificate authentication is the most secure way to SSH.
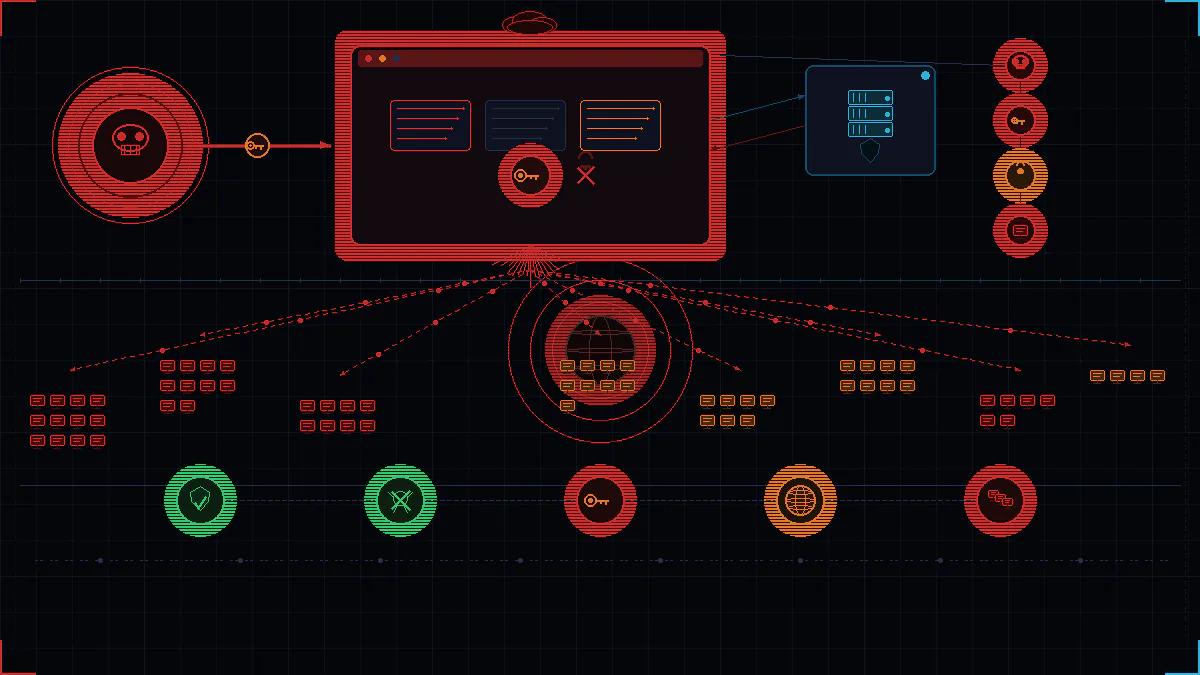
Smallstep's usage of short-lived certificates makes it an ideal solution for securing any and every connection. Short-lived certificates have a limited lifespan, usually just a few hours, and are are renewed on-demand. This approach significantly reduces the risk of security breaches due to stolen credentials. Even if a certificate is compromised, the window of opportunity for an attacker to exploit it is very small.
In this blog post, I will outline how to setup a passwordless SSH connection between a Windows 11 PC and an Ubuntu VM on Azure, using Smallstep short-lived certificates.
Using Smallstep to manage short-lived certificates for secure SSH Connection from a Windows PC to an Ubuntu Azure VM
For this tutorial, here is a summary of all the steps you need to perform:
- Sign up for a free trial of Smallstep. Initially, we will keep things simple and use Smallstep as the certificate authority (CA) and for Single Sign On (SSO) identity management.
- Install the Smallstep client software on your Windows device and configure the built-in SSH client to integrate with Smallstep. Note, for this tutorial, I used a Windows 11 PC.
- Generate a public/private keypair for Azure.
- Create and login to a new Ubuntu VM.
- Connect the VM to Smallstep as a managed host.
- Test your Smallstep SSH connection
These steps may seem daunting, but with Smallstep's user-friendly platform, the process is straightforward and can be completed even by those who are not security experts (like me).
Once you have completed these steps, you will be able to establish a secure SSH certificate authenticated connection between your Window device and the Ubuntu VM. Your SSH connection will be encrypted and authenticated on a daily basis, making it much more secure than typical SSH credentials which are stored on disk and rarely changed.
Step 1 - Sign up for a free trial of Smallstep → HERE
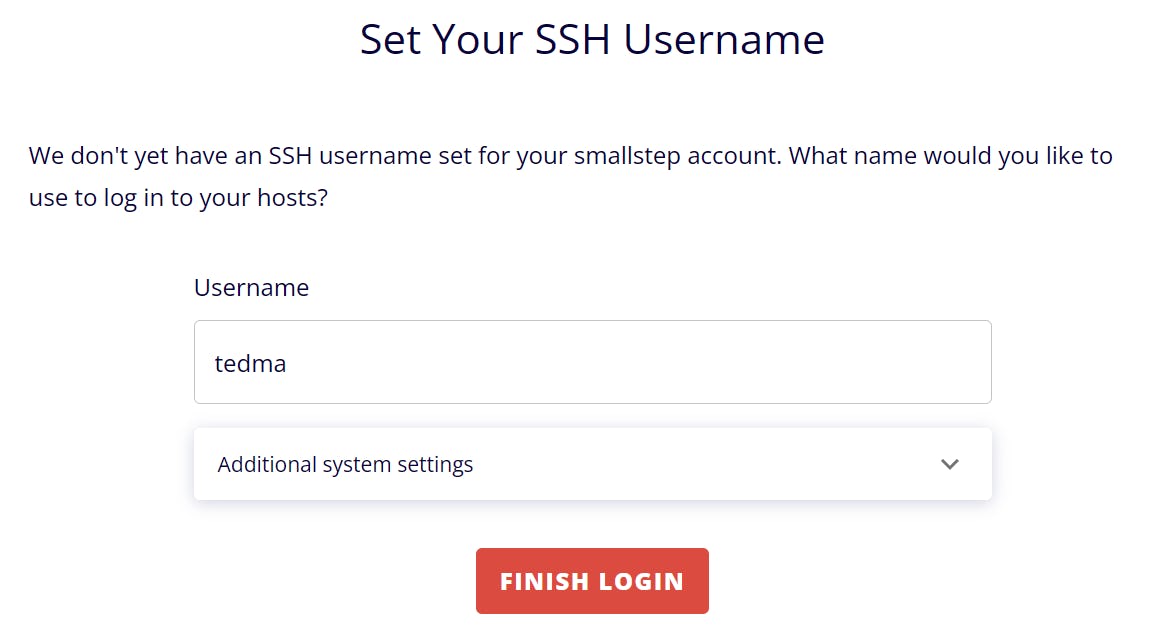
First, create a team name, and then finish signing up. I chose “tedma” as my team name, and on the screen after this one I entered my name and email as the admin for this team.
Step 2 - Install and configure the Windows 11 Smallstep client
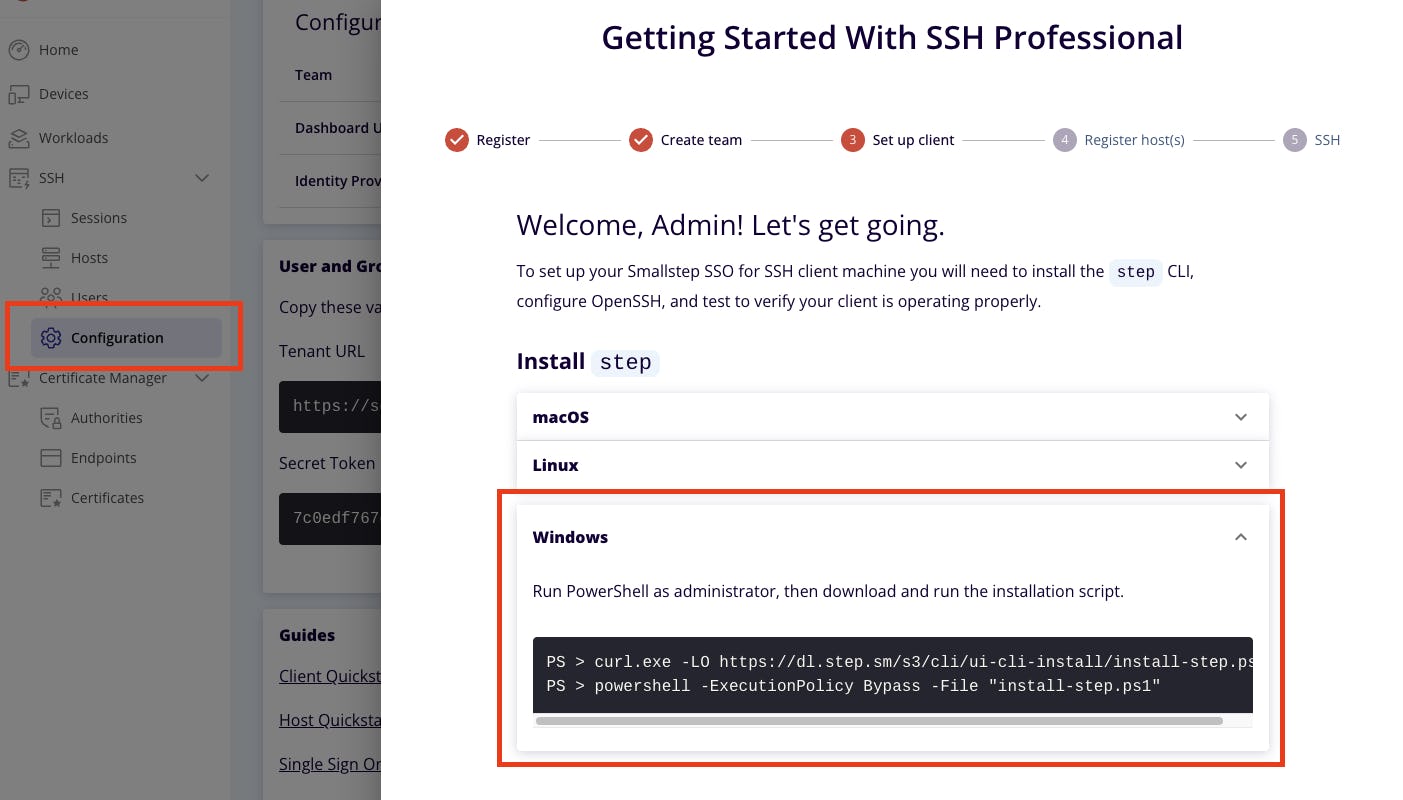
After you’ve successfully signed up for a free trial account, from the dashboard menu, click on SSH→Configuration. This launches a wizard where you’ll find installation instructions for Windows devices:
 Here’s my output from running the commands:
PS C:\users\tedma> curl.exe -LO https://dl.step.sm/s3/cli/ui-cli-install/install-step.ps1 % Total % Received % Xferd Average Speed Time Time Time Current Dload Upload Total Spent Left Speed 0 0 0 0 0 0 0 0 --:--:-- --:--:-- --:--:-- 0 100 1225 100 1225 0 0 3229 0 --:--:-- --:--:-- --:--:-- 15705 PS C:\users\tedma> powershell -ExecutionPolicy Bypass -File "install-step.ps1" *Installing step: 'C:\Program Files\Smallstep Labs' % Total % Received % Xferd Average Speed Time Time Time Current Dload Upload Total Spent Left Speed 0 0 0 0 0 0 0 0 --:--:-- --:--:-- --:--:-- 0 100 33.7M 100 33.7M 0 0 1293k 0 0:00:26 0:00:26 --:--:-- 1262k % Total % Received % Xferd Average Speed Time Time Time Current Dload Upload Total Spent Left Speed 0 0 0 0 0 0 0 0 --:--:-- --:--:-- --:--:-- 0 0 0 0 0 0 0 0 0 --:--:-- --:--:-- --:--:-- 0 100 875 100 875 0 0 870 0 0:00:01 0:00:01 --:--:-- 870 Adding step.exe to the Machine $Path Enabling ssh-agent...
Since the installer adds the location for the Smallstep binary to your path, you now need to close and restart PowerShell and continue to choose “Run as Administrator.”
Next, run the command below to configure your Smallstep SSH client using the newly installed step-cli. Replace "tedma" with the team-name you signed up with in step 1.
This should launch your web browser and initiate an SSO in order to authenticate your client against the Smallstep backend, so you can login to hosts registered to your Smallstep account.
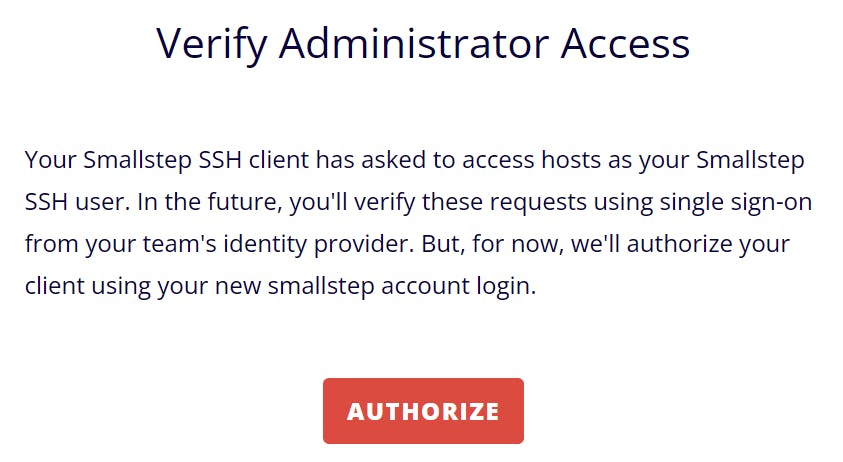
Once you have completed the login steps in your browser, you can return to PowerShell. Your Windows 11 SSH client should now be configured. To test the configuration, run the command below:
PS C:\users\tedma> ssh ssh-test.app.smallstep.com 🎺 pah-pa-rah! You have successfully connected to the smallstep test server 🎺 We have authenticated you as: fingerprint SHA256:2C5EGjuvfocMO6pClDv3NxAiSWO6nqcV4/ObKaSYkP8 username 'tedma' uid:gid 128000:128000 team 'tedma' Your next step is to register a host. This will allow you to test ssh access in your own environment. Connection to ssh-test.app.smallstep.com closed.
Step 3 - Generate a public/private keypair for Azure.
Azure requires an SSH key for authentication when setting up a VM. To generate the key pair, use the step crypto keypair command provided below. Please note that, since this key pair will only be used for initial authentication to the VM (the authentication method will be replaced with Smallstep short-lived SSH certificates), I chose not to encrypt my private key with a password.
PS C:\users\tedma\.ssh> cd ~\.ssh PS C:\users\tedma\.ssh> step crypto keypair tedma.pub tedma.key --kty RSA --size 2048 --insecure --no-password** Your public key has been saved in tedma.pub. Your private key has been saved in tedma.key.* PS C:\users\tedma\.ssh> step crypto key inspect tedma.pub** RSA Public-Key: (2048 bit) Modulus: d6:1c:2a:77:78:43:0b:bf:ab:a8:5e:45:67:de:75:cb: 97:8c:42:e3:25:a8:97:9f:43:8c:b2:e3:d9:54:74:f4: ... 23:01:43:82:b8:c3:7a:6d:02:46:54:2b:27:42:c0:c1: 77:0a:b7:b7:b0:b7:31:3a:00:27:35:67:51:9c:90:53 Exponent: 65537 (0x10001)
We have successfully generated a private/public key, but there's a problem: the exponent of 65537 indicates that the public key generated by step is in the OpenSSH format. However, Azure currently requires bring-your-own public keys to be in RSA format and in the SSH-2 format (RFC 4716). Therefore, we need to use ssh-keygen to convert the same public key to the SSH-2 format.
Now we have the SSH-2 version of our key that is expected by Azure! Let’s go spin up a new VM.
Step 4 - Setup an Ubuntu VM on Azure
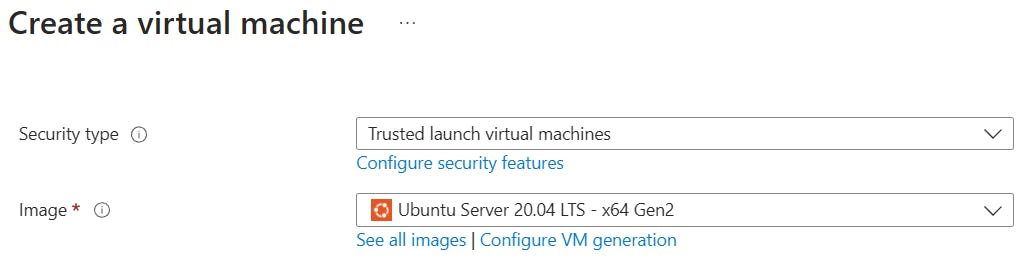
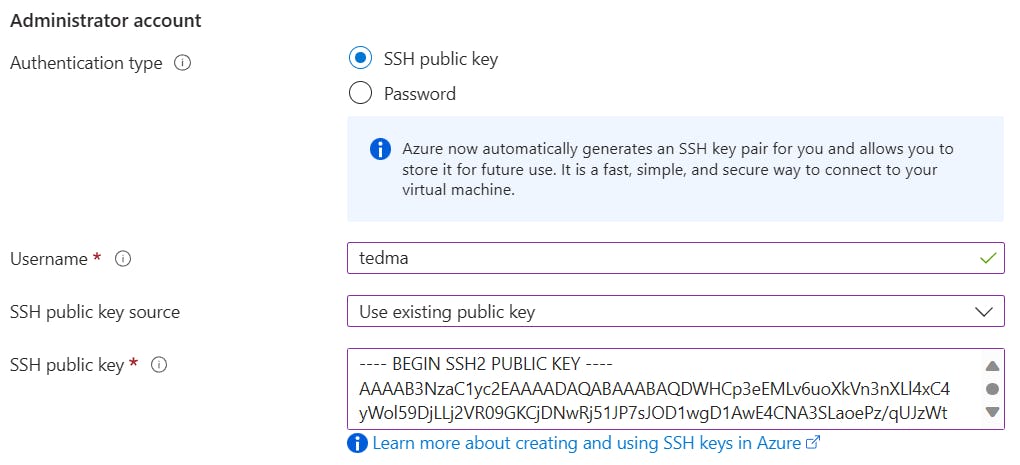
💡 The first time I copied and pasted the key into the SSH public key field, Azure didn't accept it. I tried again, and it worked on the second attempt. It's strange, but this Azure field appears to be quite sensitive, so if you encounter the same issue, don't worry.
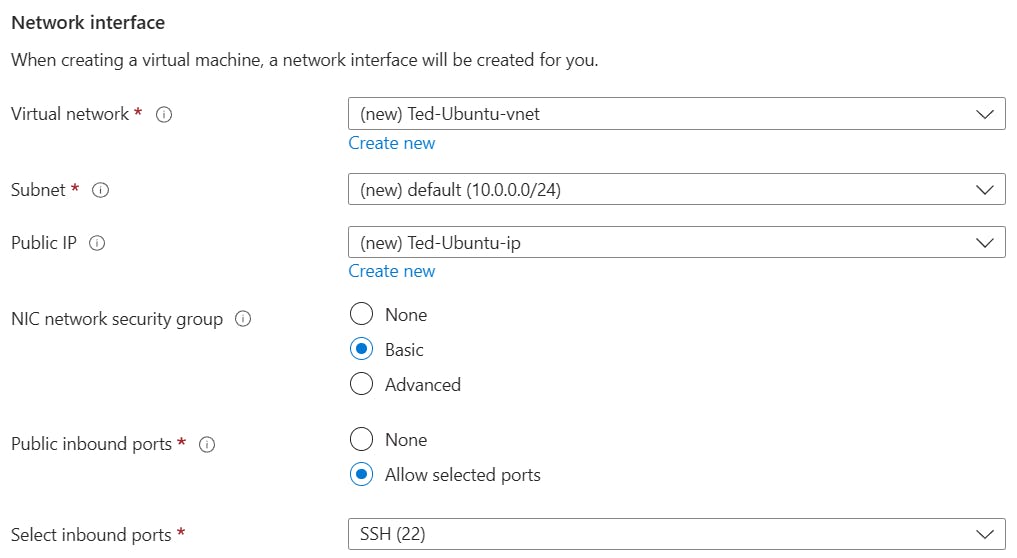
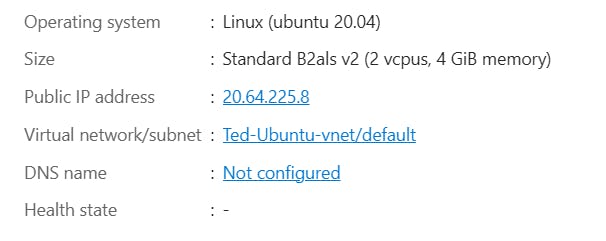
I’m leaving the SSH port open and enabling a public IP to make it easy to directly test our setup. I left most options as their defaults, and clicked CREATE to create my VM. Once it was created, I went to my VM to determine its public IP.
Step 5 - Configure Ubuntu VM to use Smallstep certificates for authentication.
First, SSH into the Ubuntu VM to confirm that everything is set up correctly. Since I did not use the system default name for my private key file, I will need to manually specify it with my SSH login command:
Next, go back to the Smallstep dashboard and navigate to SSH > Hosts, to register the Ubuntu VM as a managed host. Click on GENERATE TOKEN and download the resulting token. Save the token somewhere safe, such as a password manager. You will need it whenever you want to register a host with Smallstep.
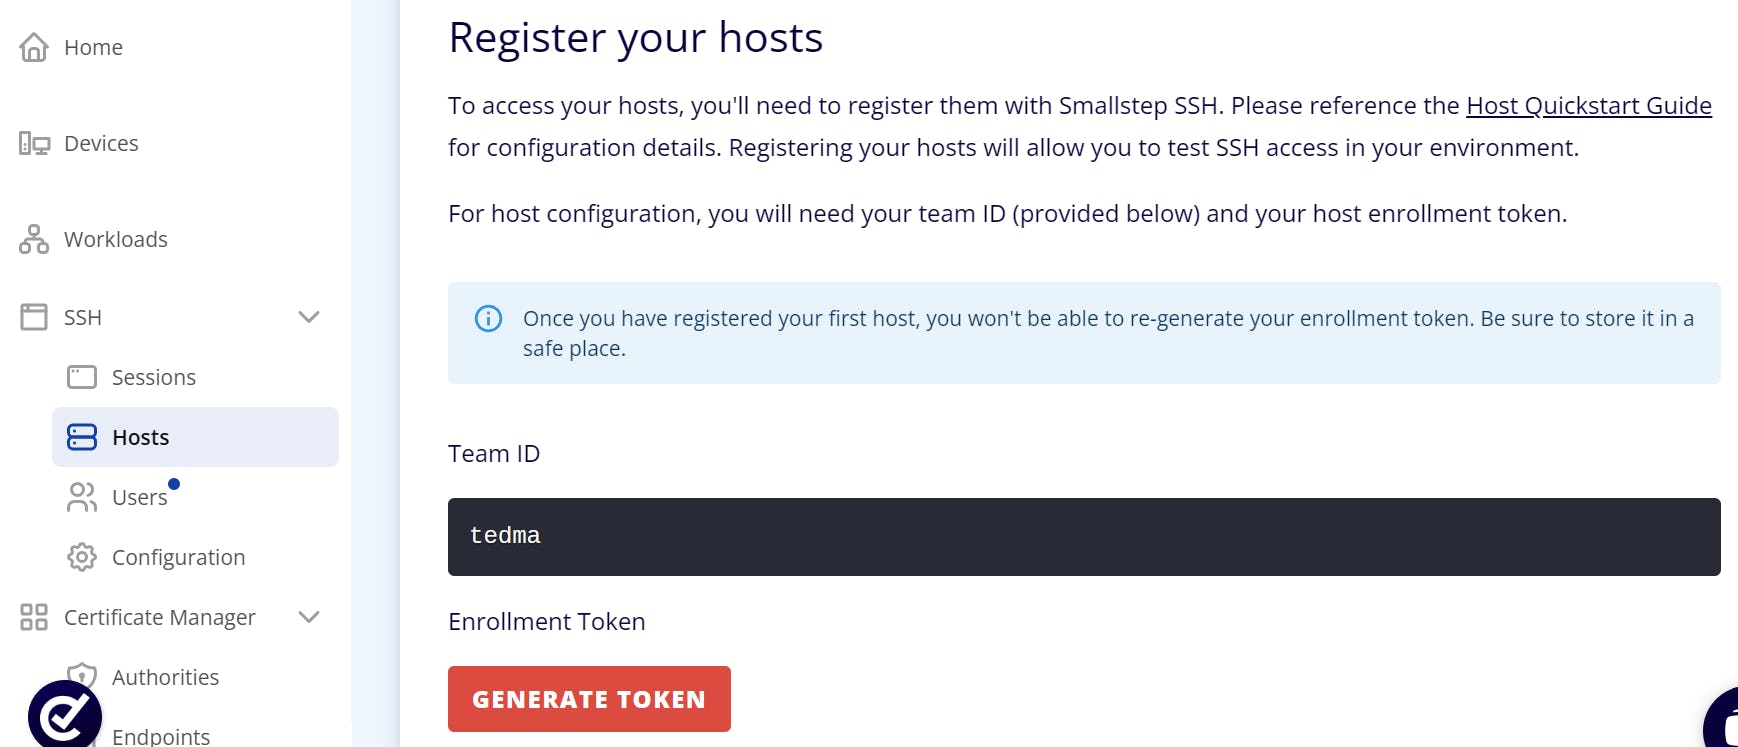
Click on GENERATE TOKEN and download the resulting token. Save the token somewhere safe, such as a password manager. You will need it whenever you want to register a host with Smallstep.
Next, go back to the Ubuntu VM and install Smallstep SSH on it. Run the following command asroot:
When you run the specified commands, you’ll be prompted for your team ID, enrollment token, hostname, and a list of space-separated host tags. You can read about using Smallstep Host Tags to manage access control to resources in multi user environments. In my case, I’m just going to specify a single host tag, “noob”. I will also specify the public IP address of my Ubuntu VM as my Hostname.
tedma@Ted-Ubuntu:~$ sudo bash root@Ted-Ubuntu:/home/tedma# curl -LO https://files.smallstep.com/ssh-host.sh root@Ted-Ubuntu:/home/tedma# chmod +x ./ssh-host.sh root@Ted-Ubuntu:/home/tedma# ./ssh-host.sh A team is required! Team: tedma A SSH enrollment token is required! Enrollment token (hidden):* <-Enter your registration token here. *One or more tags are required! Example: foo=bar bax=fax mop.top=cat-bat Tag(s): role=noob *Required variables: Team: tedma Token: eyJhbGciOi...snip...MFmvh4ohEA Hostname: 20.64.225.8 Tag(s): role=noob Optional variables: Downloading and installing step CLI and step-ssh utilities... (Reading database ... 58891 files and directories currently installed.) Preparing to unpack .../step-ssh_latest_amd64.deb ... Unpacking step-ssh (0.22.1-1) over (0.22.1-1) ... Setting up step-ssh (0.22.1-1) ... Configuring step-ssh... The root certificate has been saved in /root/.step/certs/root_ca.crt. The authority configuration has been saved in /root/.step/config/defaults.json. Generate SSH host certificate... ✔ CA: https://ssh.tedma.ca.smallstep.com ✔ Certificate: /etc/ssh/ssh_host_ecdsa_key-cert.pub Configure SSHD to use certificate authentication... ✔ /etc/ssh/sshd_config ✔ /etc/ssh/ca.pub Activating step-ssh in PAM and NSS... Activating Smallstep Step SSH. Created symlink /etc/systemd/system/multi-user.target.wants/step-ssh-renew.timer → /etc/systemd/system/step-ssh-renew.timer. Created symlink /etc/systemd/system/multi-user.target.wants/step-ssh-metadata.service → /etc/systemd/system/step-ssh-metadata.service. Restarting optional services. Restarting SSHD Registering host... Host Ted-Ubuntu has been registered. Removing temporary download directory /tmp/tmp.GW9kuvsH8x!* root@Ted-Ubuntu:/home/tedma#
If all goes well, you can go back to your Smallstep dashboard and see your newly registered host.
Next, to fully lock down our host, we will turn off logins using our initial public/private keypair and only use Smallstep certificates with daily authorization.
The series of commands above checks the current "AuthorizedKeysFile" configuration (which specifies the the files where the SSH service looks for authorized public keys during user authentication). Next, the value of "AuthorizedKeysFile" is modified and set to "none". Finally, the SSH service is restarted to apply the changes made to the configuration file. Afterwards, the ssh service will now only accept SSH connections to the Ubuntu VM with certificates, not keys anymore.
Step 6 -Test our secure SSH connection using Smallstep certificates
Let’s test it out. I will attempt of login with my initial private key and see if that works:
Now I will use Smallstep certificates to login without specifying a private key:
I am able to log in as usual without specifying a private key because Smallstep uses the certificate that was issued to my client when I successfully completed an SSO authentication while setting up the Smallstep client on my Windows device.
Now, on the Smallstep dashboard, you’ll see the secure connection under Sessions:

Step 7 - Next day login
The client certificates provisioned by Smallstep to your device are short-lived and valid only for 16 hours.
Each day, the first time youssh into your Smallstep-managed host, a single sign-on flow will be triggered in your web browser. Upon successful completion, you’ll be able to SSH as normal.
Conclusion
Smallstep provides an easy-to-use platform for securing SSH connections between Windows and Linux VMs on Azure. By using short-lived certificates, Smallstep helps to reduce the risk of security breaches and provides a more secure environment for remote access. The use of short-lived certificates means that even if a certificate is compromised, the window of opportunity for an attacker to exploit the certificate is very small. This makes Smallstep an excellent solution for securing SSH connections, especially for those who are not security experts. By following the steps outlined in this blog post, you can set up Smallstep to securely connect to Azure virtual machines using SSH certificates today!
Ted Malone is a seasoned Technology Executive with over 20 years of success in guiding high-growth organizations. From leadership roles at industry giants like Amazon, TiVo, Ericsson, and Microsoft to his current position at Smallstep, Ted consistently demonstrates prowess in strategic business development, product management, and corporate partnerships. At Smallstep, he delves into DevSecOps, product strategy, and general management.