Protect Wireless Networks with 802.1X EAP-TLS
This guide shows how to protect a wireless network with Smallstep, using 802.1X EAP-TLS (certificate-based) Wi-Fi authentication.
For EAP-TLS Wi-Fi deployments in security-sensitive environments, you’ll generally need four things:
- A Certificate Authority
- A RADIUS server
- A properly configured Access Point (AP)
- A process for distributing trusted CA certificates, client certificates, and network profiles to your devices
Smallstep provides the Certificate Authority and the RADIUS server, and it can configure your clients directly (via the Smallstep Agent) or alongside your MDM.
Here’s a simplified diagram of a laptop getting a client certificate and joining an 802.1X EAP-TLS authenticated network. With EAP-TLS, the RADIUS server must complete a mutual TLS handshake with the device before giving the thumbs up to the access point:
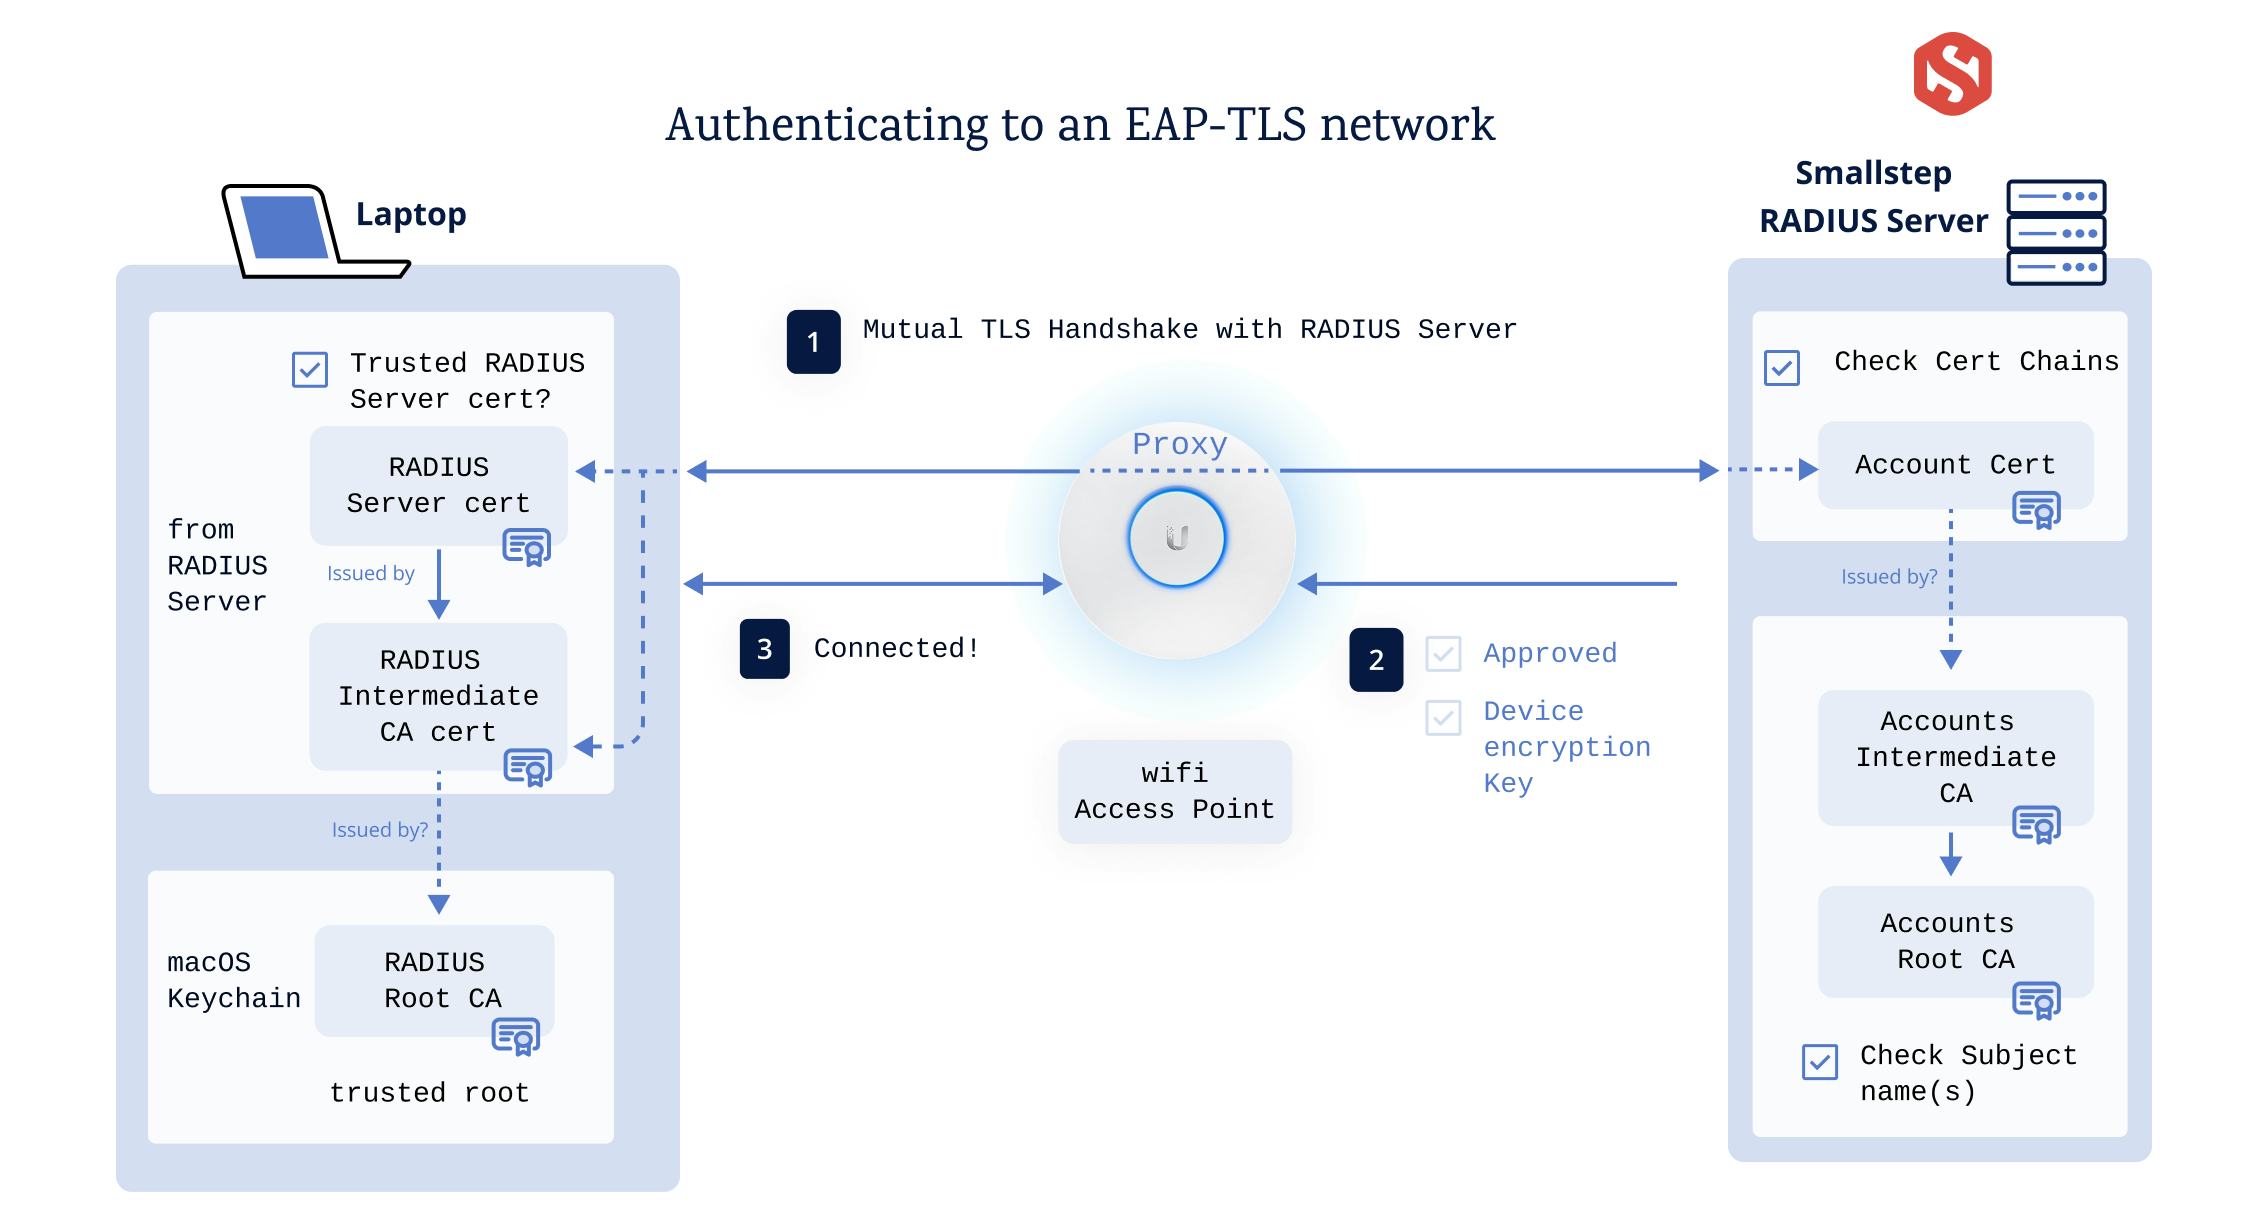
Ensure test WLANs are used for initial integration testing. Do not complete these steps on a production WLAN until after testing has been validated.
On this page, you'll find:
- How it fits together
- Step 1: Configure credential issuance
- Step 2: Configure the enforcement point
- Step 3: Configure clients
- Verify and troubleshoot
- Reference sections:
How it fits together
Three Smallstep resources work together to protect a wireless network, and you can create all of them with the Smallstep API:
- A credential describes the client certificate and private key issued to each device: which authority signs it, what goes in the subject, how the key is protected, and which devices receive it.
- A managed RADIUS server is the enforcement point. Your access points delegate authentication to it, and it verifies each client certificate presented during the EAP-TLS handshake.
- A Wi-Fi resource describes the network itself: the SSID, the RADIUS server CA that clients should trust, and the credentials clients authenticate with.
There are two ways to configure clients, and you can mix them across your fleet:
- Agent-managed: The Smallstep Agent enrolls the device, requests a hardware-bound certificate, and configures the Wi-Fi network profile on the device.
- MDM-managed: Your MDM deploys a network profile, and the client certificate is issued via SCEP or ACME Device Attestation. This path works without installing the agent.
Everything in this guide can also be configured in the Smallstep dashboard under the Protect tab, or with the Smallstep Terraform provider. This guide uses the API.
Step 1: Configure credential issuance
In this step, you'll create a credential: the configuration Smallstep uses to issue a Wi-Fi client certificate to each of your devices.
If all of your clients will be MDM-managed (using SCEP or ACME Device Attestation to get certificates), please skip to Step 2. A credential resource is only needed for macOS, Windows, or Linux clients managed by the Smallstep agent. ChromeOS clients should skip this step, too.
You will need an API token. See Smallstep API for details.
Store your API token in a headers file for curl:
set +o history
echo "Authorization: Bearer [your API token]" > api_headers
set -o history
Certificates are issued by one of your team's X.509 authorities. In the Smallstep dashboard, go to Certificate Manager → Authorities and open the authority that should issue your Wi-Fi client certificates.
Save two values from the Authority Settings panel:
- The Authority ID, which you'll use as the
authorityIDwhen creating the credential. - The Root Certificate, which you'll register with your RADIUS server in Step 2
so it can verify client certificates issued by this authority.
Download it and save it as
client_ca.crt.
Create the credential
Create the credential with the Create Credential endpoint:
curl -sH @api_headers --request POST \
--url https://gateway.smallstep.com/api/credentials \
--header 'Accept: application/json' \
--header 'Content-Type: application/json' \
--header 'x-smallstep-api-version: 2025-01-01' \
--data @- <<'EOF' | jq
{
"slug": "wifi",
"certificate": {
"type": "X509",
"authorityID": "[your authority ID]",
"duration": "24h0m0s",
"fields": {
"commonName": {
"deviceMetadata": "smallstep:identity",
"static": "Corporate Wi-Fi"
},
"sans": {
"deviceMetadata": ["smallstep:identity", "Device.Serial"]
},
"extendedKeyUsage": ["clientAuth"]
}
},
"key": {
"type": "ECDSA_P256",
"protection": "HARDWARE_ATTESTED"
},
"managementMode": "agent",
"policy": {
"assurance": ["high"],
"operatingSystem": ["macOS", "Windows", "Linux"]
}
}
EOF
Here's what the fields mean:
certificate.fieldspopulates the certificate subject. Each field takes astaticvalue, one or moredeviceMetadatakeys, or both (the static value is used as a fallback when the metadata key is not present on a device). In addition to any custom metadata keys you've set on devices, reserved keys includesmallstep:identity(the email address of the user assigned to the device),Device.Serial,Device.Hostname,Device.PermanentIdentifier, andDevice.DisplayName.key.protectioncontrols private key storage.HARDWARE_ATTESTEDgenerates the key in the device's secure hardware (TPM or Secure Enclave) and requires remote attestation. UseHARDWARE_WITH_FALLBACKto prefer hardware protection but allow software keys where hardware isn't available.policyselects the devices that receive this credential. An empty policy provisions the credential for every device. You can match onassurance(normal,high),ownership(company,user),operatingSystem, discoverysource, and devicetags.managementMode: "agent"tells the Smallstep Agent to manage the certificate lifecycle: enrollment, renewal, and key management are automatic.
Save the id returned in the response; you'll reference it when you create the Wi-Fi resource in Step 3.
If you have existing automation built on the /accounts or /endpoint-configurations endpoints,
migrate it to /credentials and /protect/*.
The older endpoints are deprecated in the 2025-01-01 API version and will be removed in a future version.
Step 2: Configure the enforcement point
The enforcement point for a wireless network is a RADIUS server. Your access point delegates authentication to RADIUS, and the RADIUS server verifies the client certificate presented during the EAP-TLS handshake.
Option 1: Smallstep Managed RADIUS
Smallstep operates a multi-tenant RADIUS service, so you don't have to run your own. The service authenticates clients with EAP-TLS only: it validates the full certificate chain against your client CA and checks revocation on every authentication. Password-based methods (EAP-TTLS, PEAP-MSCHAPv2), MAC Authentication Bypass, RADIUS accounting, and Change of Authorization are not supported—certificate-only, by design.
Create a managed RADIUS server with the Create Managed RADIUS endpoint. You provide:
nasIPs: the public (WAN) IP addresses your access points or wireless controllers will send RADIUS traffic from. This is how the service attributes incoming requests to your team, so each IP must be unique across Smallstep customers.clientCA: the CA bundle the RADIUS server will trust to verify clients—the authority root you saved in Step 1.
jq -n --rawfile ca client_ca.crt \
'{name: "Corporate RADIUS", nasIPs: ["203.0.113.10"], clientCA: $ca}' \
| curl -sH @api_headers --request POST \
--url https://gateway.smallstep.com/api/managed-radius \
--header 'Accept: application/json' \
--header 'Content-Type: application/json' \
--header 'x-smallstep-api-version: 2025-01-01' \
--data @- | jq
The response contains the server coordinates you'll enter into your access point:
serverIPandserverPort: where your access point sends RADIUS trafficserverHostname: the DNS name on the RADIUS server's TLS certificate (for example,radius.smallstep.com)serverCA: the CA your clients should use to verify the RADIUS server. Save it—you'll need it in Step 3:
curl -sH @api_headers --request GET \
--url "https://gateway.smallstep.com/api/managed-radius/[your RADIUS server ID]" \
--header 'Accept: application/json' \
--header 'x-smallstep-api-version: 2025-01-01' | jq -r '.serverCA' > radius_ca.crt
The RADIUS shared secret is not included in responses by default.
Retrieve it by passing the secret query parameter to
Get Managed RADIUS:
curl -sH @api_headers --request GET \
--url "https://gateway.smallstep.com/api/managed-radius/[your RADIUS server ID]?secret=true" \
--header 'Accept: application/json' \
--header 'x-smallstep-api-version: 2025-01-01' | jq -r '.secret'
Treat the shared secret like a password. Anyone who can send traffic from your registered NAS IPs and knows the secret can relay authentication requests to your RADIUS server.
If your network equipment's public IP addresses change (a new office, a new ISP),
update the nasIPs on your managed RADIUS server to match.
Configure your access point
Configure your wireless network to use WPA2 Enterprise or WPA3 Enterprise security,
and point it at your RADIUS server using the serverIP, serverPort, and shared secret from above.
See the access point configuration reference below for step-by-step instructions covering Ubiquiti UniFi, Aruba, Cisco WLC, Meraki, Juniper Mist, MikroTik, and other popular access points.
Option 2: Smallstep Enterprise RADIUS
Enterprise RADIUS is Smallstep's premium tier for larger deployments. In addition to everything in Managed RADIUS, it provides:
-
Dedicated infrastructure with stable static IPs, deployed in the cloud regions you choose. Your NAS source IPs no longer need to be registered or kept in sync.
-
RadSec (RADIUS over TLS) transport with a dedicated hostname, alongside standard RADIUS over UDP.
-
Reply attributes, including dynamic VLAN assignment. Attribute values can be static, extracted from a field of the client certificate by OID, or sourced from your Smallstep device inventory. For example, to assign a VLAN based on a custom certificate extension:
"replyAttributes": [ { "name": "Tunnel-Type", "value": "VLAN" }, { "name": "Tunnel-Medium-Type", "value": "IEEE-802" }, { "name": "Tunnel-Private-Group-ID", "valueFromCertificate": "1.3.6.1.4.1.37476.9000.64.1" } ]
-
Authorization webhooks: your own HTTP endpoint is consulted on every authentication, so you can layer device posture or custom authorization checks on top of certificate verification.
Enterprise RADIUS is provisioned by Smallstep for your team. Contact us to get set up.
Option 3: Bring your own RADIUS server
You can also use Smallstep-issued client certificates with a RADIUS server you operate (FreeRADIUS, Cisco ISE, Aruba ClearPass, NPS, and others).
Configure your RADIUS server for EAP-TLS,
and add the authority root certificate from Step 1 (client_ca.crt) to its trusted client CA bundle.
Then, in Step 3, use your RADIUS server's CA certificate as the radiusServerCA on the Wi-Fi resource
so that clients trust your server during the EAP-TLS handshake.
Step 3: Configure clients
Now that certificates are being issued and the RADIUS server is running, create the Wi-Fi resource that describes the network to your clients.
Deploying to ChromeOS?
Wi-Fi settings for ChromeOS clients are managed inside Google Workspace.
Skip this section and continue at ChromeOS with Google Workspace (ACME Device Attestation).
Use the Create Wi-Fi endpoint:
jq -n --rawfile ca radius_ca.crt \
'{
ssid: "[your SSID]",
hidden: false,
autojoin: true,
radiusServerCA: $ca,
radiusServerDomain: "radius.smallstep.com",
credentials: ["[your credential ID]"]
}' \
| curl -sH @api_headers --request POST \
--url https://gateway.smallstep.com/api/protect/wifi \
--header 'Accept: application/json' \
--header 'Content-Type: application/json' \
--header 'x-smallstep-api-version: 2025-01-01' \
--data @- | jq
radiusServerCAis the CA bundle clients use to verify the RADIUS server: theserverCAyou saved in Step 2 (or your own server's CA, if you brought your own RADIUS).radiusServerDomainrequires the RADIUS server certificate to match this DNS name (honored on Windows). For Managed RADIUS, use theserverHostnamevalue from Step 2.credentialsreferences the credentials from Step 1 that clients authenticate with.
The new Wi-Fi resource appears in the dashboard under Protect → Wi-Fi.
Agent-managed clients
If your devices run the Smallstep Agent, you're done.
On its next sync, the agent on every device matching the credential's policy will:
- Request a client certificate, generating the private key in the device's secure hardware.
- Install the RADIUS server CA as trusted for this network.
- Create the Wi-Fi network profile (SSID, WPA-Enterprise, EAP-TLS) on the device.
- Renew the certificate automatically before it expires.
MDM-managed clients
Your MDM can deploy the Wi-Fi profile and, if you like, manage certificate issuance too. The subsections below cover the common combinations:
- macOS and iOS with Jamf Pro (SCEP)
- macOS with Jamf Pro (ACME Device Attestation)
- macOS with Workspace ONE UEM
- iOS and Android with Workspace ONE UEM (SCEP)
- Windows with Intune (SCEP)
- Windows with Intune (agent credential + OMA-URI profile)
- Windows with Workspace ONE UEM
- ChromeOS with Google Workspace (ACME Device Attestation)
macOS and iOS with Jamf Pro (SCEP)
In this workflow, Jamf deploys a configuration profile that establishes CA trust, gets a client certificate via Smallstep's SCEP server (using dynamic, single-use challenges), and configures the Wi-Fi network. The Smallstep Agent is not required on the device.
First, connect Jamf Pro to Smallstep if you haven't already.
Will I need a Jamf SCEP Proxy?
Because your Smallstep hosted CA is reachable from the public internet, you do not need a Jamf SCEP proxy.
For a video walkthrough of this section:
Download the configuration profile template
Open your Wi-Fi resource in the dashboard, under Protect → Wi-Fi.
Choose the Configuration Profile link to download a .mobileconfig template that you'll import into Jamf.
You'll also find the Jamf Settings for this resource:
a webhook URL, username, and password to be used when configuring a Jamf SCEP Challenge webhook, below.
Resist the temptation to manually install the .mobileconfig file for testing; it won’t work.
Configure a SCEP challenge webhook
Add a SCEP Challenge webhook to your Jamf tenant configuration. You'll only need to do this once.
-
In the Jamf console, go to
Settingsand search forWebhooks -
Click + New
-
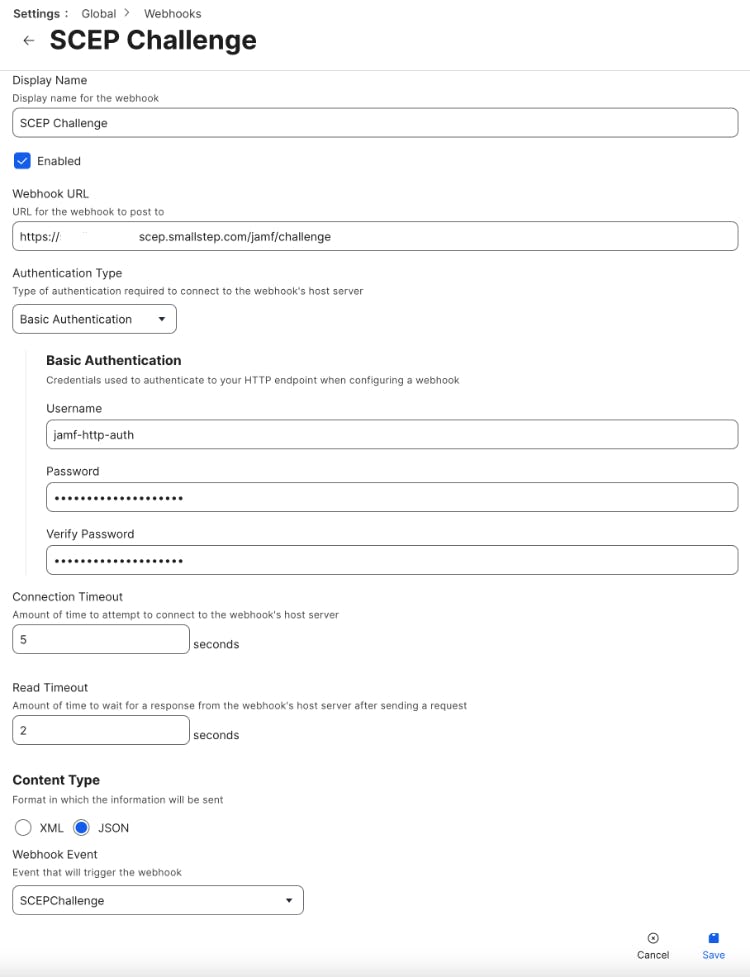
Fill out the form as follows:
-
Set a descriptive name, e.g.
SCEP Challenge -
Select ✅ Enabled
-
Use
Basic Authentication -
Populate the webhook URL, username, and password with what you were given by Smallstep
-
Select JSON as the Content Type
-
Select
SCEPChallengeas the webhook event -
Here's an example of the completed form:
-
-
Choose Save in the bottom right
Upload and test the configuration profile
Next, upload the Configuration Profile you downloaded from Smallstep, and map it to a test device.
- In the Jamf console, go to Configuration Profiles (for Computers or Devices)
- Choose Upload.
- Choose File and select the
.mobileconfigtemplate you downloaded from Smallstep - Choose the Scope tab, and select a device or user for testing. For the device to appear, the device should already be enrolled with a basic Jamf MDM profile.
Enrolled devices will immediately receive the configuration profile updates from Jamf and will be ready to join the network. If you need to make changes, you can change the settings in Smallstep and download a new Configuration Profile template.
Deploying production profiles
As you plan to deploy your configuration profile, it is recommended to stage your changes. Here's one approach:
- Clone your production profile in Jamf
- Exclude your test computer or device from your production profile
- Add your test computer or device to the cloned profile
- Make and test changes to the cloned profile
- Apply your changes back to the production profile
- Re-add your test device to the production profile scope
- Finally, remove the cloned profile
Running your own RADIUS server?
If you run your own RADIUS server, you'll need to modify your Configuration Profile to match your setup.
Link the Certificate Trust settings for your Wi-Fi Payload to your RADIUS server's Root CA certificate instead of Smallstep's. You may need to add an additional Certificate payload for your RADIUS server's Root CA.
If you’re planning to deploy Wi-Fi and EAP-TLS using a JumpCloud RADIUS server, you will need to use an RSA CA.
This requires creating an Advanced Authority.
When creating the Authority, use key type RSA_SIGN_PKCS1_2048_SHA256 for both root & intermediate CAs.
macOS with Jamf Pro (ACME Device Attestation)
On macOS, you can replace SCEP with ACME Device Attestation (ACME-DA) for a higher-assurance workflow: the private key is hardware-bound, and Apple's attestation authority cryptographically proves the certificate request came from a specific, genuine Apple device. Jamf manages all settings; the Smallstep Agent is not involved.
Before a device can obtain a certificate through ACME-DA:
- The device must already be synced from Jamf into your Smallstep inventory, because ACME-DA requests are checked against known device identifiers (the serial number, on macOS).
- The device must have a user assigned, and it must be approved.
In Jamf, create a new Computer Configuration Profile:
- Navigate to the Computer Configuration Profiles page and click New.
- In the general settings, make it a “Computer Level” profile, and ensure “Install automatically” is chosen as the “Distribution Method”.
Add an ACME Certificate payload:
- Put the full URL of your device authority's ACME-DA provisioner in the “ACME directory URL” field.
It will look like
https://devices.[your team].ca.smallstep.com/acme/acme-da/directory. - Set
$SERIALNUMBERas the “Client identifier” - Set 384 as the “Key Size”
- Select “ECSECPrimeRandom” as the “Key Type”
- Set “Hardware Bound” to “True”
- Set “Subject” to
CN=$SERIALNUMBER - Set “Extended Key Usage” to
1.3.6.1.5.5.7.3.2 - Set “Attest” to “True”
- Set “Allow all apps access” to “True”
- Set “Key is extractable” to “False”
Add Certificate payloads for the CAs the device must trust:
- Your device authority's root certificate (name it “Smallstep Devices Root”)
- Your device authority's intermediate certificate (name it “Smallstep Devices Intermediate”)
- The RADIUS server CA from Step 2 (name it “Smallstep RADIUS Root”)
For each, select “Upload”, upload the certificate, and check “Allow all apps access”.
Add a Network payload for the Wi-Fi configuration:
- Select “Wi-Fi” as the “Network Interface”
- Set the “Service Set Identifier (SSID)” to the name of your Wi-Fi network
- Check “Hidden Network”, “Auto-Join”, and “Disable MAC Address Randomization” as required
- Select “WPA3 Enterprise” (or “WPA2 Enterprise”, depending on network gear) as the “Security Type”
- Check “TLS” under “Accepted EAP Types”
- Pick the ACME Certificate you created earlier as the “Identity Certificate”
- Switch to the “Trust” tab, and select the “Smallstep RADIUS Root” certificate as trusted
- Set the RADIUS server hostname from Step 2 (for example,
radius.smallstep.com) as the “Certificate Common Name”
Finally, assign the Configuration Profile to a test user or device in the “Scope” tab.
After the profile is installed, an ACME Certificate signed by your device authority appears in the Profiles section of the Settings app.
The Subject Common Name will contain the device serial number, and the Hardware Bound property should say Yes.
Due to how managed device attestation works on macOS,
the issued certificate won't appear in the Keychain application;
you can inspect it with sudo /usr/libexec/mdmclient QueryCertificates instead.
macOS with Workspace ONE UEM
Workspace ONE UEM can deploy the configuration profile Smallstep generates for your Wi-Fi resource, which configures CA trust, certificate enrollment, and the Wi-Fi network on the device.
First, connect Workspace ONE UEM to Smallstep if you haven't already.
Then open your Wi-Fi resource in the dashboard, under Protect → Wi-Fi, and download the configuration profile.
In Workspace ONE UEM:
- Navigate to Resources
- Select Profiles from the Profiles & Baselines section of the navigation
- Select Add, then Upload Profile
- Select macOS
- Select Device Profile
- Upload the configuration file you downloaded from the Smallstep Console, and click Save
- Assign the uploaded profile to the desired device groups, and click Publish
Enrolled devices in the assigned groups will receive the profile and be ready to join the network.
iOS and Android with Workspace ONE UEM (SCEP)
In this workflow, Workspace ONE UEM deploys a profile that gets a client certificate from Smallstep's SCEP server, trusts your RADIUS server's CA, and configures the Wi-Fi network. Workspace ONE fetches a single-use SCEP challenge from Smallstep for each device, so the profile doesn't contain a shared secret. You don't need the Smallstep Agent on the device.
Before you begin
You will need:
- Workspace ONE UEM connected to Smallstep (steps 1 and 2 of that guide). Keep the SCEP URL, SCEP Challenge URL, and challenge username and password from your Workspace ONE integration settings handy.
- For iOS and iPadOS: a valid Apple Push Notification service (APNs) certificate in Workspace ONE (Groups & Settings → All Settings → Devices & Users → Apple → APNs For MDM), and a test device enrolled in Workspace ONE.
- For Android: Workspace ONE registered as your Android Enterprise EMM (Groups & Settings → All Settings → Devices & Users → Android → Android EMM Registration), and a test device managed through Android Enterprise, either with a work profile or as a fully managed device. In the device's details in Workspace ONE, Android Management should read Work Profile or another Android Enterprise mode, not Android (Legacy). Android won't install the client certificate unless the device has a screen lock.
- Your RADIUS server's CA certificate, and the hostname on your RADIUS server's certificate (see Step 2).
Your Workspace ONE integration's issuing authority signs the certificates that Workspace ONE requests from Smallstep. It may differ from the authority behind a credential you created in Step 1, so make sure your RADIUS server trusts it.
Find your issuing authority in the Smallstep console:
- Go to Settings → Device Management, choose Manage on the Omnissa Workspace ONE integration, and open the Settings tab.
- Under Authority Certificates, choose Download Root to get your issuing authority's root certificate.
- Add that root to the CAs your RADIUS server trusts for client certificates.
Add a Workspace ONE CA resource
If you already added a Smallstep CA resource and request template while following Connect Workspace ONE UEM to Smallstep, you can reuse them and skip to creating the iOS profile or the Android profile.
For compatibility with Workspace ONE, Smallstep emulates a Microsoft NDES server, including its dynamic challenges.
- In Workspace ONE UEM, go to Resources → Certificates → Certificate Authorities and choose Add
- Fill out the form:
- Name: a descriptive name, for example
Smallstep - Authority Type:
Microsoft ADCS - Protocol:
SCEP - Version:
NDES 2008/2012 - SCEP URL: the SCEP URL from your Smallstep integration settings
- Challenge Type:
Dynamic - Challenge Username, Challenge Password, and Confirm Challenge Password: the challenge username and password from Smallstep
- SCEP Challenge URL: the SCEP Challenge URL from Smallstep
- Select Show Advanced Options, and set SCEP Challenge Length to
32 - Leave Enable Proxy disabled. Smallstep's SCEP server is reachable from the public internet.
- Name: a descriptive name, for example
- Choose Test Connection and wait for a success message
- Choose Save and Add Template
Add a certificate request template
- Fill out the Certificate Template form:
- Name: for example,
Smallstep Wi-Fi - Certificate Authority: the CA resource you just added
- Subject Name:
CN={DeviceUuid} - Private Key Length:
2048 - Private Key Type: select both Signing and Encryption
- SAN Type: choose Add, select URL, and enter
deviceid://{DeviceUuid} - Automatic Certificate Renewal: Enabled, with an Auto Renewal Period (days) of
5 - Publish Private Key: Disabled
- Name: for example,
- Choose Save
Keep the {DeviceUuid} subject and SAN as shown,
so Smallstep can associate each certificate with the Workspace ONE device that requested it.
Create the iOS profile
- In Workspace ONE UEM, go to Resources → Profiles & Baselines → Profiles, then choose Add → Add Profile
- Select Apple iOS, leave Management Type set to Imperative and Context set to Device, and choose Next
- Name the profile, for example EAP-TLS Wi-Fi with Smallstep
- Add a SCEP payload:
- Credential Source: Defined Certificate Authority
- Certificate Authority: the Smallstep CA resource
- Certificate Template: the Smallstep template
- Add a Credentials payload to trust your RADIUS server's CA:
- Credential Source: Upload
- Credential Name: for example,
RADIUS Server CA - Certificate: upload your RADIUS server's CA certificate with Choose File, then choose Attach Certificate
- Add a Wi-Fi payload:
- Service Set Identifier: your SSID
- Auto-Join: enabled
- Security Type: WPA2 Enterprise or WPA3 Enterprise, to match your network
- Protocols: select EAP-TLS
- Identity Certificate: SCEP
- Trusted Certificates: select Credentials (your RADIUS server's CA)
- Trusted Server Certificate Names: the hostname on your RADIUS server's certificate
- TLS Certificate Required: enabled
- Choose Next, select a Smart Group containing your test devices, and choose Save & Publish
Create the Android profile
- In Workspace ONE UEM, go to Resources → Profiles & Baselines → Profiles, then choose Add → Add Profile
- Select Android
- Name the profile, for example EAP-TLS Wi-Fi with Smallstep (Android)
- Add a Credentials payload for the client certificate (this becomes Credentials 1):
- Credential Source: Defined Certificate Authority
- Certificate Authority: the Smallstep CA resource
- Certificate Template: the Smallstep template
- In the same payload, choose + ADD to add Credentials 2, which trusts your RADIUS server's CA:
- Credential Source: Upload
- Certificate: upload your RADIUS server's CA certificate with Choose File, then choose Attach Certificate
- Add a Wi-Fi payload:
- Service Set Identifier: your SSID
- Security Type: WPA/WPA2 Enterprise
- SFA Type: TLS
- Identity:
{DeviceUuid} - Trusted Server Domain: the hostname on your RADIUS server's certificate
- Identity Certificate: Credentials 1
- Root Certificates: Credentials 2
- Choose Next, select a Smart Group containing your test devices, and choose Save & Publish
Set both Root Certificates and Trusted Server Domain, because current Android versions won't join an enterprise network unless they can validate the RADIUS server.
Verify
When a device receives the profile, Workspace ONE requests a single-use challenge from Smallstep. The device then enrolls for its certificate and joins the network without prompting the user.
- In the Smallstep dashboard, Audit shows an X.509 certificate issued event for each certificate.
- In Workspace ONE, open the device's details. The Profiles tab shows the install status. More → Troubleshooting → Event Log lists each step from Profiles Install Initialized to Profiles Install Processed, and on Android it also shows Certificate Issued for your Smallstep CA resource.
- On iOS, go to Settings → General → VPN & Device Management, open the Workspace ONE profile, and look for the SCEP certificate.
Troubleshoot
- If the profile stays pending, select it on the device's Profiles tab and choose Install to push it to the device.
- If the certificate is installed but the device can't join the network, check that your RADIUS server trusts your issuing authority's root (see Trust your issuing authority on your RADIUS server).
- An Android device that shows Hub Registered or Android Management: Android (Legacy) isn't managed through Android Enterprise and won't receive the profile. Check that Android EMM registration is complete, and that Groups & Settings → All Settings → Devices & Users → General → Enrollment → Management Mode doesn't enroll Android devices without MDM management. Then re-enroll the device.
- To add a work profile to an Android device that's already set up, enroll it as employee-owned. Corporate-owned Android Enterprise modes are provisioned when a new or factory-reset device is set up.
- While the work profile is paused (Work apps turned off on the device), the device doesn't check in or install profiles.
Windows with Intune (SCEP)
In this workflow, Intune deploys CA trust, a SCEP-issued client certificate, and the Wi-Fi profile. The Smallstep Agent is not required on the device.
First, connect Intune to Smallstep if you haven't already—that tutorial covers registering the Entra ID application that lets Smallstep validate SCEP enrollments.
Then open your Wi-Fi resource in the dashboard, under Protect → Wi-Fi, and gather:
- Your Root CA Certificate (download)
- Your Intermediate CA Certificate (download)
- Your SCEP URL (copy)
Microsoft recommends a staged approach to Intune enrollment. Create an evaluation Group, if you don’t already have one, so that any breaking changes are limited to the group.
In Intune, create three Configuration Profiles, then a Wi-Fi profile:
Create a trusted certificate profile for your root CA
Create a new Trusted certificate profile with the following properties:
- Name: Smallstep Root CA
- Certificate file: Upload your Smallstep Root CA certificate
- Destination store: Computer certificate store - root
- Included groups: Include the users or groups you are using for your staged enrollment. As you roll out into production, you will expand this list.
- Create the profile
Create a trusted certificate profile for your intermediate CA
Create a new Trusted certificate profile with the following properties:
-
Name: Smallstep Intermediate CA
-
Certificate file: Upload your Smallstep Intermediate CA certificate
-
Destination store: Computer certificate store - root
Careful! Add your intermediate CA to the computer’s root store. Do not choose the intermediate certificate store—it will cause enrollment errors.
-
Included groups: Include the users or groups you are using for testing.
-
Create the profile
Create a SCEP certificate profile
Create a new SCEP certificate profile with the following properties:
-
Name: Smallstep SCEP Certificate
-
Certificate type: Device
-
The certificate properties may vary depending on your use case and threat model. Here are some good starting points:
- Subject name / SANs: For a test deployment, use the default values.
- Certificate validity period: Use the same duration you configured with Smallstep
- Key storage provider: Enroll to TPM KSP if available, Software KSP if not
- Key usage: ✓ Digital certificate and ✓ Key encipherment
- Key size: 2048
- Hash algorithm: SHA-2
- Extended key usage: Under Predefined values, select Client Authentication
- Renewal Threshold (%): Select 20%
-
Root Certificate: Select your Intermediate CA
Careful! Select your intermediate CA here. An enrolling device’s SCEP client will check the fingerprint of the intermediate, not the root.
-
SCEP Server URL: Use the SCEP URL you copied from Smallstep
Test and verify your profiles
Now try enrolling or syncing a device.
These instructions may vary depending on your enrollment method. We assume you’ve enabled Automatic Enrollment in Intune’s Windows enrollment blade.
- For a new device: Go to Windows Settings → Accounts → Access work or school. Then, under Add a work or school account, choose Connect to sign in to your tenant.
- For a previously enrolled device: Go to Windows Settings → Accounts → Access work or school. Expand the box for the signed-in account and select Info. Select Sync.
After the sync completes, it may take a minute for the certificate to appear in your Windows trust store. Check the reports in Intune to ensure your devices have enrolled without errors.
Add the Wi-Fi profile
With CA trust and a client certificate in place, configure an EAP-TLS Wi-Fi connection:
-
In your Intune Device Configuration Profiles, create a + New Policy.
-
Choose your Platform, select Templates, and choose the Wi-Fi template.
-
Select Create to continue, and give your template a clear name.
-
For Wi-Fi type, choose Enterprise.
-
Configure your SSID and other basic network settings.
-
For EAP type, choose EAP - TLS.
-
Under the Certificate server names, enter the Common Name that's on your RADIUS server certificate. For Managed RADIUS, this is the
serverHostnamefrom Step 2. -
Under the Trust tab, add a Trusted Certificate for your RADIUS server.
If your RADIUS server certificate is managed by Smallstep, add the Smallstep RADIUS Root CA PEM here (this is the same CA as the
serverCAreturned by the managed RADIUS API).If your RADIUS server certificate is from a different PKI, you’ll need to add a new Certificate payload containing your RADIUS server’s Root CA certificate.
-
Under Client Authentication, for Authentication method choose SCEP Certificate.
-
Select the client certificate profile you created earlier.
-
Choose Review + save.
Once you've saved your profile, you'll be ready to test and verify your Wi-Fi connection.
Windows with Intune (agent credential + OMA-URI profile)
The Smallstep Agent can manage Windows Wi-Fi configurations on your endpoints end to end (see Agent-managed clients). In some cases, though, you may want the agent to manage the credential while Intune manages the Wi-Fi profile—for example, if you need a custom network configuration, or want to consolidate network settings in Intune.
In this hybrid workflow, the client certificate comes from the credential you created in Step 1, and Intune deploys a Wi-Fi profile that selects it by issuer. The profile selects the Wi-Fi credential based on the SHA-1 fingerprint of the issuing CA certificate.
To gather the two fingerprints referenced in the XML below:
# SHA-1 fingerprint of your RADIUS server CA (radius_ca.crt from Step 2)
openssl x509 -in radius_ca.crt -noout -fingerprint -sha1
# SHA-1 fingerprint of the CA that issues your client certificates
# (the *intermediate* CA of the authority you chose in Step 1;
# download it from the authority's page in the Smallstep dashboard)
openssl x509 -in issuing_ca.crt -noout -fingerprint -sha1
Remove the colons from the fingerprint values before using them.
- In Intune, begin at Device Configuration
- Click Create and then select New Policy
- Platform: Windows 10 and Later
- Profile Type: Templates
- Template Name: Custom
- Click Create, name the policy (for example, EAP-TLS Wi-Fi with Smallstep), and click Next
- Click Add next to OMA-URI Settings:
- Name: Wi-Fi Configuration
- OMA-URI:
./Vendor/MSFT/WiFi/Profile/[your SSID]/WlanXml- Replace
[your SSID]with your own SSID. If your SSID contains any spaces, they must be URL-encoded with%20.
- Replace
- Data Type: String
- Value: your WLAN profile XML (example below). For details on this XML, see Microsoft’s documentation.
<?xml version="1.0"?>
<WLANProfile xmlns="http://www.microsoft.com/networking/WLAN/profile/v1">
<name>YOUR_SSID</name>
<SSIDConfig>
<SSID>
<name>YOUR_SSID</name>
</SSID>
<nonBroadcast>false</nonBroadcast>
</SSIDConfig>
<connectionType>ESS</connectionType>
<connectionMode>auto</connectionMode>
<autoSwitch>false</autoSwitch>
<MSM>
<security>
<authEncryption>
<authentication>WPA3ENT192</authentication>
<encryption>GCMP256</encryption>
<useOneX>true</useOneX>
<FIPSMode xmlns="http://www.microsoft.com/networking/WLAN/profile/v2">false</FIPSMode>
</authEncryption>
<PMKCacheMode>enabled</PMKCacheMode>
<PMKCacheTTL>720</PMKCacheTTL>
<PMKCacheSize>128</PMKCacheSize>
<preAuthMode>disabled</preAuthMode>
<OneX xmlns="http://www.microsoft.com/networking/OneX/v1">
<cacheUserData>true</cacheUserData>
<authMode>machine</authMode>
<EAPConfig>
<EapHostConfig xmlns="http://www.microsoft.com/provisioning/EapHostConfig">
<EapMethod>
<Type xmlns="http://www.microsoft.com/provisioning/EapCommon">13</Type>
<VendorId xmlns="http://www.microsoft.com/provisioning/EapCommon">0</VendorId>
<VendorType xmlns="http://www.microsoft.com/provisioning/EapCommon">0</VendorType>
<AuthorId xmlns="http://www.microsoft.com/provisioning/EapCommon">0</AuthorId>
</EapMethod>
<Config xmlns="http://www.microsoft.com/provisioning/EapHostConfig">
<Eap xmlns="http://www.microsoft.com/provisioning/BaseEapConnectionPropertiesV1">
<Type>13</Type>
<EapType xmlns="http://www.microsoft.com/provisioning/EapTlsConnectionPropertiesV1">
<CredentialsSource>
<CertificateStore>
<SimpleCertSelection>true</SimpleCertSelection>
</CertificateStore>
</CredentialsSource>
<ServerValidation>
<DisableUserPromptForServerValidation>true</DisableUserPromptForServerValidation>
<ServerNames>radius.smallstep.com</ServerNames>
<TrustedRootCA>RADIUS_CA_SHA1_FINGERPRINT</TrustedRootCA>
</ServerValidation>
<DifferentUsername>false</DifferentUsername>
<PerformServerValidation xmlns="http://www.microsoft.com/provisioning/EapTlsConnectionPropertiesV2">true</PerformServerValidation>
<AcceptServerName xmlns="http://www.microsoft.com/provisioning/EapTlsConnectionPropertiesV2">true</AcceptServerName>
<TLSExtensions xmlns="http://www.microsoft.com/provisioning/EapTlsConnectionPropertiesV2">
<FilteringInfo xmlns="http://www.microsoft.com/provisioning/EapTlsConnectionPropertiesV3">
<CAHashList Enabled="true">
<IssuerHash>ISSUING_CA_SHA1_FINGERPRINT</IssuerHash>
</CAHashList>
</FilteringInfo>
</TLSExtensions>
</EapType>
</Eap>
</Config>
</EapHostConfig>
</EAPConfig>
</OneX>
</security>
</MSM>
</WLANProfile>
The IssuerHash value is the SHA-1 fingerprint of the intermediate (issuing) CA for your client credential,
and TrustedRootCA is the SHA-1 fingerprint of your RADIUS server CA.
The authentication and encryption values must match your network gear—use WPA2/AES for WPA2-Enterprise networks.
The authMode element must match the certificate store where the credential is placed:
on Windows, the agent stores credentials with HARDWARE_ATTESTED key protection in the computer certificate store (use machine, as in this guide's example),
and credentials with all other protection levels in the user certificate store (use user).
See Microsoft's OneX schema documentation.
- Click Save, then Next
- Set the assignments as desired, including any groups / users to which the configuration should apply
- Click Next, skip “Applicability Rules”, and on “Review and Create”, click Create
Windows with Workspace ONE UEM
Workspace ONE UEM can deploy the same WLAN profile XML shown above:
- In Workspace ONE, begin at Profiles
- Click Add and then select Add Profile
- Select Windows, then Device Profile
- Name the policy (for example, EAP-TLS Wi-Fi with Smallstep)
- Find the WiFi template and click Add
- Enter the WLAN profile XML in the
Wlan Xmlfield - Click Next, set the assignments as desired, and click Save and Publish
ChromeOS with Google Workspace (ACME Device Attestation)
ChromeOS devices get their Wi-Fi credential through the Smallstep extension for ChromeOS, using ACME Device Attestation against the Chrome Verified Access API.
Before you begin
This guide covers deploying the Smallstep ChromeOS extension and issuing a device identity certificate on your endpoints.
First, complete the steps in Connect Google Workspace to Smallstep and Configure ChromeOS Device Identity Certificates.
Second, you will need your RADIUS server details, including:
- The CA certificate that issued your RADIUS server certificate.
Configure RADIUS server trust
If you're using an external RADIUS server, make sure your RADIUS server's client certificate trust configuration includes the root of whichever authority you chose in Configure ChromeOS Device Identity Certificates. ChromeOS's EAP-TLS handshake includes the client intermediate, so the root alone is sufficient.
Configure the EAP-TLS Wi-Fi network in Google Admin
-
In the Admin Console, go to Devices → Networks → Wi-Fi and select your target Organizational Unit.
-
Click Add Wi-Fi network and configure:
Field Value Name Your Wi-Fi network SSID Security type WPA/WPA2 Enterprise EAP method EAP-TLS EAP Identity ${DEVICE_ASSET_ID}or${USER_EMAIL}, depending on which authority you choseIssuer pattern → Common name See below CA certificate Your RADIUS server's CA ( serverCAfrom above) — upload it first under Devices → Networks → Certificates
Set the issuer pattern
The issuer pattern tells ChromeOS which client certificate to present. It must match the exact common name of the intermediate CA you configured in Configure ChromeOS Device Identity Certificates:
Smallstep (<team-slug>) Devices Intermediate CA
Or use Smallstep (<team-slug>) Accounts Intermediate CA if you chose that authority.
Replace <team-slug> with your Smallstep team label . Leave Locality, Organization, and Organizational unit empty, and leave Subject pattern empty entirely. Smallstep's device certificates don't set those fields, and any value there will prevent a match.
Verify
On the Chromebook, the configured network should appear and connect automatically with no password prompt.
If it doesn't connect:
- No RADIUS traffic at all — the device never associated. This is a client-side problem, not the network or access point: either a certificate selection failure (recheck the issuer pattern above) or no device identity certificate was issued at all — confirm Configure ChromeOS Device Identity Certificates actually completed successfully.
unknown CA/unable to get local issuer certificate— the RADIUS server's trust store is missing the issuing authority's root or intermediate.- The certificate being presented has the wrong issuer — confirm Configure ChromeOS Device Identity Certificates was completed and the device was rebooted after re-enrollment; a device can continue presenting a stale certificate until it restarts.
Verify and troubleshoot
To verify the end-to-end setup, join the network with a test device and confirm it authenticates.
- In the Smallstep dashboard, open your Wi-Fi resource under Protect → Wi-Fi to see issued certificates and authentication activity.
- For agent-managed devices, see the agent troubleshooting guide.
On Windows (Intune):
- Check the expected certificates have been deployed to the right stores on Windows: user vs. device; trusted roots; trusted intermediates; personal certificates.
- On the client side, use Settings → Accounts → Access work or school → Info to check the last sync status. You can also trigger a Sync on this screen.
- Sometimes restarting Windows is required to trigger (re-)enrollment / profile deployment. This can happen if the machine has been online for a while, has been suspended for a while, etc. It may have been disconnected from WNS in this case, resulting in no notifications being received.
- Use Windows Event Viewer to diagnose issues. SCEP related (error) logs can be found in Applications and Services Logs → Microsoft → Windows → DeviceManagement-Enterprise-Diagnostics-Provider.
- See also: Microsoft’s SCEP Troubleshooting Documentation
On macOS (Jamf):
- Check the expected certificates have been deployed to the right stores on macOS: user vs. device; trusted roots; personal certificates.
- Jamf logging can be found by navigating to the Configuration Profile and looking for the
Logsoption in the bottom right. Check out theHistory→Management Historytab for the device.
- Jamf logging can be found by navigating to the Configuration Profile and looking for the
- Use the macOS Console application to diagnose issues. SCEP related (error) logs can be found by searching for “scep”. It’s also possible to follow these logs in realtime.
- The
.mobileconfigfile is a text file and sometimes it can be useful to inspect it for debugging purposes. - If all else fails: Have you tried turning it off and on again? This can sometimes help a device to do things again.
Access point configuration reference
Each Access Point will have a slightly different configuration UI, but these network settings are constant no matter what AP you’re using:
- Security Protocol: WPA2 Enterprise or WPA3 Enterprise
- RADIUS server information (provided by Smallstep in Step 2)
- RADIUS server IP
- RADIUS server port
- RADIUS server shared secret
Ubiquiti UniFi
First, create a RADIUS Profile in the UniFi Network app:
- Go to Settings → Profiles → RADIUS → Create New
- Give the profile a name
- Under Authentication servers, add the RADIUS server IP address, port, and shared secret you received from Smallstep
- Choose Save.
Next, create a new 802.1x EAP-TLS WPA-Enterprise authenticated Wi-Fi network and link your new Smallstep RADIUS profile to it:
- Go to Settings → WiFi → Create New
- Give your network an SSID
- Under Advanced Configuration, choose Manual
- Go to Security
- For Security Protocol, select WPA-3 Enterprise
- For RADIUS Profile, select the RADIUS profile you created above
- Go back and choose Save
Your new 802.1x EAP-TLS WPA-Enterprise Wi-Fi network is ready for use.
MikroTik
This section is suitable for a MikroTik AP that uses RouterOS. You can use the WebFig UI or the MikroTik Terminal to configure your AP.
-
Add a new RADIUS client, replacing the RADIUS IP and secret with the values you received from Smallstep:
- Go to RADIUS -> Add New
- For Service, select wireless
- Enter the Address and Secret for the Smallstep RADIUS server
- Adjust the Timeout to 5000ms
- Choose Ok
Or, in the terminal:
/radius add address=123.123.123.123 secret="secret-goes-here" \ service=wireless timeout=5s
-
Add a security profile:
- Go to Wireless -> Security Profiles -> Add New
- Give the profile the name EAP_AP
- For Mode, choose dynamic keys
- For Authentication Types, select WPA2 EAP
- For Supplicant Identity, enter Mikrotik
- Choose Ok
Or, in the terminal:
/interface wireless security-profiles add authentication-types=wpa2-eap eap-method=passthrough mode=dynamic-keys name=EAP_AP supplicant-identity=Mikrotik
-
Associate the security profile with the Wireless interface:
- Go to Wireless Interfaces and choose the interface you'd like to use with EAP-TLS
- Update Security Profile to EAP_AP
- Choose Ok
Or, in the terminal:
/interface/wireless set [find] security-profile=EAP_AP
For more information, see MikroTik Documentation.
Aerohive
First, create a new RADIUS profile:
- On the Aerohive console, go to Configuration→ Common Objects→ Authentication→ External RADIUS Servers, and click on “+” to create a new RADIUS server
- Provide a Name for the server
- Enter the RADIUS server IP address, port, and shared secret you received from Smallstep into their respective fields
- Click Save
Next, create a new 802.1x EAP-TLS WPA-Enterprise authenticated Wi-Fi network and link your new Smallstep RADIUS profile to it:
- Go to Configure → Network Policies → Add Network Policy
- Select Wireless, provide a Policy Name, and click Next
- Click “+” to add a Wireless SSID.
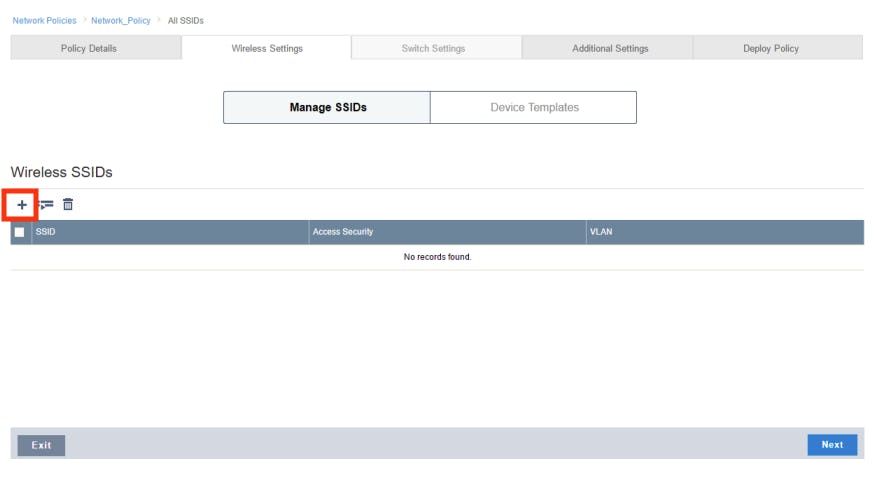
- Provide SSID Name and SSID Broadcast Name for your network
- Under SSID Usage:
- For SSID Authentication, select Enterprise WPA/WPA2 802.1X
- For Key Management, select WPA2-(WPA2 Enterprise)-802.1X
- For Encryption Method, select CCMP (AES)
- Scroll down to Authentication Settings. Click on +, next to Default RADIUS Server Group, to add a RADIUS server
- Select the Smallstep RADIUS profile you created above, and click on Save
Your 802.1x EAP-TLS WPA-Enterprise Wi-Fi network is ready for use.
Aruba
Note: these instructions follow setup for Aruba mobility controllers wireless AP portals. See Aruba reference WLAN configuration documentation
First, create a new RADIUS profile:
- On the Aruba portal, go to Configuration → Authentication → Auth Servers
- Click + in the Server Group table and provide a Name for the new server group, then click Submit
- From the Server Group table, click the group you just created, then click + to add new RADIUS server details
- Select the Add new server option, and then enter the RADIUS server IP address and hostname received from Smallstep into their respective fields
- Select RADIUS from the Type drop-down list
- Click Submit
Next, create a new 802.1x EAP-TLS WPA-Enterprise authenticated Wi-Fi network and link your new Smallstep RADIUS profile to it.
- On the console, go to Configuration → WLAN, then click the + icon to add a new WLAN
- On the General tab:
- For Name (SSID), enter a name for the SSID
- For Primary usage, select the Employee option
- For Broadcast on, click on the Select AP Groups drop-down list, then select a desired AP group
- For Forwarding Mode, leave the default tunnel option
- Click Next
- On the VLANs tab, select your VLAN ID, and click Next
- On the Security > Enterprise tab:
- For Key management, select WPA-3 Enterprise
- For Auth servers section, click +, select the Smallstep RADIUS profile, and click OK
- Click Next
- On the Access tab:
- For the Default role drop-down list, select an existing user role to be assigned to an employee that successfully authenticates to the WLAN, or define a new role by clicking on Show Roles and clicking ”+” in the Roles table
- Click Finish
- On the next page, click on Pending Changes, then click on Deploy Changes
Your new 802.1x EAP-TLS WPA-Enterprise Wi-Fi network is ready for use.
Meraki
- On your Meraki console, navigate to Wireless > Configure > SSIDs
- Enable an Unconfigured SSID
- Under the newly Unconfigured SSID, click on rename, name the SSID accordingly, then click Save Changes
- Click on edit settings. This will take you to the Access control tab for the SSID
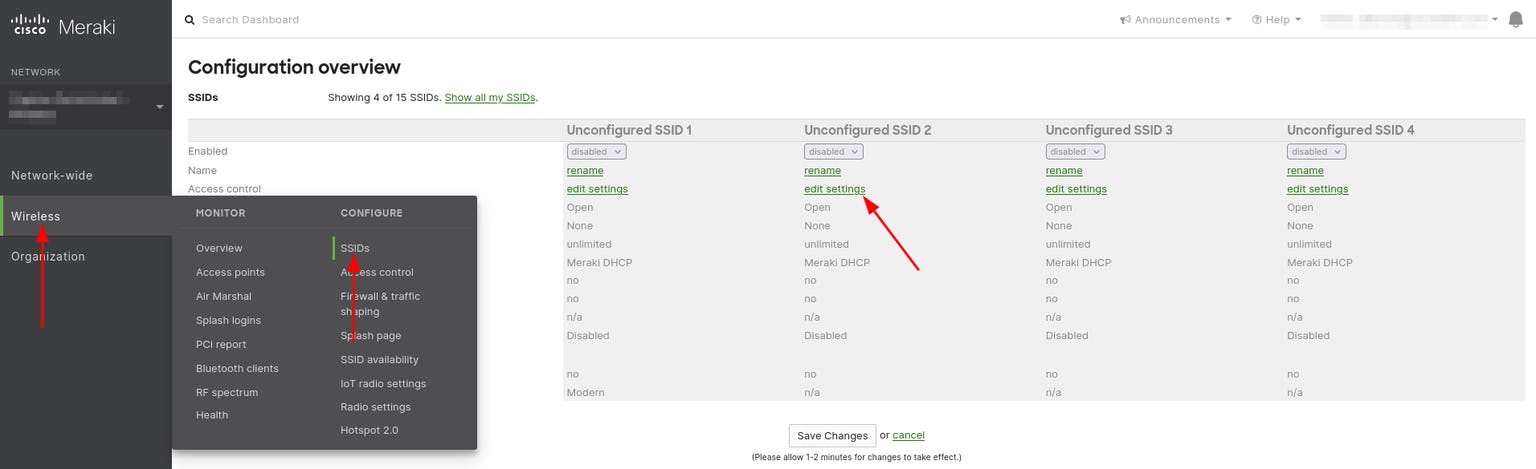
- Set the Association requirements to Enterprise with my RADIUS server
- Scroll to RADIUS servers to add your Smallstep RADIUS server. Enter the RADIUS server IP address, port, and shared secret you received from Smallstep into their respective fields
- Click Save
Your new 802.1x EAP-TLS WPA-Enterprise Wi-Fi network is ready for use.
Cisco Wireless LAN Controller
First, create a new RADIUS profile:
- Go to Security > RADIUS > Authentication, then click New to add a new RADIUS server
- Provide the Server Address, Shared Secret and Port Number obtained from Smallstep
- Click Apply
Next, create a new 802.1x EAP-TLS WPA-Enterprise authenticated Wi-Fi network and link your new Smallstep RADIUS profile to it:
- Click on the WLANs tab, choose Create New and click Go
- Provide a name for your new WLAN, and click Apply to continue
- Go to the General tab, ensure that Status is Enabled
- Go to the Security tab > AAA Servers. In the Server 1 dialog box, under Authentication Servers, select the RADIUS server that you just configured, and click Apply
Your new 802.1x EAP-TLS WPA-Enterprise Wi-Fi network is ready for use.
Extreme Networks
First, create a new RADIUS profile:
- On your Extreme Networks console, navigate to ONBOARD > AAA
- On the Default AAA Configuration page, scroll to RADIUS Servers, and click Add
- Provide the RADIUS Server IP address, RADIUS Port, and Shared Secret provided by Smallstep
- Click Save
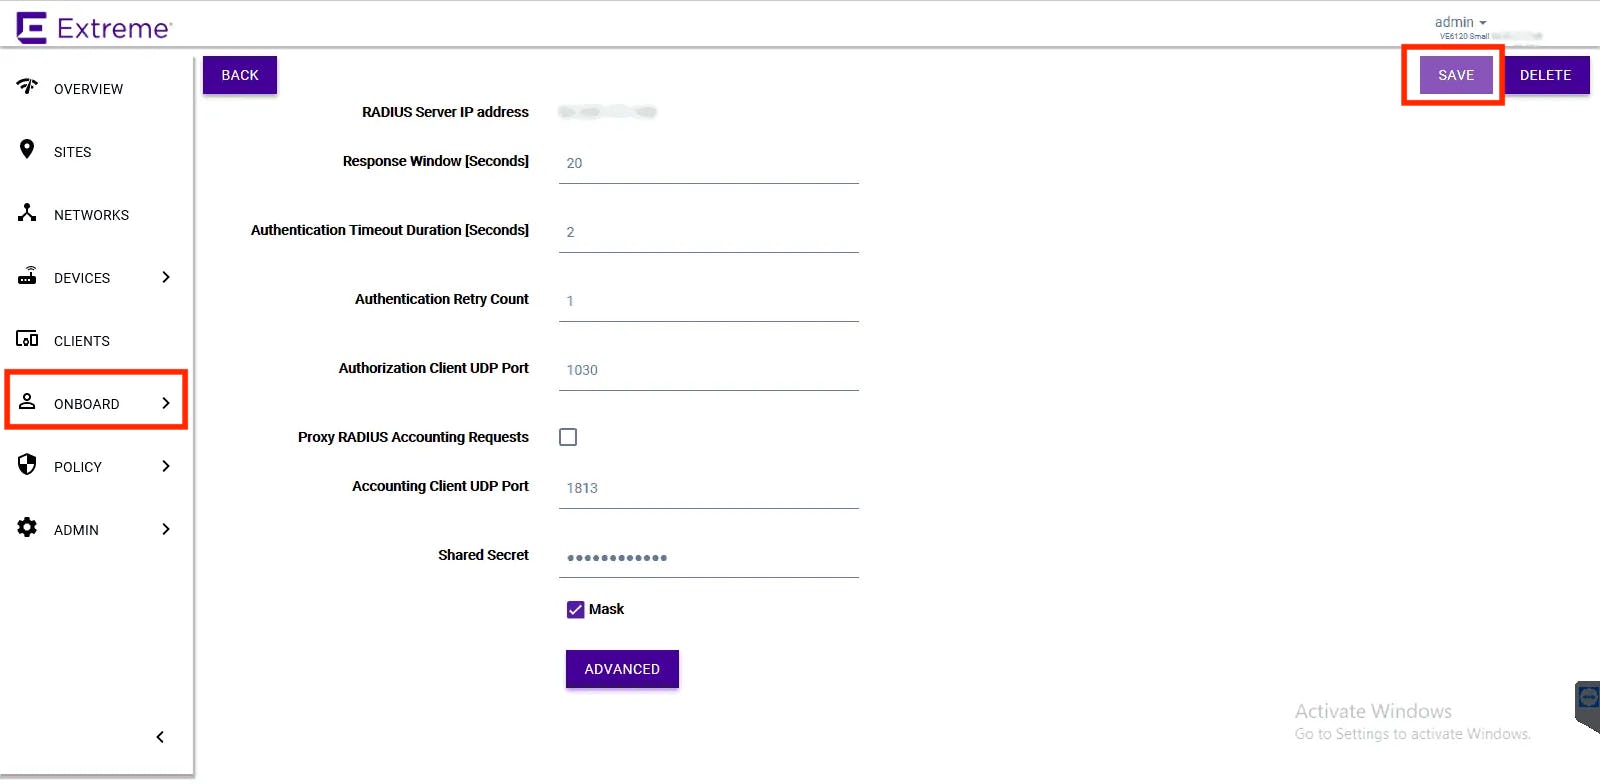
Next, create a new 802.1x EAP-TLS WPA-Enterprise authenticated Wi-Fi network and link your new Smallstep RADIUS profile to it:
- Navigate to Networks > Add:
- For Network Name, provide a suitable name
- For SSID, enter a name for the SSID
- For Status, select Enable
- For Auth Type, select WPA2 Enterprise w/ RADIUS
- For Authentication Method, select RADIUS
- For Primary RADIUS, select the Smallstep RADIUS IP Address added earlier
- For Backup RADIUS, select another if any
- For Default Auth Role, select Enterprise User
- For Default VLAN, select a VLAN
- Click Save
Your new 802.1x EAP-TLS Enterprise Wi-Fi network is ready for use.
Juniper Mist
- Navigate to Organization > WLAN Templates
- Click a WLAN template (or create a template)
- Click on Add WLAN
- In the Edit/Create WLAN window, provide an SSID for your new WLAN
- Scroll to the Security section, under Security Type, select WPA3 or WPA2, then click Enterprise (802.1X)
- Scroll to the Authentication Servers section, and click Add Server
- Enter the Hostname (IP Address) and Shared Secret of the RADIUS server received from Smallstep
- Click Save
Your 802.1x EAP-TLS WPA-Enterprise Wi-Fi network is ready for use. For more, see Juniper Mist reference documentation.
Sophos UTM
First, create a new RADIUS profile:
- Go to Definitions & Users > Authentication Services
- On the Servers tab, click New Authentication Server
- On the Add Authentication Server dialogue box:
- For Backend, select RADIUS
- For Position, select Top
- For Server, click + to add a new RADIUS server IP address provided by Smallstep
- For Shared Secret, enter the shared RADIUS server secret provided by Smallstep
- Click Save
Next, configure 802.1x EAP-TLS WPA-Enterprise WLANs to use the new RADIUS profile for authentication:
- Go to Wireless Protection > Global Settings > Advanced.
- On the Enterprise Authentication box, select the created RADIUS profile from the Radius Server dropdown.
- Click Apply
Then, create a new 802.1x EAP-TLS WPA-Enterprise authenticated Wi-Fi network:
- Go to Wireless Protection > Wireless Networks
- Click on Add Wireless Network
- On the Add Wireless Network dialog:
- For Network name, enter a descriptive name for the network
- For Network SSID, provide a suitable name
- For Encryption mode, select WPA2/WPA Enterprise
- For Client traffic, see the implications of the different options on the Sophos UTM Administrator Guide.
- Click Save
Go ahead to associate the new SSID network with your access point, and your new 802.1x EAP-TLS WPA-Enterprise Wi-Fi network is ready for use.
Asus
These instructions follow setup for RT-AX1800S. However you should find most current ASUS routers have a similar interface.
Tip: to set up an 802.1x EAP-TLS Enterprise Wi-Fi WLAN on your Asus router, start with a separate dual band setup so that you have a break-glass connection to a WPA2 Password connection in the event that your settings are not allowing access to the configured band.
-
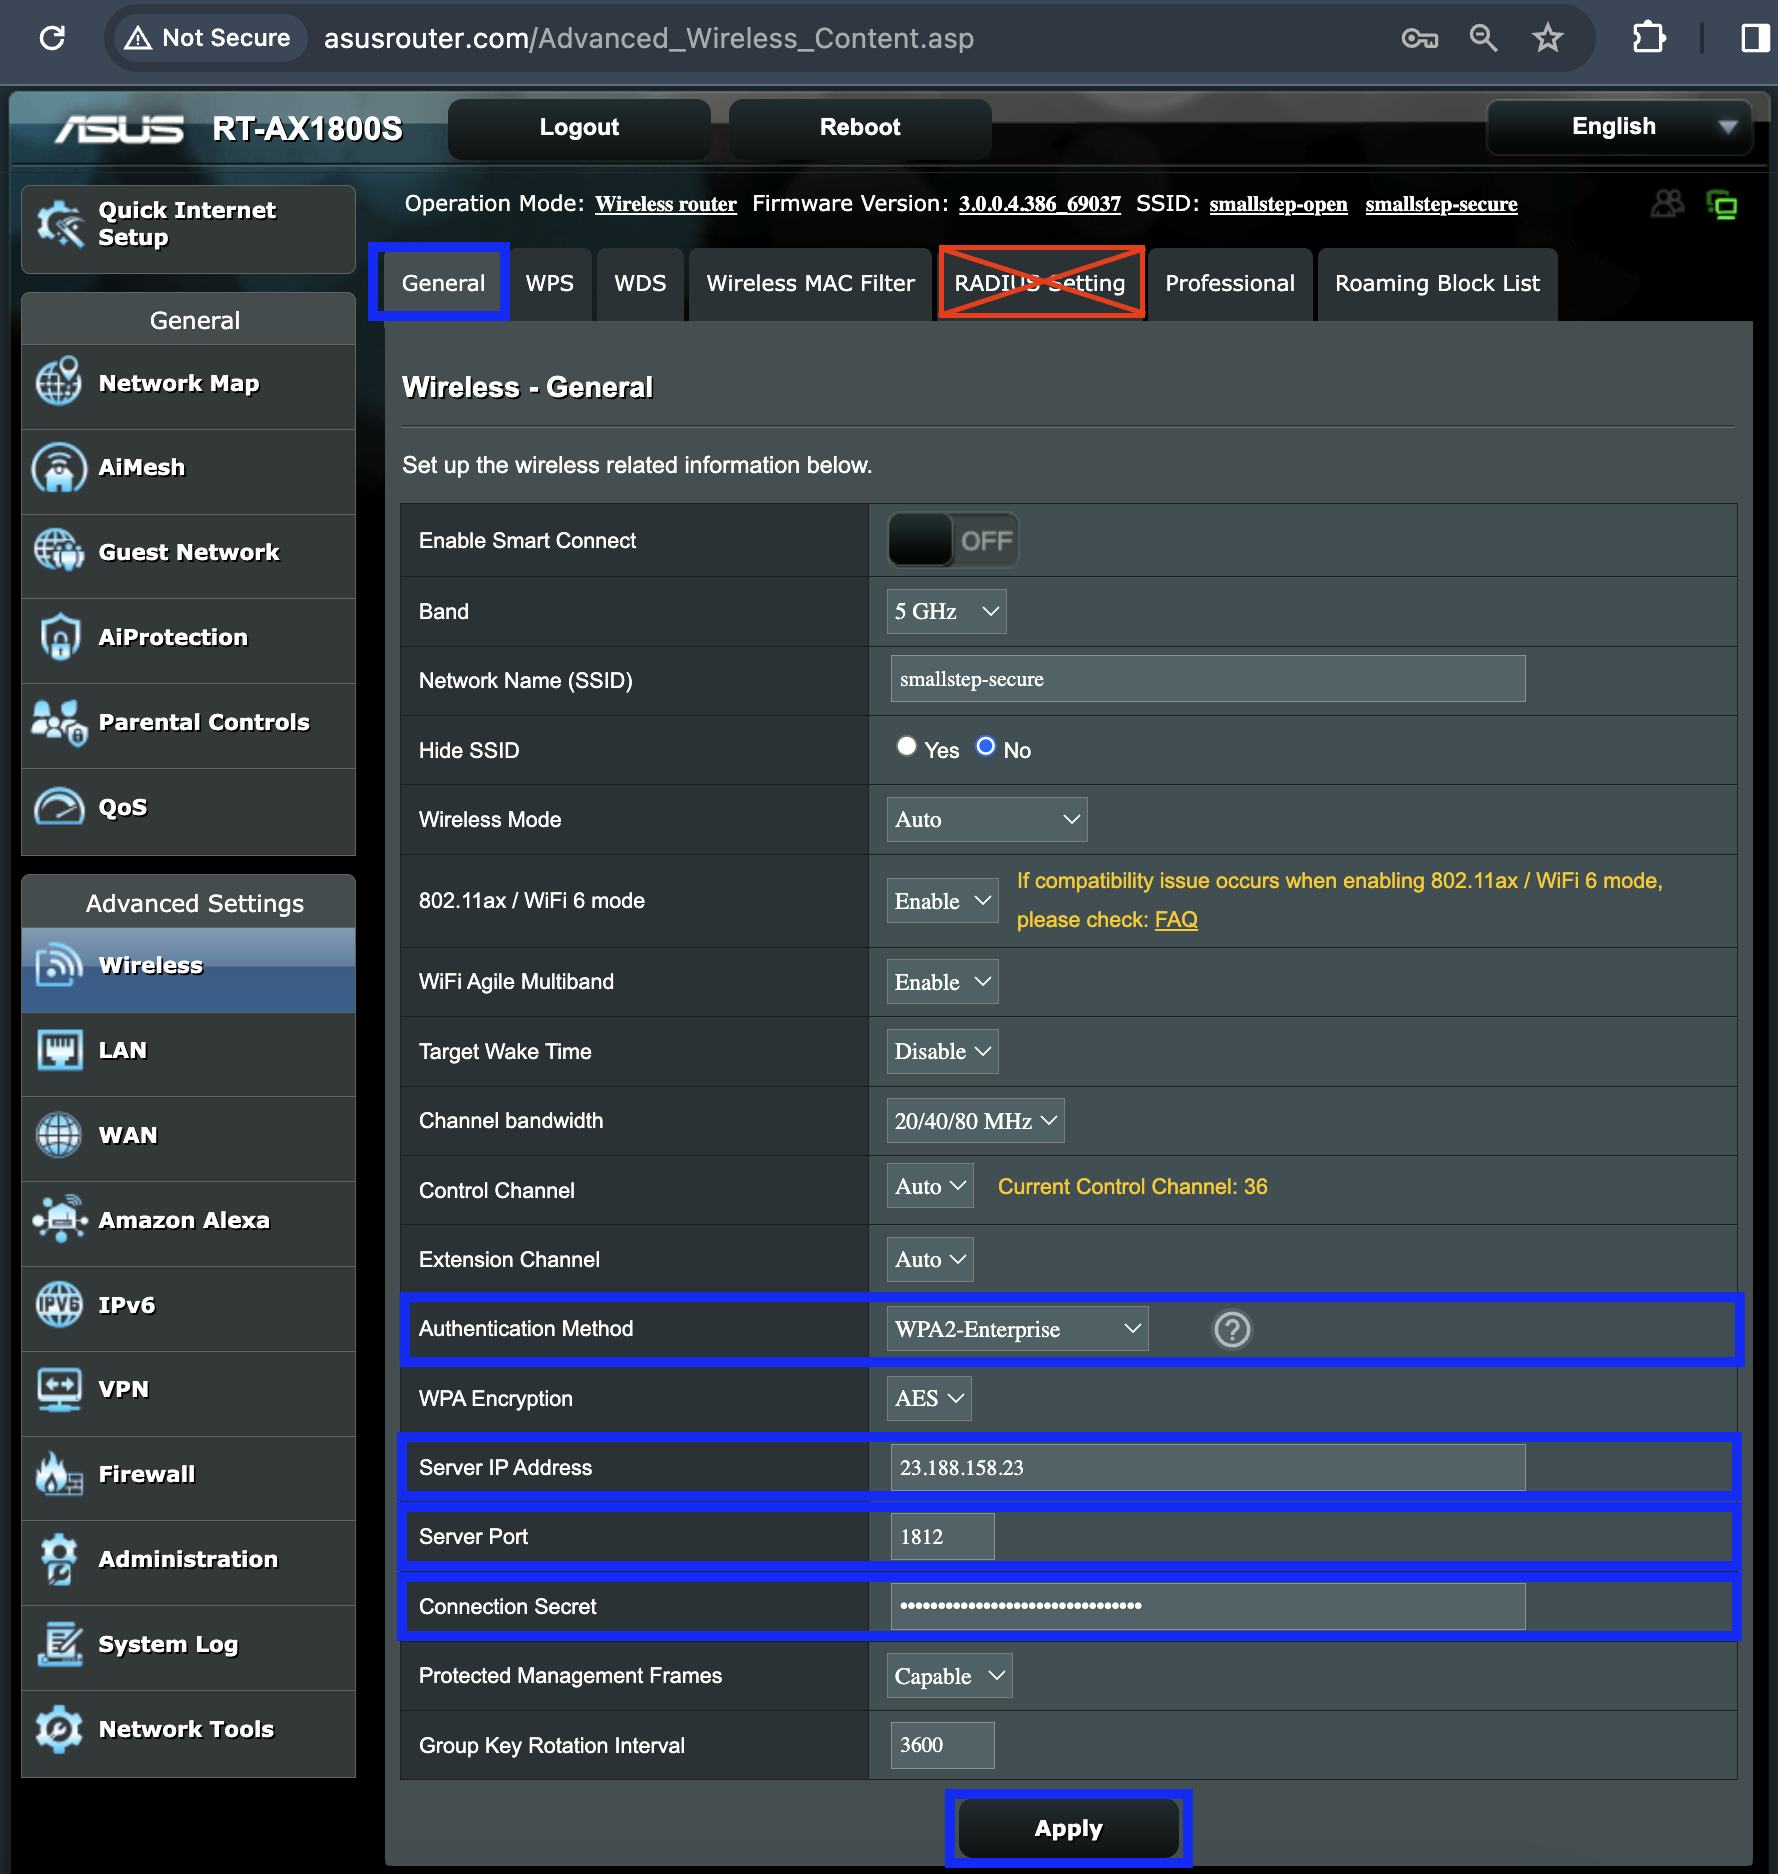
On the Asus Router console, navigate to Advanced Settings > Wireless
-
On the General tab, configure the following parameters:
- For Network Name (SSID), enter a name for the WLAN
- For Authentication Method, select WPA2-Enterprise
- For Server IP Address, Server Port, and Connection String, provide the RADIUS server properties provided by Smallstep during setup
-
Click Apply to save changes to router
Your new 802.1x EAP-TLS WPA-Enterprise Wi-Fi network is ready for use.
Can’t find configuration instructions for your access point? Create an issue for it.
This feature is available to Smallstep Enterprise RADIUS customers.
With RADIUS authorization webhooks, you can integrate Smallstep’s RADIUS authentication workflow with your own device posture or authorization checks during EAP-TLS connection requests. All you need is a webhook server that Smallstep can reach out to. Your webhook server will evaluate or log the presented client certificate, and return an authorization decision.
Smallstep can authenticate to your webhook server using a bearer token or HTTP basic authentication.
Configuring a RADIUS webhook in Smallstep
Our customer support team can configure a new RADIUS webhook for you.
RADIUS webhook specification
Your webhook server should use a TLS server certificate issued by a public Web PKI CA.
Request format
Your webhook server should expect the following request format:
- Method:
POST - Content-Type:
application/json - Headers:
X-Smallstep-Webhook-ID:A UUID for the RADIUS webhook making the requestX-Smallstep-Signature:Hex‑encoded HMAC‑SHA256 of the raw request body using the webhook’s signing secretAuthorization:Optional. Either "Bearer <token>" or HTTP Basic auth, if configured.
- Body (JSON):
timestamp: The RFC8222 timestamp of the requestx509Certificate: A JSON representation of the certificate that follows this data structure. Additionally, there is arawfield containing a base64-encoded DER representation of the client certificate.
Example request body:
{
"timestamp": "2024-01-15T10:30:00Z",
"x509Certificate": {
"subject": {
"country": ["US"],
"organization": ["Example Corp"],
"organizationalUnit": ["Engineering"],
"locality": ["San Francisco"],
"province": ["CA"],
"streetAddress": ["123 Main St"],
"postalCode": ["94105"],
"serialNumber": "123456",
"commonName": "craig@smallstep.com",
"names": [
{
"type": "2.5.4.3",
"value": "craig@smallstep.com"
}
],
"extraNames": []
},
"issuer": {
"country": ["US"],
"organization": ["Example CA"],
"organizationalUnit": ["CA Unit"],
"locality": ["San Francisco"],
"province": ["CA"],
"streetAddress": ["456 CA St"],
"postalCode": ["94105"],
"serialNumber": "CA123",
"commonName": "Example Root CA",
"names": [],
"extraNames": []
},
"serialNumber": "270390854734985720984572058347298347234",
"sans": [
{
"type": "email",
"value": "craig@smallstep.com"
}
],
"emailAddresses": ["craig@smallstep.com"],
"ipAddresses": [],
"uris": [],
"extensions": [],
"keyUsage": ["digitalSignature", "keyEncipherment"],
"extKeyUsage": ["serverAuth", "clientAuth"],
"unknownExtKeyUsage": [],
"subjectKeyId": "base64EncodedSKID==",
"authorityKeyId": "base64EncodedAKID==",
"ocspServer": ["http://ocsp.example.com"],
"issuingCertificateURL": ["http://ca.example.com/ca.crt"],
"dnsNames": ["example.com", "www.example.com"],
"permittedDNSDomainsCritical": false,
"permittedDNSDomains": [],
"excludedDNSDomains": [],
"permittedIPRanges": [],
"excludedIPRanges": [],
"permittedEmailAddresses": [],
"excludedEmailAddresses": [],
"permittedURIDomains": [],
"excludedURIDomains": [],
"crlDistributionPoints": ["http://crl.example.com/ca.crl"],
"policyIdentifiers": [],
"publicKey": "MIIBIjANBgkqhkiG9w0BAQEFAAOCAQ8AMIIBCgKCAQEA...",
"publicKeyAlgorithm": "RSA",
"notBefore": "2024-01-01T00:00:00Z",
"notAfter": "2025-01-01T00:00:00Z",
"raw": "MIIDXTCCAkWgAwIBAgIJAKb..."
}
}
Signature verification
For signature verification, you will need the signing secret associated with X-Smallstep-Webhook-ID, which was given to you when your Smallstep support representative configured the webhook on your behalf. To verify the signature:
- Compute HMAC‑SHA256 over the raw request body bytes
- Hex‑encode the result and compare to the
X-Smallstep-Signature:request header value
Response format
Your server should respond with the following:
- Content-Type:
application/json - HTTP status codes:
200: Webhook processed successfully- Anything else: Authorization will be denied by RADIUS
- Body (JSON):
-
allow: boolean. Should the Wi-Fi client authentication request be allowed?Minimal success response:
{ "allow": true }
-
error: object (optional). If an error is passed, it will be visible in your Smallstep event log.Deny with reason:
{ "allow": false, "error": { "message": "Device non-compliant with posture check", "code": "E1002" } }
-
Example code
As a starting point for your implementation, Smallstep offers an example RADIUS webhook server, written in Go.
Operational guidance
- Multiple webhooks are supported. Webhooks are called after a client certificate is verified by Smallstep. They are called sequentially, but without any guarantee of order.
- Timeouts (10 seconds) or non-
200HTTP status codes result in a denial decision by Smallstep. Build for high availability and fast failover. Run at least two replicas behind a load balancer. - Smallstep may retry briefly if it receives a transient
5xxHTTP status codes - Deny known‑bad cases using
"allow": false; reserve non‑200HTTP status codes for unexpected failures. This will avoid incidental denies. - Store the signing secret securely. Rotate the secret by creating a new webhook, distributing its secret, then decommissioning the old one.
- It is recommended that you log request IDs, the webhook ID, and your decision for auditing. If possible, avoid logging full certificates.
Last updated on October 5, 2026

Introducing
Device Identity
Ensure that only company-owned devices can access your enterprise's most sensitive resources.
