Configuring step-ca Provisioners
Provisioners are methods of using the CA to get certificates for humans or machines. They offer different modes of authorization for the CA. In this section we'll discuss the different provisioners, their target use cases, and how to add, remove, and configure them.
Overview
- Choosing a Provisioner
- Authorization Scope by Provisioner
- Provisioner Management
- Remote Provisioner Management
- Provisioner Types
Choosing a provisioner
When choosing a provisioner for your use case, you can narrow your options by starting from the types of identifiers you need on a certificate.
| Identifier Type | JWK | OAuth | X5C | ACME dns-01 | ACME http-01 | ACME tls-alpn-01 | ACME device-attest-01 | Nebula | SCEP | K8sSA | Cloud Provisioners |
|---|---|---|---|---|---|---|---|---|---|---|---|
| Hostname | ✔️ | 𝗫 | ✔️ | ✔️ | ✔️ | ✔️ | 𝗫 | ✔️ | ✔️ | 𝗫 | ✔️ |
| IP address | ✔️ | 𝗫 | ✔️ | 𝗫 | ✔️ | ✔️ | 𝗫 | ✔️ | ✔️ | 𝗫 | ✔️ |
| Hardware ID | ✔️ | 𝗫 | ✔️ | 𝗫 | 𝗫 | 𝗫 | ✔️ | 𝗫 | ✔️ | 𝗫 | 𝗫 |
| Service Account | ✔️ | ✔️ | ✔️ | 𝗫 | 𝗫 | 𝗫 | 𝗫 | 𝗫 | ✔️ | ✔️ | 𝗫 |
| Human | ✔️ | ✔️ | ✔️ | 𝗫 | 𝗫 | 𝗫 | 𝗫 | 𝗫 | 𝗫 | 𝗫 | 𝗫 |
Besides the identifier types described above, step-ca also integrates with and supports Wire messenger application identities.
The configuration for this is described in ACME for Wire messenger clients.
You can also narrow your provisioner options based on trust dependencies. Trust dependencies are third parties you can leverage to bootstrap trust within your PKI.
| Provisioner | What Is Trusted? |
|---|---|
| JWK | Private key bearers |
| OAuth | An OIDC authorization server (Okta, Google, Azure, etc.) |
| X5C | Another X.509 CA |
ACME dns-01 | Your DNS server and network |
ACME http-01 | Your network, DNS, and OS privileged port protections |
ACME tls-alpn-01 | Your network, DNS, and OS privileged port protections |
ACME device-attest-01 | Security hardware manufacturer (Apple, Infineon, Yubico, etc.) |
| Cloud Provisioners | Your cloud provider (AWS, GCP, Azure) |
| SCEP | Shared secret bearers |
Every provisioner has a slightly different scope of authorization. Below is a table detailing the authorization capabilities of each provisioner.
| Provisioner Capabilities | x509-sign | x509-renew | x509-revoke | ssh-user-cert-sign | ssh-host-cert-sign | ssh-user-cert-renew1 | ssh-host-cert-renew | ssh-revoke | ssh-rekey |
|---|---|---|---|---|---|---|---|---|---|
| JWK | ✔️ | ✔️ | ✔️ | ✔️ | ✔️ | 𝗫 | 𝗫 | ✔️ | 𝗫 |
| OIDC | ✔️ | ✔️ | ✔️ | ✔️ | ✔️ 2 | 𝗫 | 𝗫 | ✔️ | 𝗫 |
| X5C | ✔️ | ✔️ | ✔️ | ✔️ | ✔️ | 𝗫 | 𝗫 | 𝗫 | 𝗫 |
| Nebula | ✔️ | ✔️ | ✔️ | ✔️ | 𝗫 | 𝗫 | 𝗫 | ✔️ | 𝗫 |
| K8sSA | ✔️ | ✔️ | ✔️ | ✔️ | ✔️ | 𝗫 | 𝗫 | 𝗫 | 𝗫 |
| ACME | ✔️ | ✔️ | 𝗫 | 𝗫 | 𝗫 | 𝗫 | 𝗫 | 𝗫 | 𝗫 |
| SCEP | ✔️ | ✔️ | 𝗫 | 𝗫 | 𝗫 | 𝗫 | 𝗫 | 𝗫 | 𝗫 |
| SSHPOP | 𝗫 | 𝗫 | 𝗫 | 𝗫 | 𝗫 | 𝗫 | ✔️ | ✔️ | ✔️ |
| AWS | ✔️ | ✔️ | 𝗫 | 𝗫 | ✔️ | 𝗫 | 𝗫 | 𝗫 | 𝗫 |
| Azure | ✔️ | ✔️ | 𝗫 | 𝗫 | ✔️ | 𝗫 | 𝗫 | 𝗫 | 𝗫 |
| GCP | ✔️ | ✔️ | 𝗫 | 𝗫 | ✔️ | 𝗫 | 𝗫 | 𝗫 | 𝗫 |
For an example of how to interpret this table, let's take the JWK provisioner.
The JWK provisioner is capable of signing, renewing, and revoking X.509
certificates, as well signing user and host SSH certificates. A JWK provisioner
cannot renew or rekey SSH certificates.
An SSHPOP provisioner can revoke and rekey SSH certificates and renew SSH host
certificates. An SSHPOP provisioner cannot sign, renew, or revoke X.509
certificates, and it cannot sign SSH user and host certificates or renew SSH
user certificates.
It's important to understand the capabilities and limitations when selecting a provisioner for a given workload.
Provisioner management
Use the step ca provisioner command group to add, remove, or modify provisioner configurations. Run these commands directly on your CA machine. They need to modify the $(step path)/config/ca.json configuration file.
May I edit ca.json directly?
You may edit your ca.json configuration file directly, but we strongly recommend using step ca provisioner commands instead.
Fields in ca.json may be encoded differently than you expect.
Some provisioner options override global defaults for your CA.
For a list of global options, see the configuration guide section for the authority configuration block.
A remote provisioner management API can be enabled in step-ca.
It is disabled by default.
With remote provisioner management, the CA's provisioner configuration is stored in the database instead of ca.json. (The global CA configuration remains in ca.json.)
This feature can be useful if you
have multiple CA administrators,
run several load-balanced step-ca instances,
or if you want to manage your provisioners remotely (eg. with Infrastructure as Code (IaC) tools; see below).
See Remote Provisioner Management for more.
Common provisioner operations
Common provisioner operations include:
- Adding a provisioner
- Removing a provisioner
- Listing all provisioner
- Modifying the configuration of an existing provisioner
Unless you are using remote provisioner management, you must send a SIGHUP signal, or restart the step-ca process, for changes to your provisioner configuration to take effect.
Add a provisioner
Use step ca provisioner add to add a provisioner:
step ca provisioner add acme --type ACME
See the command reference for complete documentation and examples.
Remove a provisioner
Use step ca provisioner remove to remove provisioners:
step ca provisioner remove acme
You can also edit the ca.json configuration file and remove the entire block
containing the provisioner you'd like to remove.
List all provisioners
To get a list of all of your current provisioners, use step ca provisioner list or the /provisioners endpoint on your CA.
Modify a provisioner
Use step ca provisioner update to update provisioner configurations:
step ca provisioner update acme \
--x509-min-dur=20m \
--x509-max-dur=72h \
--x509-default-dur=36h
In this example we've modified the minumum, maximum, and default durations for TLS certificates generated by this provisioner.
Provisioner configuration can be used to affect X.509 and SSH certificate lifetimes, extensions, and templates. Some provisioner-specific options exist, which are covered by the documentation for each provisioner type, below.
Remote provisioner management
This feature is disabled by default.
When remote provisioner management is enabled, your provisioner configuration is
stored in the database, rather than in ca.json.
Provisioner configuration is managed by running step ca provisioner commands locally or remotely.
These commands require you to sign in as an Admin user.
Enable remote provisioner management
On a new CA
To enable remote provisioner management on a new CA, pass --remote-management to step ca init. This will:
- Add an initial JWK provisioner called Admin JWK to the database.
- Create an initial Super Admin user, with default username
step, and link it to the Admin JWK provisioner.
On an existing CA
To migrate your ca.json provisioners to the database, and to enable remote provisioner management on an existing CA:
- Stop
step-caif it is running. - Update your
"authority"block inca.jsonto include the following:
"authority": {
"enableAdmin": true,
"provisioners": [
...
]
},
-
Start
step-cafrom the command line.When
step-castarts up, it will:- Migrate the provisioners from your
ca.jsonto the database - Repurpose the first JWK provisioner in your
ca.jsonas an administrative provisioner. If no JWK provisioner exists, it will add a JWK provisioner called Admin JWK to the database. You will be prompted for a password that will encrypt the new provisioner key. - Create an initial Super Admin user, with username
step, and link it to the administrative provisioner.
- Migrate the provisioners from your
-
Remove old provisioner configurations from
ca.json. Once your provisioners are migrated to the database, the provisioners inca.jsonare ignored and you can remove them from that file:"authority": { "enableAdmin": true, "provisioners": [] },
Managing admin users
With remote provisioner management,
"Admins" can remotely manage provisioners.
"Super Admins" are Admins that can also manage the list of Admins for the CA using step ca admin.
Create an admin user
To perform CA administrative operations, you sign into that provisioner as an Admin.
As a Super Admin, lets create an Admin user linked to the Admin JWK provisioner:
step ca admin add carl "Admin JWK"
Output:
SUBJECT PROVISIONER TYPE
carl Admin JWK (JWK) ADMIN
Authenticating as an admin
An Admin (or a Super Admin) is a combination of a username (a subject name) and a provisioner. No passwords are associated with administrators. An administrator is just a subject name and a provisioner name.
The default Super Admin username is step, and the default admin provisioner is called Admin JWK.
You can authenticate as an administrator via the authentication scheme of the provisioner.
For example, for the default JWK provisioner, running administrative commands in step will prompt for the provisioner password.
Tip: single sign-on can be used for Admin users. To enable SSO CA administration, first add an OIDC provisioner linked to your identity provider. Then, add an Admin user associated with that provisioner, using your email address as the Admin's subject name.
The Admin and Super Admin privileges are not scoped to a provisioner: admins can modify any provisioner configurations. Super Admins are Admins that can also modify Admins, regardless of provisioner.
Use remote provisioner management
You're all set. 🎉
You can use the step ca provisioner commands, from any client, to modify your CA's provisioner configuration.
Unattended remote provisioner management
If you want to manage provisioners remotely using a script or an Infrastructure as Code (IaC) tool, you will need an administrative certificate and key.
An administrative certificate must meet the following criteria:
- The Subject (or any SAN) must match the name of an Admin or Super Admin.
- The certificate must be issued by the provisioner of the Admin or Super Admin.
- The certificate must be valid and unexpired.
- A passively revoked certificate is valid until it expires; for immediate revocation, remove the admin instead of revoking the certificate.
To create an admin certificate, run:
step ca certificate step admin.crt admin.key --provisioner "Admin JWK"
Output:
✔ Provisioner: Admin JWK (JWK) [kid: 5UasaZcgkI_PxQeZqssfq5mzFnGHOWL5g5kDt07Vc1k]
Please enter the password to decrypt the provisioner key:
✔ CA: https://localhost
✔ Certificate: admin.crt
✔ Private Key: admin.key
With that certificate, you can use it as follows:
step ca provisioner add ... --admin-cert=admin.crt --admin-key=admin.key
If the admin.crt represents a Super Admin, the same flags can also be used to manage Admins:
step ca admin add ... --admin-cert=admin.crt --admin-key=admin_key
Provisioner types
JWK
JSON Web Key (JWK) is the default CA provisioner type,
and the step ca certificate client tries to use it by default.
With a JWK provisioner,
a Certificate Signing Request (CSR) is sent to the CA
along with a short-lived JSON Web Token (JWT) which authenticates the request.
The JWK provisioner can be useful for custom integrations.
JWTs are easy to generate programmatically,
without using step.
We have written a few example clients for demonstration purposes.
Here's an example JWT used by step-ca:
$ step ca token foo.internal | step crypto jwt inspect --insecure
{
"header": {
"alg": "ES256",
"kid": "kXLZ2xHQEXAMPLEq4j38N5QzQzNBmOPp0NCLzKAI0yA",
"typ": "JWT"
},
"payload": {
"aud": "https://ca.internal/1.0/sign",
"exp": 1711479459,
"iat": 1711479159,
"iss": "carl@tashian.com",
"jti": "8211a180b6EXAMPLEed81da54132e9...",
"nbf": 1711479159,
"sans": [
"foo.internal"
],
"sha": "c8de28e620ecEXAMPLE4a0c405d92d7350dbec351cec3e4f6a6d1fc9512387aa",
"sub": "foo.internal"
},
"signature": "MEcSHfmIEXAMPLElNiLoDcHz90..."
}
The JWT subject (sub) specifies a subject Common Name for the issued certificate.
The sha and sans claims are non-standard:
they specify the root CA certificate fingerprint in SHA256
and any subject alternative names
that are authorized for inclusion in the issued certificate.
The JWT is designed to be generated in one context, then passed into the context where it will be used (eg. a container or pod). Meanwhile, sensitive private key material can remain in the context where it is generated. Therefore, by default, the JWT is not bound to the CSR, which may not yet exist when the token is created. The JWT is instead bound to the expected SANs, subject common name, and the CA's root fingerprint. See Issue a Certificate Using A Single-Use CA Token for an example.
Optionally, a confirmation claim (cnf) can be added (as defined in RFC 7800 § 3.4 to bind the JWT to a CSR. See smallstep/certificates#1637 for details.
Example
Add a JWK provisioner:
step ca provisioner add you@smallstep.com --create
In the ca.json configuration file, a complete JWK provisioner example looks like:
{
"type": "JWK",
"name": "you@smallstep.com",
"key": {
"use": "sig",
"kty": "EC",
"kid": "NPM_9Gz_omTqchS6Xx9Yfvs-EuxkYo6VAk4sL7gyyM4",
"crv": "P-256",
"alg": "ES256",
"x": "bBI5AkO9lwvDuWGfOr0F6ttXC-ZRzJo8kKn5wTzRJXI",
"y": "rcfaqE-EEZgs34Q9SSH3f9Ua5a8dKopXNfEzDD8KRlU"
},
"encryptedKey": "eyJhbGciOiJQQkVTMi1IUzI1NitBMTI4S1ciLCJjdHkiOiJqd2sranNvbiIsImVuYyI6IkEyNTZHQ00iLCJwMmMiOjEwMDAwMCwicDJzIjoiTlV6MjlEb3hKMVdOaFI3dUNjaGdYZyJ9.YN7xhz6RAbz_9bcuXoymBOj8bOg23ETAdmSCRyHpxGekkV0q3STYYg.vo1oBnZsZjgRu5Ln.Xop8AvZ74h_im2jxeaq-hYYWnaK_eF7MGr4xcZGodMUxp-hGPqS85oWkyprkQLYt1-jXTURfpejtmPeB4-sxgj7OFxMYYus84BdkG9BZgSBmMN9SqZItOv4pqg_NwQA0bv9g9A_e-N6QUFanxuYQsEPX_-IwWBDbNKyN9bXbpEQa0FKNVsTvFahGzOxQngXipi265VADkh8MJLjYerplKIbNeOJJbLd9CbS9fceLvQUNr3ACGgAejSaWmeNUVqbho1lY4882iS8QVx1VzjluTXlAMdSUUDHArHEihz008kCyF0YfvNdGebyEDLvTmF6KkhqMpsWn3zASYBidc9k._ch9BtvRRhcLD838itIQlw",
"claims": {
"minTLSCertDuration": "5m",
"maxTLSCertDuration": "24h",
"defaultTLSCertDuration": "24h",
"disableRenewal": false,
"minHostSSHCertDuration": "5m",
"maxHostSSHCertDuration": "1680h",
"minUserSSHCertDuration": "5m",
"maxUserSSHCertDuration": "24h",
"enableSSHCA": true
},
"options": {
"x509": {
"templateFile": "templates/certs/x509/default.tpl"
},
"ssh": {
"templateFile": "templates/certs/ssh/default.tpl"
}
}
}
-
type: for a JWK provisioner it must be
JWK, this field is case insensitive. -
name: identifies the provisioner, a good practice is to use an email address or a descriptive string that allows the identification of the owner, but it can be any non-empty string.
-
key: is the JWK (JSON Web Key) representation of a public key used to validate a signed token.
-
encryptedKey*: is the encrypted private key used to sign a token. It's a JWE compact string containing the JWK representation of the private key. This value is not necessary for CA operation, but is provided for the convenience of clients. Without the
encryptedKeyattribute, the private key must be provided by the client, using the--keyflag. -
claims**: overwrites the default claims set in the authority. See claims for details.
-
options*: see template configuration for more details.
Decrypting the private key
We can use step crypto jwe decrypt to see the private key encrypted with the password asdf:
$ step ca provisioner list \
| jq -r '.[] | select(.name == "you@smallstep.com") | .encryptedKey' \
| step crypto jwe decrypt \
| jq
Please enter the password to decrypt the content encryption key:
{
"use": "sig",
"kty": "EC",
"kid": "NPM_9Gz_omTqchS6Xx9Yfvs-EuxkYo6VAk4sL7gyyM4",
"crv": "P-256",
"alg": "ES256",
"x": "bBI5AkO9lwvDuWGfOr0F6ttXC-ZRzJo8kKn5wTzRJXI",
"y": "rcfaqE-EEZgs34Q9SSH3f9Ua5a8dKopXNfEzDD8KRlU",
"d": "rsjCCM_2FQ-uk7nywBEQHl84oaPo4mTpYDgXAu63igE"
}Changing a JWK provisioner password
-
Retrieve the current encrypted key.
Run the following, changing the provisioner name in the
jqcommand to match your configuration:OLD_ENCRYPTED_KEY=$(step ca provisioner list \ | jq -r '.[] | select(.name == "you@smallstep.com").encryptedKey')
-
Update the encrypted key password.
Run:
ENCRYPTED_KEY=$(echo $OLD_ENCRYPTED_KEY | \ step crypto jwe decrypt | \ step crypto jwe encrypt --alg PBES2-HS256+A128KW | \ step crypto jose format)
You'll be asked for the old and new passwords.
-
Update the provisioner.
Run the following, changing the provisioner name in the command to match your configuration:
step ca provisioner update you@smallstep.com \ --private-key=<(echo -n "$ENCRYPTED_KEY")
-
Send a
SIGHUPtostep-cato reload the configuration file.(Skip this step if you have enabled remote provisioner administration.)
killall -i -s SIGHUP step-ca
Rekeying a JWK provisioner
-
Update the provisioner.
Run the following, changing the provisioner name in the command to match your configuration:
step ca provisioner update you@smallstep.com --create -
Send a
SIGHUPtostep-cato reload the configuration file.(Skip this step if you have enabled remote provisioner administration.)
killall -i -s SIGHUP step-ca
Removing the encrypted private key from a JWK provisioner
The encrypted private key stored in the JWK provisioner configuration and published to the public /provisioners endpoint is provided for client convenience.
It is not required for step-ca to operate.
To remove this key:
-
Update the provisioner.
Run the following, changing the provisioner name in the command to match your configuration:
step ca provisioner update you@smallstep.com --private-key "" -
Send a
SIGHUPtostep-cato reload the configuration file.(Skip this step if you have enabled remote provisioner administration.)
killall -i -s SIGHUP step-ca
OAuth/OIDC single sign-on
Sometimes it's useful to issue certificates to people.
So step-ca supports single sign-on with identity providers (IdPs) like Google, Okta, Microsoft Entra ID, Keycloak,
or any other provider that supports OAuth's OpenID Connect extension.
OpenID Connect is an extension to OAuth 2.0 that adds an identity layer. Providers that support OIDC can issue identity tokens ("ID tokens") to OAuth clients. These are JSON Web Tokens (JWTs) containing user identity information (eg. full name, username, email address). Like certificates, OIDC tokens have a validity period and are cryptographically signed by a trust authority (the OAuth provider).
Here's an example OIDC identity token issued by Google:
{
"alg": "RS256",
"kid": "cd49b2ab16e1e9a496c8239dac0dadd09d443012",
"typ": "JWT"
}.{
"iss": "https://accounts.google.com",
"azp": "1087160488420-8qt7bavg3qesdhs6it824mhnfgcfe8il.apps.googleusercontent.com",
"aud": "1087160488420-8qt7bavg3qesdhs6it824mhnfgcfe8il.apps.googleusercontent.com",
"sub": "115449349109627210866",
"hd": "smallstep.com",
"email": "mike@smallstep.com",
"email_verified": true,
"at_hash": "lE6o-GdMpurFQ0WrJ9-H7g",
"nonce": "5f5820880a43c3f50d55ce79af15430b14b4059bdf4efbe717da6af8bfc53122",
"iat": 1621877714,
"exp": 1621881314
}.[Signature]
The OIDC provisioner in step-ca can be configured to trust and accept an OAuth provider's ID tokens for authentication.
By default, the issued certificate will use the subject (sub) claim from the identity token as its subject.
The value of the token's email claim is also included as an email SAN in the certificate.

Fig. 3: diagram of how step works with individuals using a single sign-on provisioner
From the user's perspective, when requesting a certificate, step detects the OIDC provisioner and initiates the OAuth login flow automatically:
$ step ca certificate mike@smallstep.com mike.crt mike.key
✔ Key ID: 650445034027-jsjdrkiskeq9ke99ud2rqkst82ft8uch.apps.googleusercontent.com (Google)
✔ CA: https://ca.internal
✔ Certificate: mike.crt
✔ Private Key: mike.key
$ step certificate inspect --short mike.crt
X.509v3 TLS Certificate (ECDSA P-256) [Serial: 2581...6739]
Subject: 115449349109627210866
mike@smallstep.com
Issuer: Smallstep Intermediate CA
Provisioner: Google [ID: 6504....com]
Valid from: 2019-06-20T18:21:52Z
to: 2019-06-21T18:21:52ZConfiguring your identity provider (IdP)
When creating an OAuth app, there isn't much to configure on the IdP.
Most providers will ask you to specify a Redirect URI, where the ID token will be delivered at the end of the OAuth flow.
Since step starts its own local web server to receive the token, use http://127.0.0.1 as the Redirect URI.
Example: Google identity
One of the most common providers, and the one used in the following example, is Google Identity.
Add a Google provisioner:
$ step ca provisioner add Google --type oidc \
--client-id 650445034027-jsjdrkiskeq9ke99ud2rqkst82ft8uch.apps.googleusercontent.com \
--client-secret 6Q7lGMua_Oox4nA92QBXYypT \
--configuration-endpoint https://accounts.google.com/.well-known/openid-configuration \
--domain smallstep.com --domain gmail.com
Example ca.json provisioner configuration for a Google provisioner:
{
"type": "OIDC",
"name": "Google",
"clientID": "1087160488420-8qt7bavg3qesdhs6it824mhnfgcfe8il.apps.googleusercontent.com",
"clientSecret": "udTrOT3gzrO7W9fDPgZQLfYJ",
"configurationEndpoint": "https://accounts.google.com/.well-known/openid-configuration",
"admins": ["you@smallstep.com"],
"domains": ["smallstep.com"],
"scopes": ["openid", "email"],
"listenAddress": ":10000",
"claims": {
"maxTLSCertDuration": "8h",
"defaultTLSCertDuration": "2h",
"disableRenewal": true
},
"options": {
"x509": {
"templateFile": "templates/certs/x509/default.tpl"
},
"ssh": {
"templateFile": "templates/certs/ssh/default.tpl"
}
}
}
-
type: indicates the provisioner type and must be OIDC.
-
name: a string used to identify the provider when the CLI is used.
-
clientID: the client id provided by the identity provider used to initialize the authentication flow.
-
clientSecret: the shared secret provided by the identity provider; used to get the id token during the OAuth flow. Some identity providers may use an empty string as a secret. In the context of
step-ca, the client "secret" is not actually a secret and is available via the CA's/provisionersconfiguration endpoint, because everystepclient needs to use it locally. -
configurationEndpoint: is the HTTP address used by the CA to get the OpenID Connect configuration and public keys used to validate the tokens.
-
admins*: These privileged users may request certificates with arbitrary subject names (custom SANs). Non-privileged users may only request certificates for their email address.
-
domains*: is the list of domains valid. If provided only the emails with the provided domains will be able to authenticate.
-
scopes: a list of scopes OAuth clients should request. This is used by the
stepCLI. The default value is["openid","email"]. -
listenAddress*: is the address (
:portorhost:port) where the authorization server will redirect the client's web browser at the end of the authorization flow. By default, thestepclient will bind to 127.0.0.1 on a random port. This parameter is only required if the authorization server demands a specific port for loopback IP redirect URIs. -
claims*: overwrites the default claims set in the authority, see the claims section for all the options.
-
options*: see template configuration for more details.
Browserless console mode
For OpenID Connect, by default, step opens a web browser to run the Authorization Code flow with PKCE.
Sometimes it's helpful to use OAuth in an input-constrained environment where no web browser is available.
The Device Authorization Grant flow (aka "Device Flow") is an OAuth 2.0 extension designed for this scenario.
The step client supports the Device Authorization Grant flow.
To use the Device Authorization Grant flow for input-constrained devices, run:
$ step ca certificate foo foo.crt foo.key --console
or
$ STEP_CONSOLE=true step ssh certificate carl carl.crt
Notes
Why is the OAuth client secret unprotected?
When using the OIDC provisioner, you may notice that your OAuth client secret is visible to anyone via the CA's /provisioners API endpoint.
Counterintuitively, this is a secure implementation of OAuth that conforms to the OAuth Best Current Practices for Native Apps (RFC8252 / IETF BCP212).
And it is the same approach that Google's gcloud CLI tool uses for Google Cloud Platform authentication: An OAuth client secret is hardcoded into its source code.
So, what makes it secure?
The Authorization Code flow for native OAuth apps requires the redirect URI hostname be hardcoded as 127.0.0.1 (or localhost) in the client configuration.
This constraint obviates the need for a client secret, because the loopback address is inherently resistant to network attacks that the client secret is designed to mitigate in other, non-native app flows.
An attacker in posession of the client secret would need local access to your device in order to compromise the flow. OAuth in general is not very resistant to local attacks, so the threat model for the native app flow with an exposed client secret is the same as with any other OAuth flow: It assumes that if you have a local attacker on your device, it's unlikely that this kind of attack is going to be your biggest threat.
The client secret is superfluous in the Authorization Code flow for native apps. In fact, BCP212 has recommended that OAuth identity providers offer a special OAuth client type that has no client secret. In practice, very few OAuth providers have implemented this "secretless" approach, so we don't yet support it. Functionally, however, it is equivalent to having a public secret.
Bottom line, the OAuth flow implemented in step and step-ca is widely vetted and considered secure.
Further reading
- Tutorial: Use Keycloak to issue user certificates with step-ca
- Tutorial: Connect your identity provider and issue X.509 certificates for user authentication to services
X5C - X.509 certificate
With the X5C provisioner, a client can authenticate a certificate request using an existing X.509 certificate from a different CA. It allows clients to use a different PKI to bootstrap trust. Configure this provisioner with a root CA certificate, and any certificate that chains up to that root can be used in a certificate request.
May I configure my CA's X5C provisioner accept its own root?
We do not recommend it, because it will allow any user with a valid certificate from your PKI to get any kind of certificate. Configure X5C with the root of a more restricted CA, to ensure only specific people or machines can use the provisioner.
- Clients may request an X.509 or SSH certificate
- Clients must provide an X.509 certificate bundle whose root is trusted by the provisioner
- Clients sign their request with the certificate private key
- The validity period of the new certificate must fall within the validity period of the certificate used to authenticate the request
The X5C provisioner uses X5C tokens for authentication. An X5C token is a JWT, signed by the certificate private key, with an x5c header that contains the certificate bundle.
Example
If you would like any certificate signed by step-ca to become a provisioner
(have the ability to request new certificates with any name),
you can create an X5C provisioner using the root certificate used by
step-ca, like so:
step ca provisioner add x5c-smallstep --type X5C --x5c-root $(step path)/certs/root_ca.crt
Or, you can configure the X5C provisioner with an outside root, granting provisioner capabilities to a completely separate PKI.
Below is an example of an X5C provisioner in the ca.json:
...
{
"type": "X5C",
"name": "x5c",
"roots": "LS0tLS1 ... Q0FURS0tLS0tCg==",
"claims": {
"maxTLSCertDuration": "8h",
"defaultTLSCertDuration": "2h",
"disableRenewal": true
},
"options": {
"x509": {
"templateFile": "templates/certs/x509/default.tpl"
},
"ssh": {
"templateFile": "templates/certs/ssh/default.tpl"
}
}
}
-
type: indicates the provisioner type and must be
X5C. -
name: a string used to identify the provider when the CLI is used.
-
roots: a base64 encoded list of root certificate PEM blocks used for validating X5C tokens.
-
claims*: overwrites the default claims set in the authority, see the claims section for all the options.
-
options*: see template configuration for more details.
By default, the X5C provisioner will issue a certificates for any Subject names.
If you want to limit or modify the subject names this provisioner will issue,
you can use a certificate template.
For example, say your users will use the X5C provisioner to exchange an X.509 client certificate for an SSH user certificate.
The X.509 client certificate has alice@example.com as its subject,
and you want to ensure the SSH certificate has both alice and alice@example.com as principals.
The following template will make that scenario possible:
{
"type": {{ toJson .Type }},
"keyId": {{ toJson .AuthorizationCrt.Subject.CommonName }},
"principals": [
{{ replace "@example.com" "" .AuthorizationCrt.Subject.CommonName | toJson }},
{{ toJson .AuthorizationCrt.Subject.CommonName }}
],
"extensions": {{ toJson .Extensions }},
"criticalOptions": {{ toJson .CriticalOptions }}
}
Nebula
This is an experimental feature.
If you have a Nebula overlay network, you can create a Nebula provisioner and configure it with your Nebula root CA certificate.
Clients can then use their Nebula client certificate and private key to request an X.509 or SSH host certificate from step-ca.
The Nebula certificate they use for authentication must be issued by the Nebula root CA configured in the provisioner.
The Nebula client certificate is used for authorization, too:
the client is allowed to request an X.509 or SSH host certificate with the name or any of the ips appearing on the Nebula client certificate.
To be clear, Nebula certificates can contain a single name and a list of ips.
The name field is often a DNS hostname, but it could be an email, IP, or URI.
And ips contains a list of CIDR blocks.
In step-ca, the Nebula provisioner will authorize certificate subjects or SANs that include the name, plus IPs in any of the CIDR blocks in ips on the Nebula certificate.
To get started, create a Nebula provisioner:
step ca provisioner add --type Nebula --nebula-root /etc/nebula/ca.crt
Now you can get an X509 certificate with the Nebula provisioner, using a Nebula client certificate. Here's an example using the DNS name host3.example.com, and two IPs:
step ca certificate host3.example.com host3.crt host3.key \
--nebula-cert /etc/nebula/client.crt \
--nebula-key /etc/nebula/client.key \
--san 192.168.100.2 \
--san 192.168.100.3
SSHPOP - SSH certificate
An SSHPOP provisioner allows a client to renew, revoke, or rekey an SSH certificate using that certificate for authentication with the CA. The renew and rekey methods can only be used on SSH host certificates.
An SSHPOP provisioner is configured with the user and host root ssh certificates
from the ca.json. The SSHPOP provisioner can only authenticate SSHPOP tokens
generated using SSH certificates created by step-ca.
An SSHPOP token is a JWT, signed by the certificate private key, with an sshpop
header that contains the SSH certificate.
When configured with the --ssh option (step ca init --ssh), the CA
will contain a default SSHPOP provisioner named sshpop.
Example
Add an SSHPOP provisioner:
step ca provisioner add sshpop --type SSHPOP
An example SSHPOP provisioner in the ca.json:
...
{
"type": "SSHPOP",
"name": "sshpop",
"claims": {
"enableSSHCA": true
},
"options": {
"ssh": {
"templateFile": "templates/certs/ssh/default.tpl"
}
}
}
-
type: indicates the provisioner type and must be
SSHPOP. -
name: a string used to identify the provider when the CLI is used.
-
claims*: overwrites the default
claimsset in the authority, see the claims section for all the options. -
options*: see template configuration for more details.
ACME
The ACME Protocol can authenticate Certificate Signing Requests (CSRs) in a way that enables automation.
ACME clients must answer challenges presented by the ACME server to prove to the CA that they control the identifiers listed in the CSR.
ACME supports four different types of challenges: http-01, dns-01, tls-alpn-01 for server certificates, and device-attest-01 for device certificates. These are designed for operability in different environments.
See ACME Basics for a description of each challenge type and their tradeoffs.
The ACME provisioner in step-ca supports issuing X.509 certificates using IP, hostname, and device identifiers.
Example
Add an ACME provisioner:
step ca provisioner add acme-example --type ACME
This will add an ACME server to step-ca.
ACME clients are commonly configured with an ACME directory URL.
If your CA is hosted at ca.internal, and you run the above command, your ACME server directory URL will be https://ca.internal/acme/acme-example/directory.
To configure popular ACME clients to use step-ca, see our tutorial on the subject.
Here's an example of an ACME provisioner configuration in ca.json:
...
{
"type": "ACME",
"name": "acme-example",
"forceCN": true,
"claims": {
"maxTLSCertDuration": "8h",
"defaultTLSCertDuration": "2h"
},
"termsOfService": "",
"website": "",
"caaIdentities": [],
"challenges": [
"http-01",
"dns-01",
"tls-alpn-01"
],
"attestationFormats": [
"apple",
"step",
"tpm"
],
"attestationRoots": "",
"options": {
"x509": {
"templateFile": "templates/certs/x509/default.tpl"
}
}
}
-
type: indicates the provisioner type and must be
ACME. -
name: a string used to identify the provider when the CLI is used.
-
forceCN*: force one of the SANs to become the Common Name, if a common name is not provided.
-
claims*: overwrites the default claims set in the authority, see the claims section for all the options.
-
options*: see template configuration for more details.
-
termsOfService*: contains a URL pointing to the ACME server's terms of service. Defaults to empty.
-
website*: contains a URL pointing to more information about the ACME server. Defaults to empty.
-
caaIdentities*: an array of hostnames that the ACME server identifies itself with. These hostnames can be used by ACME clients to determine the correct issuer domain name to use when configuring CAA records. Defaults to empty array.
-
challenges*: which ACME challenge types are allowed. By default,
device-attest-01,wire-oidc-01andwire-dpop-01are disabled. -
attestationFormats*: which attestation formats are allowed for
device-attest-01challenges. Valid values areapple,step, andtpm. By default, all formats are enabled. -
attestationRoots*: a CA trust bundle that will be used to verify attestation certificates. A base64-encoded string is expected. To generate this string, create a single PEM bundle containing all trusted CA certificates for the provisioner, then base64 encode the bundle. The default value of attestationRoots depends on the value of attestationFormats. If provided, this PEM bundle will override the CA default trust roots established by setting attestationFormats.
See ACME Basics
for more guidance on configuring and using the ACME protocol with step-ca.
ACME for device attestation
🚧 read before digging
step-ca is focused on being a great CA for protecting cloud resources and DevOps workloads.
It is not a complete solution for device identity.
Its ACME Device Attestation support
is a reference implementation of the device-attest-01 RFC.
For a complete device identity solution, you will need a lot more:
a complete device inventory,
a production solution for dynamic SCEP,
a TPM Attestation CA,
cross-platform ACME Device Attestation clients,
OCSP,
logging,
high availability,
and so on.
You should talk to our sales team before building all of that.
We offer an off-the-shelf,
comprehensive device identity solution
to ensure that only corporate owned devices can access sensitive infrastructure and resources.
This challenge type is not enabled by default and must be explicitly enabled.
Attestation statement formats
The device-attest-01 challenge response
uses a variant of the WebAuthn attestation statement format
adapted for ACME.
The variations are specified in
IETF draft-acme-device-attest.
step-ca supports device attestation statements
in tpm, apple, and step formats.
- The
tpmformat is a variant of the WebAuthn TPM Attestation statement. By default, it does not add trust for any CAs. You must add the trust roots of an attestation CA, via theattestationRootsconfiguration. - The
appleformat is a variant of WebAuthn Apple Anonymous Attestation format, compatible with Apple's Managed Device Attestation (MDA). By default, it adds trust for Apple's Enterprise CA. - The
stepformat is a variant of WebAuthnpackedattestation format. It is designed for non-TPM devices that can issue attestation certificates, such as YubiKey PIV. It adds trust for Yubico's root CA.
☠️ Careful!
By enabling a device-attest-01 provisioner configured for apple or step attestation formats,
you are forming a trust relationship with Apple or Yubico CAs.
Your provisioner will issue certificates
to any Apple or Yubico device with an attestation certificate.
Therefore,
you must explicitly restrict the provisioner
to only issue certificates to your devices.
Device attestation for Apple devices
To add a device-attest-01 provisioner
for use with Managed Device Attestation on Apple devices,
run:
step ca provisioner add acme-da \
--type ACME \
--challenge device-attest-01 \
--attestation-format apple
☠️ Apple's device attestation CA will be trusted by the provisioner. Without policy restrictions, the provisioner may issue certificates for any Apple device.
In your Apple MDM profile, you will need:
- A
CertificateRootpayload, containing your root CA certificate PEM block, so that it's trusted by the device. - An
ACMECertificatepayload. For this one, set theClientIdentifierto the UDID or serial number of the device. - Set
HardwareBoundtotrue
Device attestation for YubiKeys
To add a device-attest-01 provisioner for YubiKey devices, run:
step ca provisioner add acme-da \
--type ACME \
--challenge device-attest-01 \
--attestation-format step
☠️ Yubico's attestation CA will be trusted by the new provisioner. Without policy restrictions, the provisioner may issue certificates for any YubiKey.
To get a client certificate for a hardware-bound private key on your YubiKey:
-
Create a
device-attest-01provisioner as described above. -
Install
step-kms-plugin -
Insert the YubiKey.
-
Generate a private key in one of the YubiKey's slots, if you haven't already. In this example, we'll use slot
9a. Run:step kms create 'yubikey:slot-id=9a' \ --kms 'yubikey:?pin-value=123456'
-
Get a certificate for the YubiKey from
step-ca. Substitute the serial number of your YubiKey here:{ YUBIKEY_SERIAL_NO=123EXAMPLE90 step ca certificate \ --attestation-uri 'yubikey:slot-id=9a?pin-value=123456' \ --provisioner acme-da \ $YUBIKEY_SERIAL_NO yubikey.crt }
Device attestation for TPM 2.0
While step-ca supports the tpm attestation format of ACME device-attest-01,
an end-to-end TPM-bound client certificate flow is not available at this time.
A device needs to provide an attestation certificate in its response to an ACME device-attest-01 challenge.
Apple has an online attestation authority service for this.
Yubico offers attestation certificates on their devices.
But we have not seen a public or open source attestation authority that can issue attestation certificates for TPMs.
TPMs also have privacy constraints and a wide range of use case-specific validation requirements that complexify attestation flows.
A complete TPM attestation flow and attestation authority is available in Smallstep's commercial platform. We offer cloud SaaS and on-prem hosting options. Learn More...
ACME for Wire messenger clients
The challenge types for Wire clients must be explicitly enabled in an ACME provisioner. Currently the configuration can only be done through editing the configuration file.
The wire-oidc-01 and wire-dpop-01 challenges enable step-ca to issue certificates to Wire messenger clients.
Wire clients make use of a user and a device identity, both of which are challenged and verified, after which the identities are combined into a single X.509 certificate.
Here's an example of an ACME provisioner with Wire support enabled in $(step path)/config/ca.json:
...
{
"type": "ACME",
"name": "wire",
"claims": {
"maxTLSCertDuration": "2160h",
"defaultTLSCertDuration": "1440h"
},
"challenges": [
"wire-oidc-01",
"wire-dpop-01"
],
"options": {
"x509": {
"template":
"{
\"subject\": {
\"organization\": \"example.com\",
\"commonName\": {{ toJson .Oidc.name }}
},
\"uris\": [{{ toJson .Oidc.preferred_username }}, {{ toJson .Dpop.sub }}],
\"keyUsage\": [\"digitalSignature\"],
\"extKeyUsage\": [\"clientAuth\"]
}"
},
"wire": {
"oidc": {
"provider": {
"discoveryBaseUrl": "https://accounts.example.com/.well-known/openid-configuration",
"issuerUrl": "https://accounts.example.com",
"authorizationUrl": "https://accounts.example.com/o/oauth2/v2/auth",
"tokenUrl": "https://oauth2.example.com/token",
"jwksUrl": "https://www.example.com/oauth2/v3/certs",
"userInfoUrl": "https://openidconnect.example.com/v1/userinfo",
"signatureAlgorithms": [
"RS256",
"ES256",
"ES384",
"EdDSA"
]
},
"config": {
"clientId": "wireapp",
"signatureAlgorithms": [
"RS256",
"ES256",
"ES384",
"EdDSA"
]
},
"transform": "{\"name\": \"{{ .name }}\", \"preferred_username\": \"{{ .preferred_username }}\"}"
},
"dpop": {
"key": "base64(public.pem)",
"target": "https://wire-server.example.com/clients/{{ .DeviceID }}/access-token"
}
}
}
}
- challenges: to enable the Wire integration,
wire-oidc-01andwire-dpop-01must be set. - options*: with the Wire integration enabled, the certificate template can include (transformed) properties from the OIDC and DPoP tokens (for example,
.Oidc.preferred_username, and.Dpop.sub). See template configuration for more template configuration details. - discoveryBaseUrl*: sets the OIDC discovery URL, automatically configuring the OIDC provider. If provided, the other
oidcconfiguration options are ignored. - issuerUrl*: sets the OIDC issuer URL. Ignored if
discoveryBaseUrlis set. - authorizationUrl*: sets the OIDC authorization URL. Ignored if
discoveryBaseUrlis set. - tokenUrl*: sets the OIDC token URL. Ignored if
discoveryBaseUrlis set. - jwksUrl*: sets the OIDC JWKS URL. Ignored if
discoveryBaseUrlis set. - userInfoUrl*: sets the OIDC userInfo URL. Ignored if
discoveryBaseUrlis set. - provider.signatureAlgorithms*: sets the supported OIDC signature algorithms. Ignored if
discoveryBaseUrlis set. - clientId: sets the OIDC client ID used in OIDC token validation.
- config.signatureAlgorithms*: sets the OIDC signature algorithms to be used in validation.
- transform*: a Go template that can be used to map and/or transform properties in the OIDC token. Different SSO IdPs include different claims in their OIDC tokens. Using this
transformtemplate, the tokens are verified first, then transformed and persisted. Transformation uses the same engine as our certificate template engine, and it's thus possible to use the same functions available for certificate templates. The properties from the transformed token can be referenced in the certificate template configured in thex509option. Documentation for creating and using templates can be found here. - key: the base64 encoded PEM public key corresponding to the private key that signs the DPoP token.
- target: a templated URL pointing to the token issuer (the Wire server). The value of
DeviceIDis evaluated when the certificate is requested.
SCEP
The SCEP provisioner can sign and renew certificates using the SCEP protocol (RFC8894). SCEP is very popular for use in network equipment and mobile device management (MDM). It runs over HTTP using POSTed binary data or base64-encoded GET parameters, using CMS (PKCS#7) and CSR (PKCS#10) data formats. A (shared) secret authenticates clients to the CA.
The SCEP provisioner does not support "dynamic SCEP" workflows with single-use secrets, such as Intune or Jamf. Our commercial platform adds these workflows.
Requirements
Your CA must use an RSA intermediate CA, even if your client supports ECDSA.
The RSA intermediate is used to decrypt the contents of the SCEP pkcsPKIEnvelope containing the certificate request.
This operation cannot be performed using an ECDSA key.
Because step ca init creates an ECDSA chain by default, you will need to convert your CA to use an RSA CA chain before using the SCEP provisioner.
Note: Some SCEP clients may fail if the intermediate CA certificate does not contain the right key usage extensions or does contain otherwise unexpected content. Consult the documentation of your SCEP client for specific configuration required or ask us on Discord or in GitHub Discussions if you hit a blocker.
Configure the provisioner
In this example, we will add a SCEP provisioner using challenge secret secret1234 and AES-256-CBC as the encryption algorithm:
step ca provisioner add my_scep_provisioner \
--type SCEP --challenge "secret1234" \
--encryption-algorithm-identifier 2
The shared challenge should be a value that you will distribute to your SCEP clients.
Here's an example of a SCEP provisioner in $(step path)/config/ca.json:
{
"type": "SCEP",
"name": "my_scep_provisioner",
"forceCN": true,
"challenge": "secret1234",
"minimumPublicKeyLength": 2048,
"includeRoot": true,
"encryptionAlgorithmIdentifier": 2,
}
- forceCN*: force one of the SANs to become the Common Name, if a common name is not provided in the CSR. Defaults to false.
- challenge*: is the secret shared between the provisioner and SCEP clients. By default no secret is used. Ignored when a
SCEPCHALLENGEwebhook is configured. - minimumPublicKeyLength*: the minimum length of RSA public keys submitted by a client. Defaults to 2048.
- includeRoot*: the root CA certificate will be returned in responses to
GetCACertrequests in addition to the intermediate CA certificate. This option was added to support a specific use case for the macOS SCEP client (see certificates#746 for more details). Defaults to false. - excludeIntermediate*: excludes the intermediate CA certificate from being returned in responses to
GetCACertrequests. Defaults to false. - encryptionAlgorithmIdentifier*: sets the encryption algorithm used for encrypting the request content. Defaults to 0:
DES-CBCfor legacy compatibility. - decrypterCertificate*: a base64 PEM encoded RSA public key certificate to which clients can encrypt requests. When not provided, the CA certificate is used for this purpose.
- decrypterKeyPEM*: a base64 PEM encoded RSA private key, corresponding to the
decrypterCertificate. Used to decrypt requests from clients. Ignored ifdecrypterKeyURIis provided. - decrypterKeyURI*: a KMS URI for an RSA private key, corresponding to the
decrypterCertificate. Used to decrypt requests from clients. Takes precedence overdecrypterKeyPEM. - decrypterKeyPassword*: password for the RSA private key.
If you don't want to rely on a single, static secret, you can configure a SCEPCHALLENGE webhook instead.
When a SCEP client requests a certificate, the webhook server will receive a request with the scepChallenge and scepTransactionID properties from the SCEP request.
The webhook server can then decide if the request is allowed or not.
Enable the HTTP server
By default SCEP will only be served via HTTPS.
Most SCEP clients use HTTP, so you will most likely need your CA to listen using HTTP too, which it does not do by default.
Enable this by filling in the "insecureAddress" property to your top-level CA configuration:
...
"insecureAddress": ":8080",
...
Finally, restart step-ca.
Your SCEP provisioner is now available at the endpoint http://ca.example.com:8080/scep/my_scep_provisioner.
Note: Some SCEP clients expect a specific path segment at the end of the SCEP URL (Cisco Catalyst switches, for example). For compatibility with these clients, the SCEP provisioner is also made available at any path segment beneath the configured provisioner endpoint.
K8sSA - Kubernetes service account
A K8sSA provisioner allows a client to request a certificate from the server using a Kubernetes Service Account Token.
As of the time when this provisioner was coded, the Kubernetes Service Account API for retrieving the token from a running instance was still in beta. Therefore, our K8sSA provisioner must be configured with the public key that will be used to validate K8sSA tokens.
K8sSA tokens are very minimal. No place exists for SANs, or other details that a user may want validated in a CSR. It is essentially a bearer token. Therefore, at this time a K8sSA token can be used to sign a CSR with any SANs. Said differently, the K8sSA provisioner does little to no validation on the CSR before signing it. You should only configure and use this provisioner if you know what you are doing. If a malicious user obtains the private key they will be able to create certificates with any SANs and Subject.
Example
Add a K8sSA provsioner:
step ca provisioner add my-kube-provisioner --type K8sSA --pem-keys key.pub
An example of a K8sSA provisioner in the ca.json:
...
{
"type": "K8sSA",
"name": "my-kube-provisioner",
"publicKeys": "LS0tLS1...LS0tCg==",
"claims": {
"maxTLSCertDuration": "8h",
"defaultTLSCertDuration": "2h"
},
"options": {
"x509": {
"templateFile": "templates/certs/x509/default.tpl"
}
}
}
-
type: indicates the provisioner type and must be
K8sSA. -
name: a string used to identify the provider when the CLI is used.
-
publicKeys: a base64 encoded list of public keys used to validate K8sSA tokens.
-
claims*: overwrites the default claims set in the authority, see the claims section for all the options.
-
options*: see template configuration for more details.
Cloud provisioners
step-ca can be configured to use instance identity documents (IIDs) to authorize certificate signing requests from cloud VMs running on AWS, GCP, or Azure.
IIDs are signed JSON tokens, created when the instance is launched, and made available via the instance metadata API.
Here's the contents of an example IID from AWS:
{
"devpayProductCodes" : null,
"marketplaceProductCodes" : [ "1abc2defghijklm3nopqrs4tu" ],
"availabilityZone" : "us-west-2b",
"privateIp" : "10.158.112.84",
"version" : "2017-09-30",
"instanceId" : "i-1234567890abcdef0",
"billingProducts" : null,
"instanceType" : "t2.micro",
"accountId" : "123456789012",
"imageId" : "ami-5fb8c835",
"pendingTime" : "2016-11-19T16:32:11Z",
"architecture" : "x86_64",
"kernelId" : null,
"ramdiskId" : null,
"region" : "us-west-2"
}
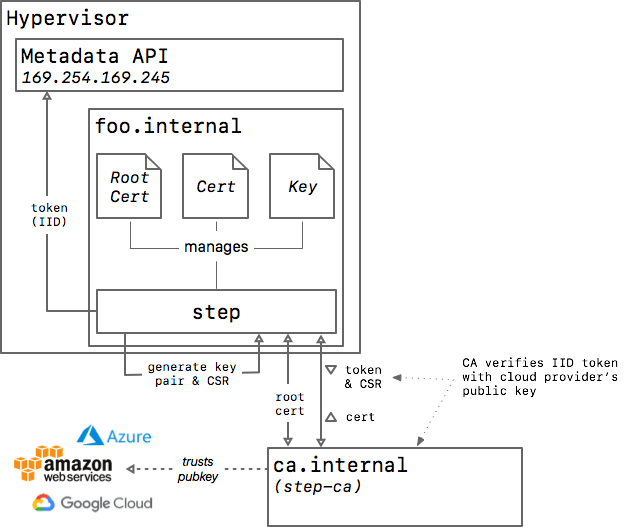
Fig. 2: diagram of how step works with a cloud service as the provisioner
Once you’ve configured step-ca to accept IIDs for authentication,
step will detect the provisioner type,
obtain an IID token from your cloud provider's metadata API,
and use it to obtain a certificate from step-ca.
From the CA's perspective, an IID is a single-use token.
A host can only get one certificate, ever, per IID.
A host can then renew its certificate using step ca renew.
If the certificate ever expires, the host will need to use a different provisioner to issue a new one.
Security risks and limitations
While IIDs simplify the integration of step-ca, the approach comes with risks.
Unfortunately, an IID usually doesn't contain enough information to authenticate a host certificate. For example, while an IID may contain the private or public IP for the host, it will not contain all of the DNS names and IP addresses that you may want on the certificate.
Because of this, step-ca's cloud provisioners use the Trust on First Use (TOFU) security model,
allowing any instance to get a certificate with any names (SANs) on it.
This allows for a "cryptographic perimeter": if a host presents a certificate that was signed by your CA using a cloud provisioner, and the CA is configured to verify the instance's account, project, or tenant ID in the IID, you can have some confidence that the request came from your infrastructure (not someone else's), but you cannot assume that the names on the certificate are authentic.
Because of this, every host in your infrastructure must be trusted.
Mitigating the risk of IIDs
Here are some things you can do to mitigate risk when using IIDs:
- Configure the provisioner with
instanceAge. The IID will effectively "expire" if it's not used withininstanceAgeafter the instance is launched. - Use a trusted launch configuration / User Data script to obtain a certificate.
Coupled with
instanceAge, this will give you more assuance that the names on your certificates can be trusted. - Restrict provisioning by your cloud provider account or project IDs.
Configure the provisioner's
accounts(AWS) orprojectIDs(GCP) setting. - Disable Custom SANs, if possible.
When using the
disableCustomSANssetting, the CA will only issue certificates with authentic names extracted from the signed instance identity document. Unfortunately, the names on the IID may not be the names that you use to refer to your servers and services. - Instances that don't obtain a certificate are a risk.
Anyone with access to the instance will be able to obtain a certificate binding any names,
so long as the instance is younger than
instanceAge. Consider requesting certificates even for instances that will never use them, so that the IID cannot later be used by an attacker.
Many details must be configured correctly to make this model secure, and many of these details are environment-dependent and beyond the scope of this document.
AWS
The AWS provisioner allows granting a certificate to an Amazon EC2 instance using the Instance Identity Documents
The step CLI will generate a custom JWT
token containing the instance identity document and its signature and the CA
will grant a certificate after validating it.
Example
Find your AWS account ID to restrict access to our VMs:

On the host running step-ca add an AWS provisioner to your configuration by running:
step ca provisioner add "AWS IID Provisioner" --type AWS --aws-account 123456789042
In the ca.json, an AWS provisioner looks like:
{
"type": "AWS",
"name": "Amazon Web Services",
"accounts": ["123456789042"],
"disableCustomSANs": false,
"disableTrustOnFirstUse": false,
"instanceAge": "1h",
"claims": {
"maxTLSCertDuration": "2160h",
"defaultTLSCertDuration": "2160h"
},
"options": {
"x509": {
"templateFile": "templates/certs/x509/default.tpl"
}
}
}
-
type: indicates the provisioner type and must be
AWS. -
name: a string used to identify the provider when the CLI is used.
-
accounts*: the list of AWS account numbers that are allowed to use this provisioner. If none is specified, all AWS accounts will be valid.
-
disableCustomSANs*: by default custom SANs are valid, but if this option is set to true only the SANs available in the instance identity document will be valid, these are the private IP and the DNS
ip-<private-ip>.<region>.compute.internal. -
disableTrustOnFirstUse*: by default only one certificate will be granted per instance, but if the option is set to true this limit is not set and different tokens can be used to get different certificates.
-
instanceAge*: The maximum age of an instance that should be allowed to obtain a certificate. Limits certificate issuance to new instances to mitigate the risk of credential-misuse from instances that don't need a certificate.
-
claims*: overwrites the default claims set in the authority, see the claims section for all the options.
-
options*: see template configuration for more details.
GCP
The GCP provisioner grants certificates to Google Compute Engine instance using its identity token. The CA will validate the JWT and grant a certificate.
Example
On the host running step-ca, add an GCP provisioner to your configuration by running:
step ca provisioner add Google --type GCP \
--gcp-service-account 1234567890-compute@developer.gserviceaccount.com \
--gcp-service-account 9876543210-compute@developer.gserviceaccount.com \
--gcp-project identity --gcp-project accounting
In the ca.json, a GCP provisioner looks like:
{
"type": "GCP",
"name": "Google Cloud",
"serviceAccounts": ["1234567890"],
"projectIDs": ["project-id"],
"organizationID": "organization-id",
"disableCustomSANs": false,
"disableTrustOnFirstUse": false,
"instanceAge": "1h",
"claims": {
"maxTLSCertDuration": "2160h",
"defaultTLSCertDuration": "2160h"
},
"options": {
"x509": {
"templateFile": "templates/certs/x509/default.tpl"
}
}
}
-
type: indicates the provisioner type and must be
GCP. -
name: a string used to identify the provider when the CLI is used.
-
serviceAccounts*: the list of service account numbers that are allowed to use this provisioner. If none is specified, all service accounts will be valid. -
projectIDs*: the list of project identifiers that are allowed to use this provisioner. If non is specified all project will be valid.
-
organizationID: an optional GCP organization ID. If provided, the provisioner will verify that the project ID in the token belongs to the GCP organization, using the
projects.getAncestrycall in the Cloud Resource Manager API. -
disableCustomSANs*: by default custom SANs are valid, but if this option is set to true only the SANs available in the instance identity document will be valid, these are the DNS
<instance-name>.c.<project-id>.internaland<instance-name>.<zone>.c.<project-id>.internal -
disableTrustOnFirstUse*: by default only one certificate will be granted per instance, but if the option is set to true this limit is not set and different tokens can be used to get different certificates.
-
instanceAge*: The maximum age of an instance that should be allowed to obtain a certificate. Limits certificate issuance to new instances to mitigate the risk of credential-misuse from instances that don't need a certificate.
-
claims*: overwrites the default claims set in the authority, see the claims section for all the options.
-
options*: see template configuration for more details.
Azure
The Azure provisioner grants certificates to Microsoft Azure instances using the managed identities tokens. The CA will validate the JWT and grant a certificate.
Example
On the host running step-ca, add an Azure provisioner to your configuration by running:
step ca provisioner add Azure --type Azure \
--azure-tenant bc9043e2-b645-4c1c-a87a-78f8644bfe57 \
--azure-resource-group identity --azure-resource-group accounting
In the ca.json, an Azure provisioner looks like:
{
"type": "Azure",
"name": "Microsoft Azure",
"tenantId": "b17c217c-84db-43f0-babd-e06a71083cda",
"resourceGroups": ["backend", "accounting"],
"audience": "https://management.azure.com/",
"disableCustomSANs": false,
"disableTrustOnFirstUse": false,
"claims": {
"maxTLSCertDuration": "2160h",
"defaultTLSCertDuration": "2160h"
},
"options": {
"x509": {
"templateFile": "templates/certs/x509/default.tpl"
}
}
}
-
type: indicates the provisioner type and must be
Azure. -
name: a string used to identify the provider when the CLI is used.
-
tenantId: the Azure account tenant id for this provisioner. This id is the Directory ID available in the Microsoft Entra ID properties.
-
audience*: defaults to
https://management.azure.com/but it can be changed if necessary. -
resourceGroups*: the list of resource group names that are allowed to use this provisioner. If none is specified, all resource groups will be valid.
-
disableCustomSANs*: by default custom SANs are valid, but if this option is set to true only the SANs available in the token will be valid, in Azure only the virtual machine name is available.
-
disableTrustOnFirstUse*: by default only one certificate will be granted per instance, but if the option is set to true this limit is not set and different tokens can be used to get different certificates.
-
claims*: overwrites the default claims set in the authority, see the claims section for all the options.
-
options*: see template configuration for more details.
Last updated on February 3, 2026
Introducing
Device Identity
Ensure that only company-owned devices can access your enterprise's most sensitive resources.