Configure 802.1x EAP-TLS WPA-Enterprise Wi-Fi on your Access Point
For 802.1x EAP-TLS (certificate-based) Wi-Fi deployments in security-sensitive environments, you’ll generally need four things:
- A Certificate Authority
- A RADIUS server
- A properly configured Access Point (AP)
- A process for distributing the CA certificate and enrolling clients. This is usually handled via a Mobile Device Management (MDM) enrollment of client devices
Smallstep provides a Certificate Authority, a RADIUS server, and MDM integrations for the seamless deployment of certificates and network profiles to your clients.
Here’s a simplified diagram of an Apple laptop getting a client certificate and joining an 802.1x EAP-TLS authenticated network. With EAP-TLS, the RADIUS server must complete a mutual TLS handshake with the device before giving the thumbs up to the access point:
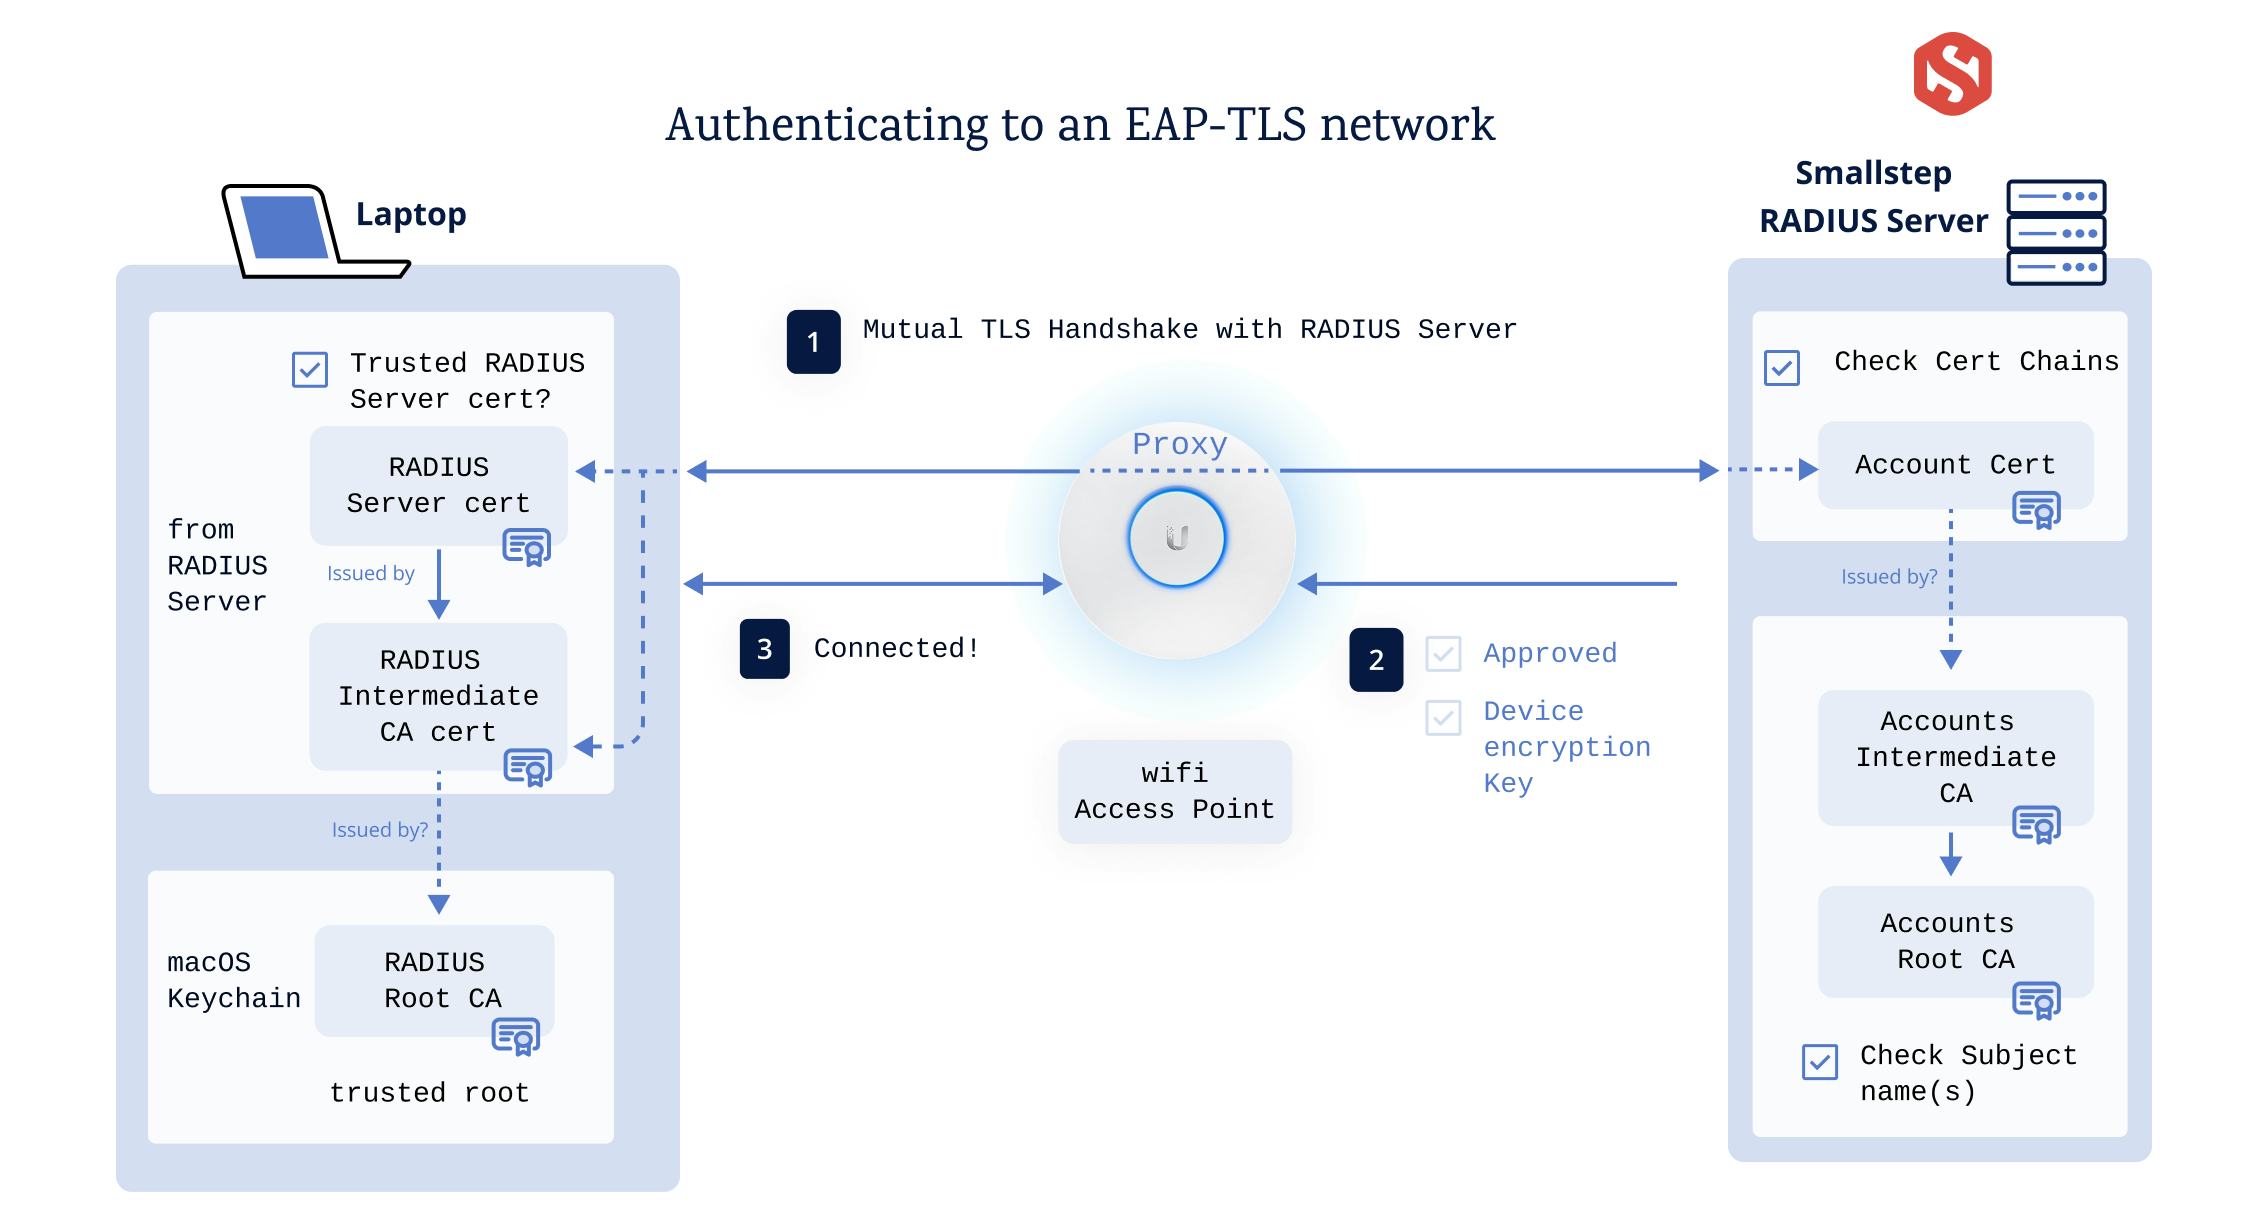
This document describes how to configure popular Wi-Fi Access Points (AP) to use 802.1x EAP-TLS with WPA-Enterprise Wi-Fi, with RADIUS provided by Smallstep. These instructions will delegate Wi-Fi authentication on your AP to your Smallstep account.
For MDM enrollment, we have integrations and tutorials for Jamf and Intune, but Smallstep can integrate with just about any MDM, and can even be deployed in environments without MDM.
Ensure test WLANs are used for initial integration testing. Do not complete these steps on a production WLAN until after testing has been validated.
On this page, you'll find:
- Protect a Wi-Fi Resource in Smallstep
- Configure 802.1x EAP-TLS on any Access Point
- Instructions for specific Access Points:
Protect a Wi-Fi resource in Smallstep
Before you configure an Access Point for EAP-TLS, you need create a Smallstep Wi-Fi Resource.
If you haven’t already, sign up for a Smallstep account and add some devices for testing, under the Devices tab.
-
Sign into Smallstep. Under the Protect tab, go to Wi-Fi and Add a Wi-Fi resource.
You’ll need to supply the Wi-Fi SSID you’ll use for WPA3 Enterprise and your public-facing (WAN) IP address, so our RADIUS server can identify requests from your network.
-
When you’re finished, if you're using a Smallstep-managed RADIUS server, you’ll see your RADIUS server details. Use these details when you configure your Access Point.
General instructions for configuring 802.1x EAP-TLS on any access point
In case your Access Point isn’t specifically listed here, here are some general instructions. Each Access Point will have a slightly different configuration UI, but these network settings are constant no matter what AP you’re using:
- Security Protocol: WPA2 Enterprise or WPA3 Enterprise
- RADIUS server information (provided by Smallstep)
- RADIUS server IP
- RADIUS server port
- RADIUS server shared secret
- RADIUS accounting port
Configure 802.1x EAP-TLS WPA-Enterprise Wi-Fi on ubiquiti unifi
First, create a RADIUS Profile in the Unifi Network app, :
- Go to Settings → Profiles → RADIUS → Create New
- Give the profile a name
- Under Authentication servers, add the RADIUS server IP address, port, and shared secret you received from Smallstep
- Choose Save.
Next, create a new 802.1x EAP-TLS WPA-Enterprise authenticated Wi-Fi network and link your new Smallstep RADIUS profile to it:
- Go to Settings → WiFi → Create New
- Give your network an SSID
- Under Advanced Configuration, choose Manual
- Go to Security
- For Security Protocol, select WPA-3 Enterprise
- For RADIUS Profile, select the RADIUS profile you created above
- Go back and choose Save
Your new 802.1x EAP-TLS WPA-Enterprise Wi-Fi network is ready for use.
Configure 802.1x EAP-TLS WPA-Enterprise Wi-Fi on mikrotik
This section is suitable for a MikroTik AP that uses RouterOS. You can use the WebFig UI or the MikroTik Terminal to configure your AP.
-
Add a new RADIUS client, replacing the RADIUS IP and secret with the values you received from Smallstep:
- Go to RADIUS -> Add New
- For Service, select wireless
- Enter the Address and Secret for the Smalletp RADIUS server
- Adjust the Timeout to 5000ms
- Choose Ok
Or, in the terminal:
/radius add address=123.123.123.123 secret="secret-goes-here" \ service=wireless timeout=5s
-
Add a security profile:
- Go to Wireless -> Security Profiles -> Add New
- Give the profile the name EAP_AP
- For Mode, choose dynamic keys
- For Authentication Types, select WPA2 EAP
- For Supplicant Identity, enter Mikrotik
- Choose Ok
Or, in the terminal:
/interface wireless security-profiles add authentication-types=wpa2-eap eap-method=passthrough mode=dynamic-keys name=EAP_AP supplicant-identity=Mikrotik
-
Associate the security profile with the Wireless interface:
- Go to Wireless Interfaces and choose the interface you'd like to use with EAP-TLS
- Update Security Profile to EAP_AP
- Choose Ok
Or, in the terminal:
/interface/wireless set [find] security-profile=EAP_AP
For more information, see MicroTik Documentation.
Configure 802.1x EAP-TLS WPA-Enterprise Wi-Fi on aerohive
First, create a new RADIUS profile:
- On the Aerohive console, go to Configuration→ Common Objects→ Authentication→ External RADIUS Servers, and click on “+” to create a new RADIUS server
- Provide a Name for the server
- Enter the RADIUS server IP address, port, and shared secret you received from Smallstep into their respective fields
- Click Save
Next, create a new 802.1x EAP-TLS WPA-Enterprise authenticated Wi-Fi network and link your new Smallstep RADIUS profile to it:
- Go to Configure → Network Policies → Add Network Policy
- Select Wireless, provide a Policy Name, and click Next
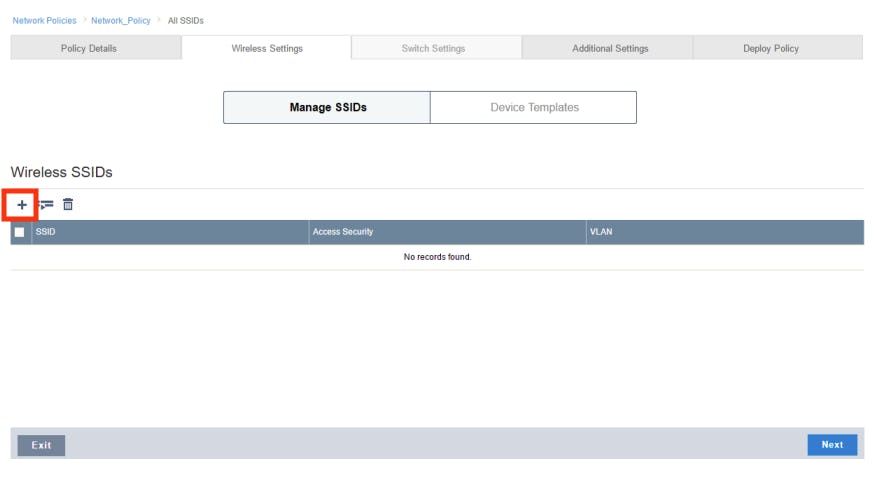
- Click “+” to add a Wireless SSID.
- Provide SSID Name and SSID Broadcast Name for your network
- Under SSID Usage:
- For SSID Authentication, select Enterprise WPA/WPA2 802.1X
- For Key Management, select WPA2-(WPA2 Enterprise)-802.1X
- For Encryption Method, select CCMP (AES)
- Scroll down to Authentication Settings. Click on +, next to Default RADIUS Server Group, to add a RADIUS server
- Select the Smallstep RADIUS profile you created above, and click on Save
Your 802.1x EAP-TLS WPA-Enterprise Wi-Fi network is ready for use.
Configure 802.1x EAP-TLS WPA-Enterprise Wi-Fi on aruba
Note: these instructions follow setup for Aruba mobility controllers wireless AP portals. See Aruba reference WLAN configuration documentation
First, create a new RADIUS profile:
- On the Aruba portal, go to Configuration → Authentication → Auth Servers
- Click + in the Server Group table and provide a Name for the new server group, then click Submit
- From the Server Group table, click the group you just created, then click + to add new RADIUS server details
- Select the Add new server option, and then enter the RADIUS server IP address and hostname received from Smallstep into their respective fields
- Select RADIUS from the Type drop-down list
- Click Submit
Next, create a new 802.1x EAP-TLS WPA-Enterprise authenticated Wi-Fi network and link your new Smallstep RADIUS profile to it.
- On the console, go to Configuration → WLAN, then click the + icon to add a new WLAN
- On the General tab:
- For Name (SSID), enter a name for the SSID
- For Primary usage, select the Employee option
- For Broadcast on, click on the Select AP Groups drop-down list, then select a desired AP group
- For Forwarding Mode, leave the default tunnel option
- Click Next
- On the VLANs tab, select your VLAN ID, and click Next
- On the Security > Enterprise tab:
- For Key management, select WPA-3 Enterprise
- For Auth servers section, click +, select the Smallstep RADIUS profile, and click OK
- Click Next
- On the Access tab:
- For the Default role drop-down list, select an existing user role to be assigned to an employee that successfully authenticates to the WLAN, or define a new role by clicking on Show Roles and clicking ”+” in the Roles table
- Click Finish
- On the next page, click on Pending Changes, then click on Deploy Changes
Your new 802.1x EAP-TLS WPA-Enterprise Wi-Fi network is ready for use.
Configure 802.1x EAP-TLS WPA-Enterprise Wi-Fi on Meraki
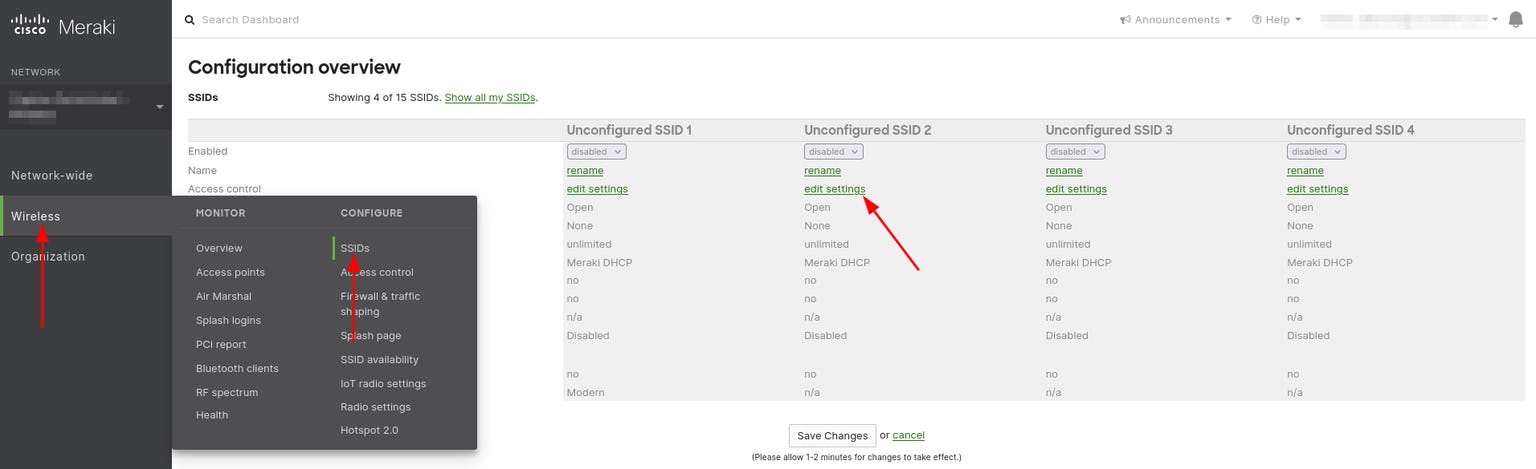
- On your Meraki console, navigate to Wireless > Configure > SSIDs
- Enable an Unconfigured SSID
- Under the newly Unconfigured SSID, click on rename, name the SSID accordingly, then click Save Changes
- Click on edit settings. This will take you to the Access control tab for the SSID
- Set the Association requirements to Enterprise with my RADIUS server
- Scroll to RADIUS servers to add your Smallstep RADIUS server. Enter the RADIUS server IP address, port, and shared secret you received from Smallstep into their respective fields
- Click Save
Your new 802.1x EAP-TLS WPA-Enterprise Wi-Fi network is ready for use.
Configure 802.1x EAP-TLS WPA-Enterprise Wi-Fi on Cisco wireless LAN controller
First, create a new RADIUS profile:
- Go to Security > RADIUS > Authentication, then click New to add a new RADIUS server
- Provide the Server Address, Shared Secret and Port Number obtained from Smallstep
- Click Apply
Next, create a new 802.1x EAP-TLS WPA-Enterprise authenticated Wi-Fi network and link your new Smallstep RADIUS profile to it:
- Click on the WLANs tab, choose Create New and click Go
- Provide a name for your new WLAN, and click Apply to continue
- Go to the General tab, ensure that Status is Enabled
- Go to the Security tab > AAA Servers. In the Server 1 dialog box, under Authentication Servers, select the RADIUS server that you just configured, and click Apply
Your new 802.1x EAP-TLS WPA-Enterprise Wi-Fi network is ready for use.
Configure 802.1x EAP-TLS WPA-Enterprise Wi-Fi on extreme
First, create a new RADIUS profile:
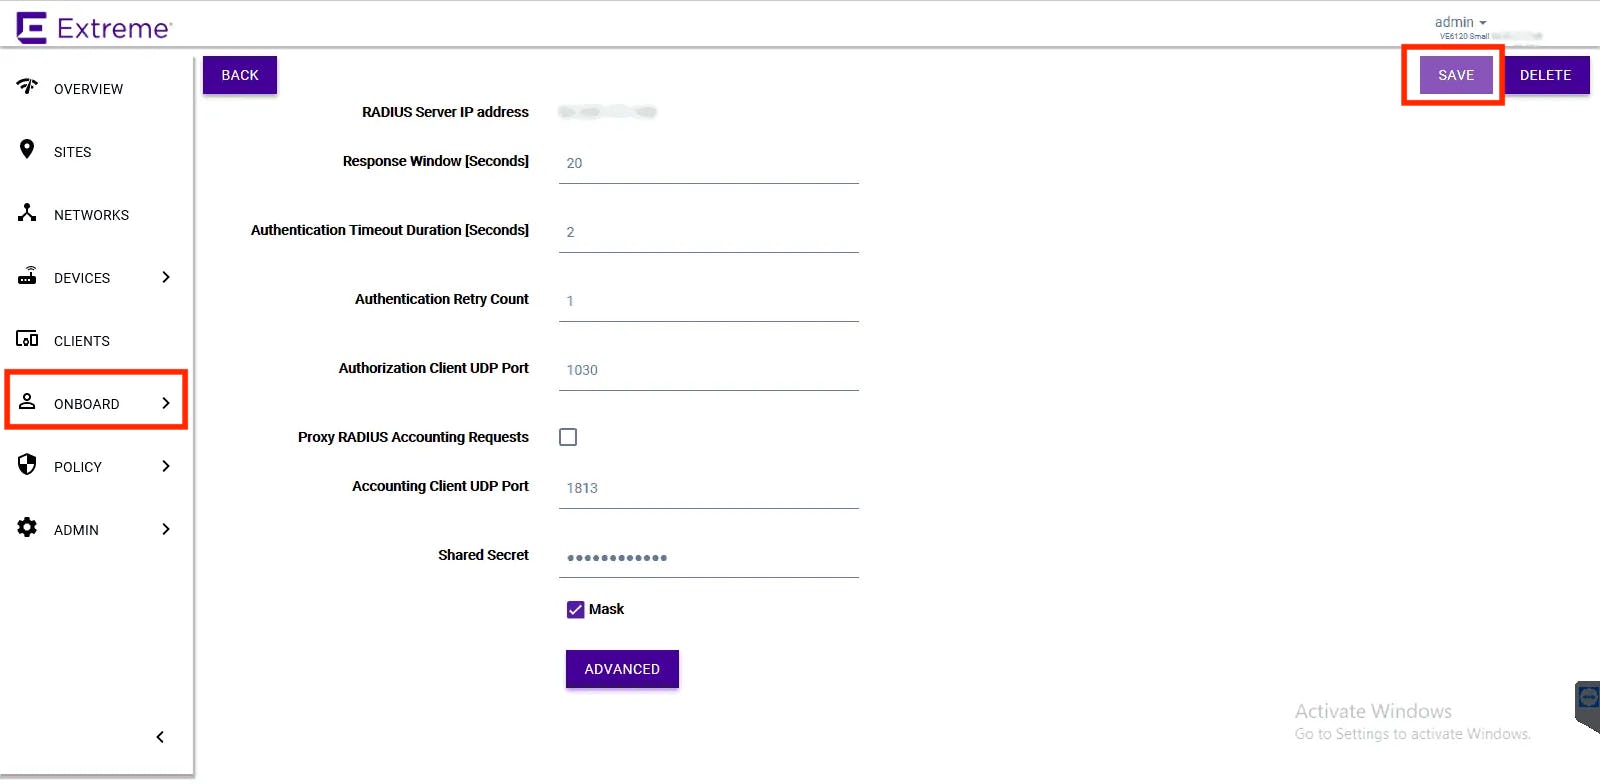
- On your Extreme Networks console, navigate to ONBOARD > AAA
- On the Default AAA Configuration page, scroll to RADIUS Servers, and click Add
- Provide the RADIUS Server IP address, RADIUS Port, and Shared Secret provided by Smallstep
- Click Save
Next, create a new 802.1x EAP-TLS WPA-Enterprise authenticated Wi-Fi network and link your new Smallstep RADIUS profile to it:
- Navigate to Networks > Add:
- For Network Name, provide a suitable name
- For SSID, enter a name for the SSID
- For Status, select Enable
- For Auth Type, select WPA2 Enterprise w/ RADIUS
- For Authentication Method, select RADIUS
- For Primary RADIUS, select the Smallstep RADIUS IP Address added earlier
- For Backup RADIUS, select another if any
- For Default Auth Role, select Enterprise User
- For Default VLAN, select a VLAN
- Click Save
Your new 802.1x EAP-TLS Enterprise Wi-Fi network is ready for use.
Configure 802.1x EAP-TLS WPA-Enterprise Wi-Fi on juniper mist
- Navigate to Organization > WLAN Templates
- Click a WLAN template (or create a template)
- Click on Add WLAN
- In the Edit/Create WLAN window, provide an SSID for your new WLAN
- Scroll to the Security section, under Security Type, select WPA3 or WPA2, then click Enterprise (802.1X)
- Scroll to the Authentication Servers section, and click Add Server
- Enter the Hostname (IP Address) and Shared Secret of the RADIUS server received from Smallstep
- Click Save
Your 802.1x EAP-TLS WPA-Enterprise Wi-Fi network is ready for use. For more, see Juniper Mist reference documentation.
Configure 802.1x EAP-TLS WPA-Enterprise Wi-Fi on sophos UTM
First, create a new RADIUS profile:
- Go to Definitions & Users > Authentication Services
- On the Servers tab, click New Authentication Server
- On the Add Authentication Server dialogue box:
- For Backend, select RADIUS
- For Position, select Top
- For Server, click + to add a new RADIUS server IP address provided by Smallstep
- For Shared Secret, enter the shared RADIUS server secret provided by Smallstep
- Click Save
Next, configure 802.1x EAP-TLS WPA-Enterprise WLANs to use the new RADIUS profile for authentication:
- Go to Wireless Protection > Global Settings > Advanced.
- On the Enterprise Authentication box, select the created RADIUS profile from the Radius Server dropdown.
- Click Apply
Then, create a new 802.1x EAP-TLS WPA-Enterprise authenticated Wi-Fi network:
- Go to Wireless Protection > Wireless Networks
- Click on Add Wireless Network
- On the Add Wireless Network dialog:
- For Network name, enter a descriptive name for the network
- For Network SSID, provide a suitable name
- For Encryption mode, select WPA2/WPA Enterprise
- For Client traffic, see the implications of the different options on the Sophos UTM Administrator Guide.
- Click Save
Go ahead to associate the new SSID network with your access point, and your new 802.1x EAP-TLS WPA-Enterprise Wi-Fi network is ready for use.
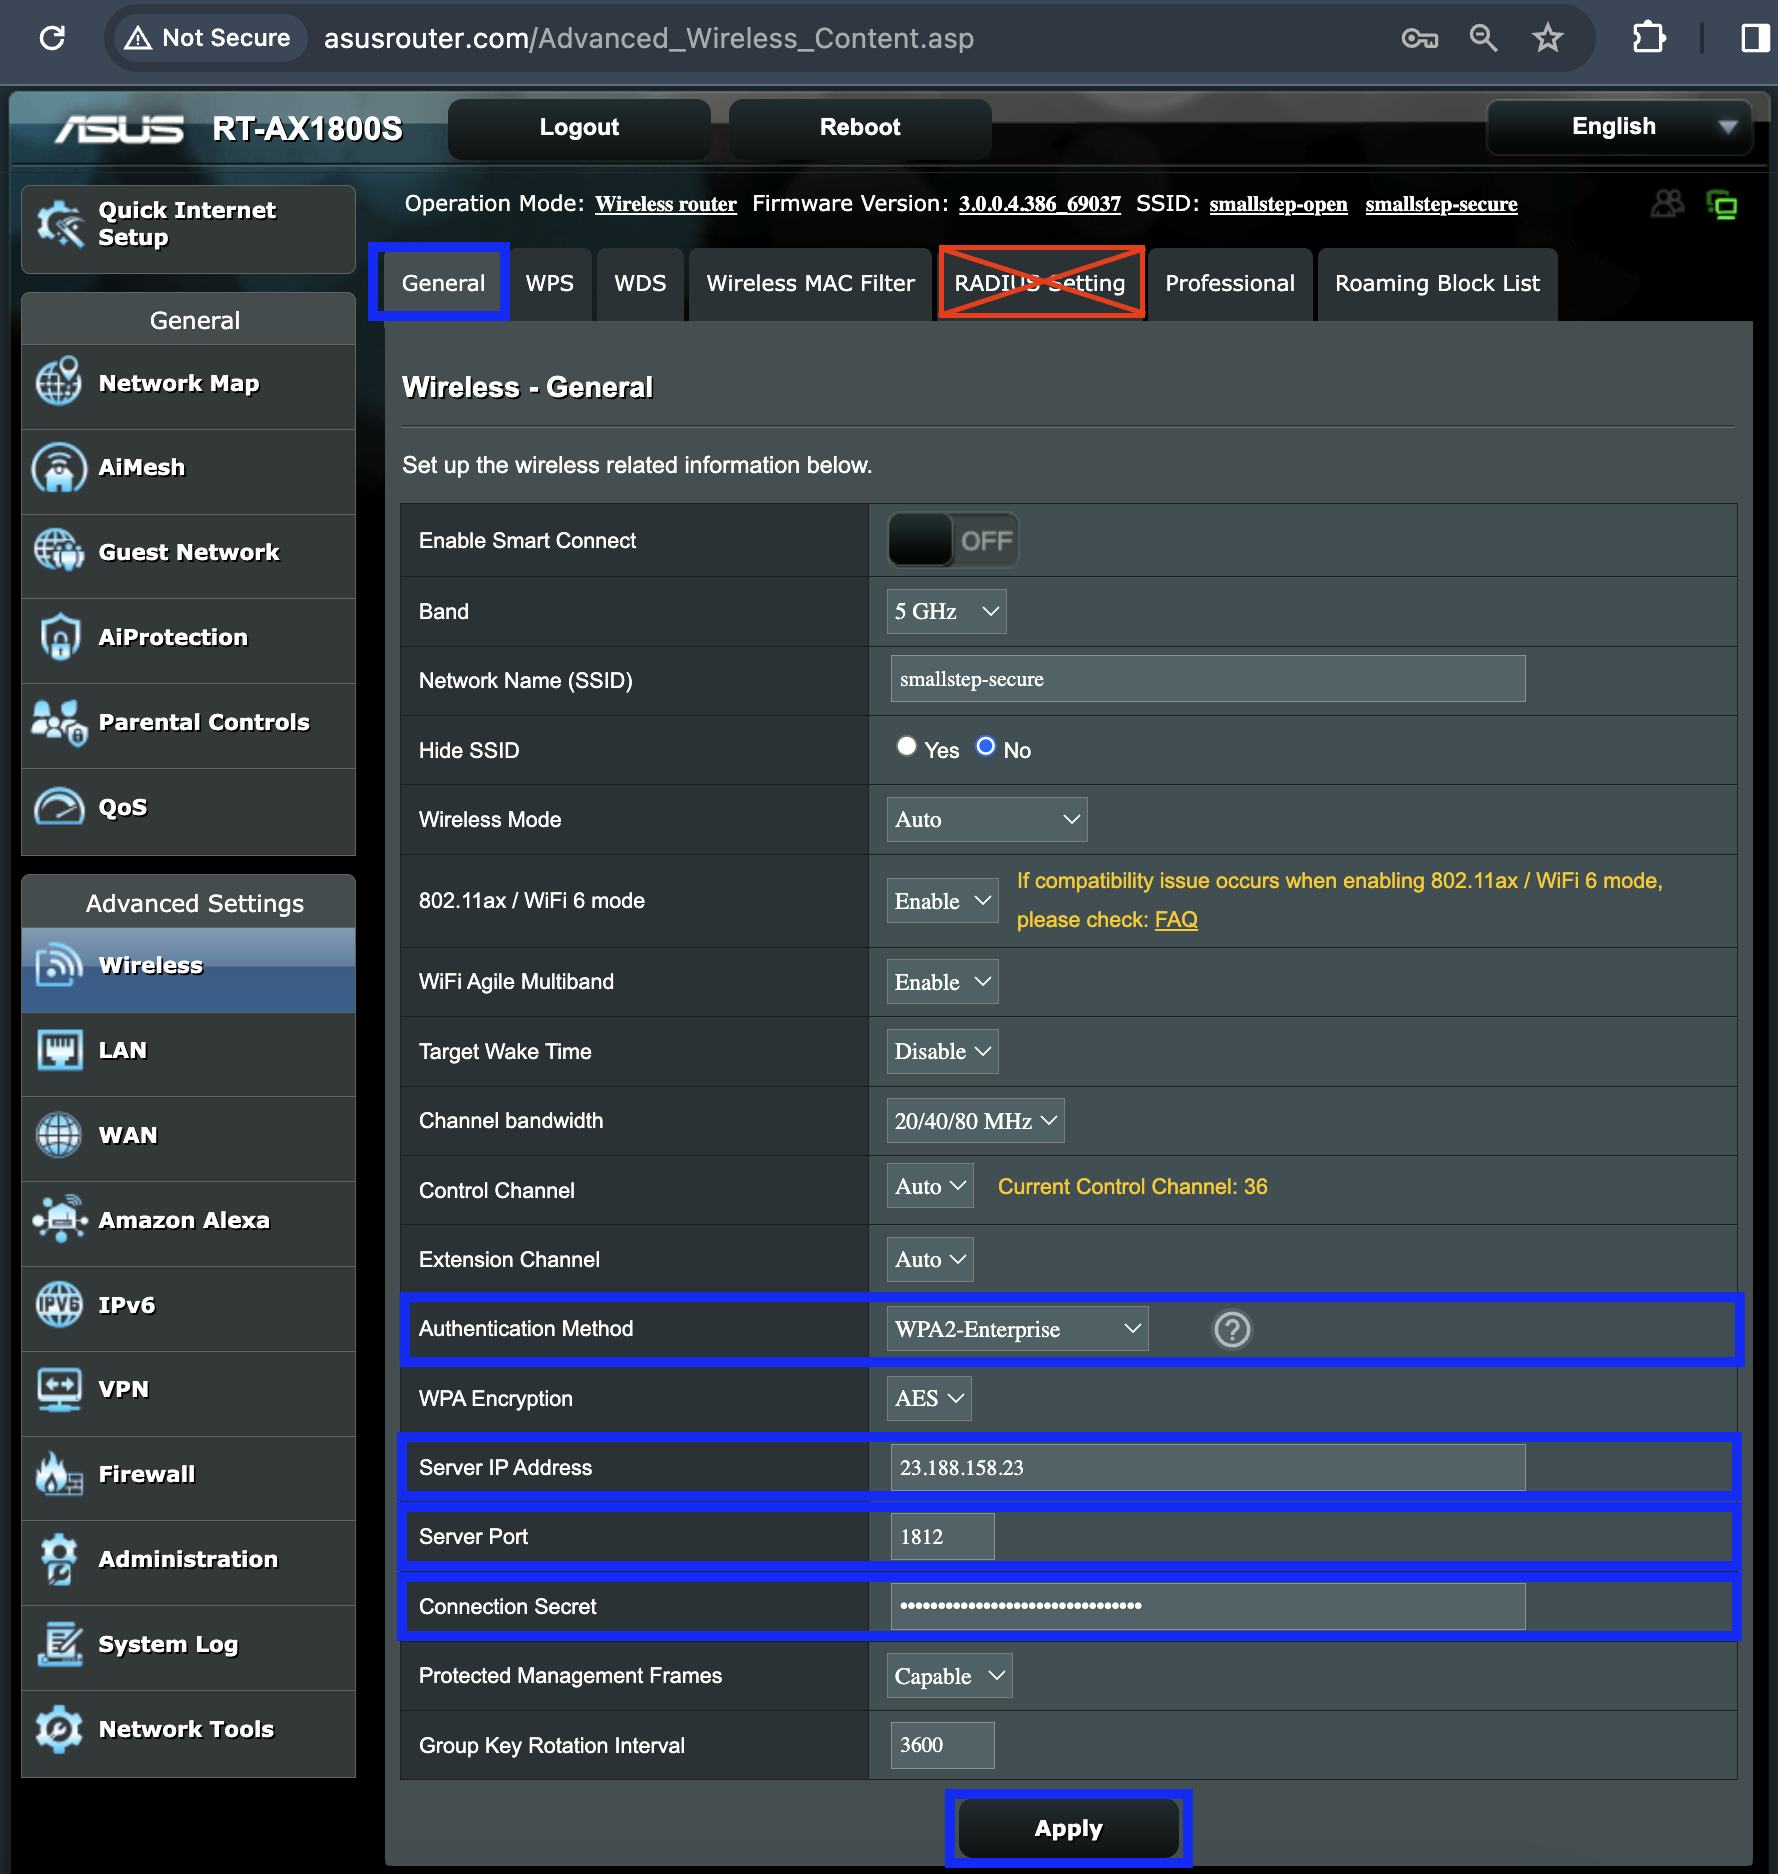
Configure 802.1x EAP-TLS WPA-Enterprise Wi-Fi on Asus
These instructions follow setup for RT-AX1800S. However you should find most current ASUS routers have a similar interface.
Tip: to set up an 802.1x EAP-TLS Enterprise Wi-Fi WLAN on your Asus router, start with a separate dual band setup so that you have a break-glass connection to a WPA2 Password connection in the event that your settings are not allowing access to the configured band.
-
On the Asus Router console, navigate to Advanced Settings > Wireless
-
On the General tab, configure the following parameters:
- For Network Name (SSID), enter a name for the WLAN
- For Authentication Method, select WPA2-Enterprise
- For Server IP Address, Server Port, and Connection String, provide the RADIUS server properties provided by Smallstep during setup
-
Click Apply to save changes to router
Your new 802.1x EAP-TLS WPA-Enterprise Wi-Fi network is ready for use.
Can’t find configuration instructions for your access point? Create an issue for it.
Last updated on February 3, 2026
Introducing
Device Identity
Ensure that only company-owned devices can access your enterprise's most sensitive resources.