Registration Authority Mode
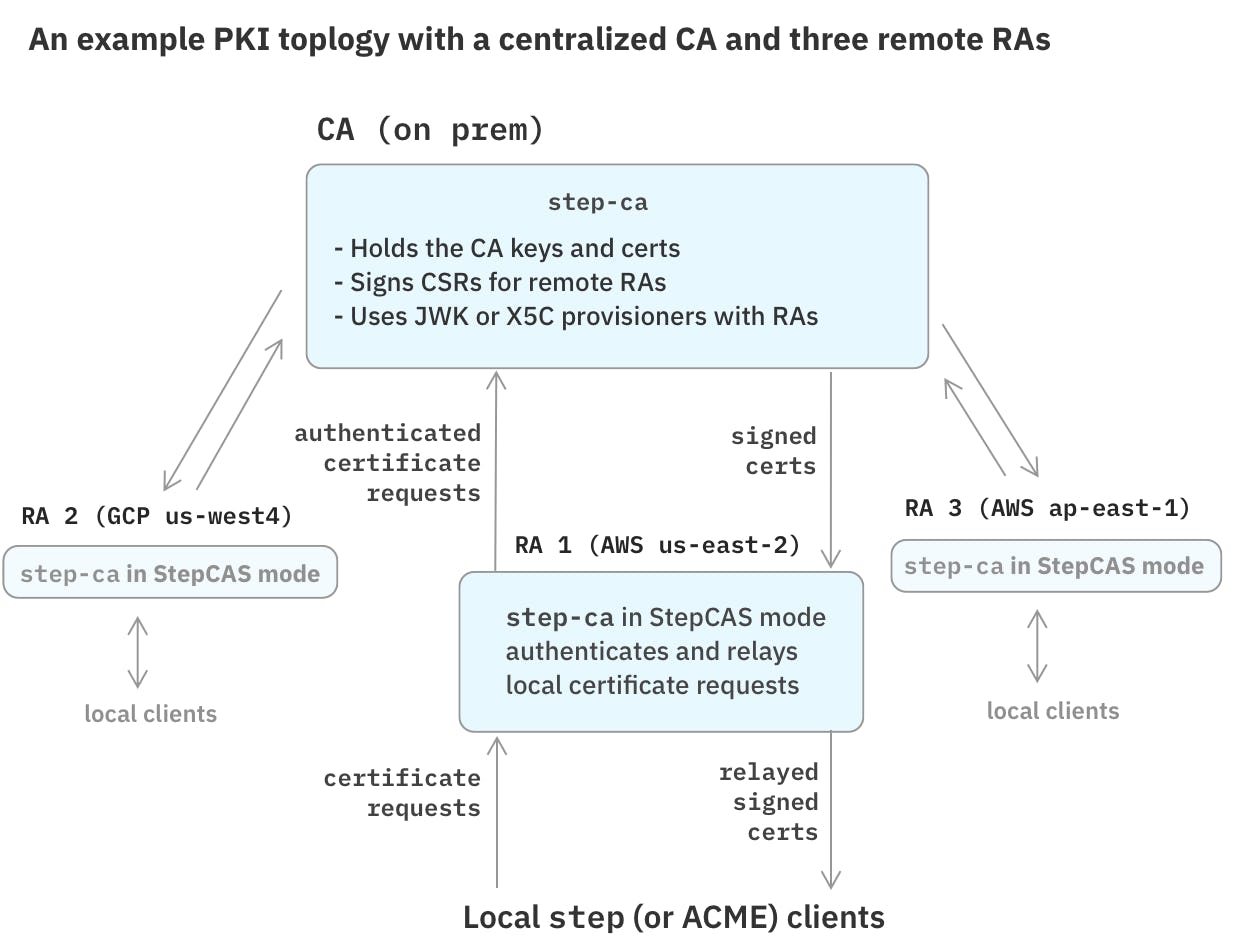
Some PKI topologies rely on one or more Registration Authority (RA) servers. An RA server acts as a front-end to a Certificate Authority. While the CA holds the signing keys, the RA is responsible for authenticating requests from its clients and enforcing policies before passing them along to the CA. The CA implicitly trusts the RA and will sign certificates for it.
Local RA servers are often used to distribute certificates across several cloud providers or on-prem environments.
step-ca has a special operational mode that turns it into an RA server.
This mode allows you to centralize and simplifies key management,
because a single backing CA can serve several RAs.
Certificate Authority Service (CAS) vs. Key Management Service (KMS)
In an RA setup, the upstream CA is also known as a Certificate Authority Service (CAS).
A CAS is a service that implements an API to sign certificate requests from a trusted source.
If you've used a KMS before, you may wonder: How is a CAS different from a KMS?
A KMS can sign any data, while a CAS is intended to sign only X.509 certificates.
When in RA mode, step-ca can peer with one of three types of upstream CA:
- Another
step-caserver ("StepCAS" mode) - A Google CloudCAS CA
- A Hashicorp Vault CA
Configuring RA modes
StepCAS RA mode
StepCAS allows configuring a step-ca server as an RA, with a second, upstream step-ca server acting as the main CA.
StepCAS supports the JWK and X5C provisioners for requests between RAs and the CA. The JWK provisioner balances security and simplicity, and it covers the most common use cases. The X5C provisioner allows for more complex trust relationships and expiring certificates, but it requires setting up ongoing certificate lifecycle management on the RAs.
Example: A simple RA ↔ CA configuration
Let's set up a simple RA ↔ CA pair, with one RA and one upstream CA.
The CA will be configured with a JWK provisioner, and the RA will use that provisioner to make authenticated certificate requests to the CA.
The RA, in turn, can offer its clients certificates using any step-ca provisioners.
In this example, we'll configure an ACME provisioner in the RA.
Configure additional RA provisioners just as you would configure provisioners for a CA.
Setting up the CA
You can set up the CA using the Getting Started guide.
You will need the name and password of the first provisioner you created when running step ca init.
Setting up the RA
Here's an example configuration file for an RA that uses the JWK provisioner to connect to the CA, and that offers an ACME provisioner to its clients:
{
"address": ":9100",
"dnsNames": ["ra.smallstep.com"],
"db": {
"type": "badgerV2",
"dataSource": "/etc/step-ca/db"
},
"logger": {"format": "text"},
"authority": {
"type": "stepcas",
"certificateAuthority": "https://ca.smallstep.com:9000",
"certificateAuthorityFingerprint": "b4fc6b547ca4610b69cfcc53c6933e7a37170476dfe134a2c257726f92c403f5",
"certificateIssuer": {
"type" : "jwk",
"provisioner": "ra@smallstep.com"
},
"provisioners": [{
"type": "ACME",
"name": "acme"
}]
},
"tls": {
"cipherSuites": [
"TLS_ECDHE_ECDSA_WITH_CHACHA20_POLY1305",
"TLS_ECDHE_ECDSA_WITH_AES_128_GCM_SHA256"
],
"minVersion": 1.2,
"maxVersion": 1.3,
"renegotiation": false
}
}
The crucial bit of configuration here is the "certificateIssuer" section.
This section connects this RA to the CA using the JWK provisioner named ra@smallstep.com on the CA.
When step-ca starts up with this RA configuration, it will download the encrypted JWK key from the CA automatically.
The RA will still need the JWK provisioner password, to decrypt the key.
The JWK password can be supplied in a "password" field in the "certificateIssuer" block,
or it can be passed in via a file when starting the RA:
$ step-ca --issuer-password-file=$(step path)/secrets/issuer_jwk_password.txt $(step path)/config/ca.json
Your RA is ready to process certificate requests.
Securing the issuer credentials with a different password
If you don't want your RA to hold the CA's provisioner password, you can create a new key for your RA by decrypting the CA's JWK provisioner key and re-encrypting it with a new password for the RA.
- On the CA, create a new private key that the RA will use:
$ step ca provisioner list | jq -r '.[] | select(.type == "JWK") | .encryptedKey' | step crypto key format --pkcs8 > ra.key.pem
You will be asked for the JWK password to decrypt the provisioner key, and a new password to encrypt a new PEM file for your RA.
- Transfer
ra.key.pemto your RA
On the RA, save the PEM file into $(step path)/secrets and configure the "certificateIssuer" as follows:
{
"type": "jwk",
"provisioner": "jane@smallstep.com",
"key": "/home/jane/.step/secrets/ra.key.pem"
}
Finally, use --issuer-password-file to provide a password file when starting up the RA.
Using the X5C provisioner
Instead of a JWK, the RA can alternatively use certificate authentication with the CA, via the X5C Provisioner. While this approach is more complex, it offers more security because it uses expiring certificates instead of non-expiring JWKs.
In this scenario, the RA "certificateIssuer" block will need to be configured with a certificate and key signed by a CA that the CA's X5C provisioner is configured to trust.
To configure an RA ↔ CA connection using an X5C provisioner, first add an X5C provisioner to the CA. (See the X5C Provisioner configuration section.)
Next, change the "certificateIssuer" object in the RA configuration as follows:
{
"type": "x5c",
"provisioner": "X5C",
"crt": "/home/jane/.step/certs/x5c.crt",
"key": "/home/jane/.step/secrets/x5c.key"
}
These files will are read by step-ca upon every certificate request made to the RA.
Finally, use --issuer-password-file to provide a private key password file when starting up the RA.
StepCAS limitations
An RA can use any step-ca provisioners to authenticate requests, but there are some caveats:
step ca renewtypically uses mutual TLS authentication, but with a StepCAS RA it must use X5C authentication. Pass--mtls=falsetostep ca renewwhen working with RAs.step ca rekeyis not supported.- SSH is not supported.
- ACME load balancing across StepCAS RAs is not officially supported, but it may work just fine if you use a shared
mysqlorpostgresqldatabase for your RAs. - StepCAS RA keys cannot be stored in KMS or HSMs; only files are supported. This is because all the keys are kept in memory.
Google Cloud CAS RA mode
This RA mode allows you to use Google Cloud Certificate Authority Service (CAS) as your CA.
The top of an example ca.json for cloudCAS looks like:
{
"address": ":9000",
"dnsNames": ["ra.smallstep.com"],
"authority": {
"type": "cloudCAS",
"credentialsFile": "/path/to/credentials.json",
"certificateAuthority": "projects/<name>/locations/<loc>/certificateAuthorities/<intermediate-name>"
},
"..."
}
When CloudCAS is enabled, it will retrieve the root certificate from the configured certificate authority,
so there is no need to configure the "root" or "crt" in ca.json.
Creating a CloudCAS RA
Before enabling CloudCAS in step-ca,
you'll need to set up your Google Cloud project using the gcloud CLI:
-
Create or define a Google Cloud Platform project to use. In this example, we'll call it
smallstep-cas-test. -
Enable the CA service API. Run:
$ gcloud services enable privateca.googleapis.com
-
Configure API access.
Start by creating a service account for accessing CAS:
$ gcloud iam service-accounts create step-ca-sa \ --project smallstep-cas-test \ --description "Step-CA Service Account" \ --display-name "Step-CA Service Account"
Now add permissions to use the CAS API:
$ gcloud projects add-iam-policy-binding smallstep-cas-test \
--member=serviceAccount:step-ca-sa@smallstep-cas-test.iam.gserviceaccount.com \
--role=roles/privateca.caManager
$ gcloud projects add-iam-policy-binding smallstep-cas-test \
--member=serviceAccount:step-ca-sa@smallstep-cas-test.iam.gserviceaccount.com \
--role=roles/privateca.certificateRequester
Finally, download the service account credentials, which you will use to configure the RA:
$ gcloud iam service-accounts keys create credentials.json \
--iam-account step-ca-sa@smallstep-cas-test.iam.gserviceaccount.com
The RA will use the service account you just created, via the keys you exported into credentials.json.
- Initialize your PKI.
Run step ca init --ra cloudcas to create a new PKI in CAS.
This will generate a root and intermediate certificate in Google CAS.
You will be prompted for your GCP project id, a resource id, region, and other information.
Here's an example of what a ca.json for a CloudCAS RA might look like:
{
"address": ":443",
"dnsNames": ["ra.example.com"],
"logger": {"format": "text"},
"db": {
"type": "badger",
"dataSource": "/home/jane/.step/db",
},
"authority": {
"type": "cloudCAS",
"credentialsFile": "/home/jane/.step/credentials.json",
"certificateAuthority": "projects/smallstep-cas-test/locations/us-west1/certificateAuthorities/prod-intermediate-ca",
"provisioners": [
{
"type": "JWK",
"name": "jane@example.com",
"key": {
"use": "sig",
"kty": "EC",
"kid": "ehFT9BkVOY5k_eIiMax0ZxVZCe2hlDVkMwZ2Y78av4s",
"crv": "P-256",
"alg": "ES256",
"x": "GtEftN0_ED1lNc2SEUJDXV9EMi7JY-kqINPIEQJIkjM",
"y": "8HYFdNe1MbWcbclF-hU1L80SCmMcZQI6vZfTOXfPOjg"
},
"encryptedKey": "eyJhbGciOiJQQkVTMi1IUzI1NitBMTI4S1ciLCJjdHkiOiJqd2sranNvbiIsImVuYyI6IkEyNTZHQ00iLCJwMmMiOjEwMDAwMCwicDJzIjoiSjBSWnY5UFZrM3JKRUJkem5RbExzZyJ9.Fiwvo-RIKU5G6v5udeCT1nlX87ElxrocP2FcgNs3AqEz5OH9H4suew.NmzUJR_9xv8ynQC8.dqOveA_G5kn5lxjxnEZoJCystnJMVYLkZ_8CVzfJQhYchbZfNk_-FKdIuQxeWWBzvmomsILFNtLOIUoqSt30qk83lFyGQWN8Ke2bK5DhuwojF7RI_UqkMyiKP0F28Z4ZFhfQP5D2ZT_stoFaMlU8eak0-T8MOiBIfdAJTWM9x2DN-68mtUBuL5z5eU8bqsxELnjGauD_GHTdnduOosmYsw8vp_PmffTTwqUzDFH1RhkeSmRFRZntAizZMGYkxLamquHI3Jvuqiv4eeJ3yLqh3Ppyo_mVQKnxM7P9TyTxcvLkb2dB3K-cItl1fpsz92cy8euKsKG8n5-hKFRyPfY.j7jBN7nUwatoSsIZuNIwHA"
}
]
},
"tls": {
"cipherSuites": [
"TLS_ECDHE_ECDSA_WITH_CHACHA20_POLY1305",
"TLS_ECDHE_ECDSA_WITH_AES_128_GCM_SHA256"
],
"minVersion": 1.2,
"maxVersion": 1.3,
"renegotiation": false
}
}
The "credentialsFile" field isn't the only option for providing Google Cloud credentials.json filename to the RA.
You can alternatively set the GOOGLE_APPLICATION_CREDENTIALS environment variable.
- Start
step-ca
step-ca will automatically download the root certificate from Google CAS.
In ca.json, you don't need to configure "root",
and because the intermediate is in Google Cloud, "crt" and "key" are also not needed.
The RA will print your CA's root fingerprint upon startup:
$ step-ca /home/jane/.step/config/ca.json
2020/09/22 13:17:15 Using root fingerprint '3ef16343cf0952eedbe2b843066bb798fa7a7bceb16aa285e8b0399f661b28b7'
2020/09/22 13:17:15 Serving HTTPS on :9000 ...
Save the fingerprint! You will need it to bootstrap new clients into your PKI:
$ step ca bootstrap --ca-url https://ra.example.com --fingerprint 3ef16343cf0952eedbe2b843066bb798fa7a7bceb16aa285e8b0399f661b28b7
Finally, we can sign a certificate as always:
$ step ca certificate test.example.com test.crt test.key
Hashicorp Vault RA mode
The RA mode in step-ca can peer with Vault's PKI secrets engine, using it as an upstream CA.
From the Vault Documentation:
"The PKI secrets engine generates dynamic X.509 certificates. With this secrets engine, services can get certificates without going through the usual manual process of generating a private key and CSR, submitting to a CA, and waiting for a verification and signing process to complete."
Overview
In this tutorial, we'll create a PKI and a Certificate Authority in Vault.
Then we'll configure step-ca's RA mode to use Vault to sign certificates.
Requirements
step-ca- A Hashicorp Vault server
- The
jqtool to parse JSON output
Creating a Vault PKI
1. Start a Vault server and log into vault
For a proof of concept, you can run vault server -dev in a terminal window to start an ephemeral Vault server for testing, and use an HTTP Vault address as shown here. With Vault in dev mode, you will lose your PKI when you exit the Vault server.
In production, you'll need to run Vault as a daemon and use HTTPS. Vault supports both server TLS verification, and mutual TLS authentication. See Vault's Environment Variables documentation for more.
If you're running Vault in dev mode, set VAULT_ADDR:
export VAULT_ADDR='http://127.0.0.1:8200'
Now login to Vault:
vault login token=xxxxx
Output:
Success! You are now authenticated. The token information displayed below
is already stored in the token helper. You do NOT need to run "vault login"
again. Future Vault requests will automatically use this token.
Key Value
--- -----
token hvs.VGBPeFkQtkGp5sDdHBug0Bge
token_accessor kGo8ZgkOlrw9Fa1neEjDH52m
token_duration ∞
token_renewable false
token_policies ["root"]
identity_policies []
policies ["root"]
2. Create your root CA:
Let's create our PKI inside of Vault. In this example, we're creating a 10 year root certificate.
Run:
ROOT_CA_COMMON_NAME="Vault Root CA"
ROOT_CA_TTL="87600h"
vault secrets enable pki
vault secrets tune -max-lease-ttl=$ROOT_CA_TTL pki
vault write pki/root/generate/internal \
common_name="$ROOT_CA_COMMON_NAME" \
ttl=$ROOT_CA_TTL
vault read -format=json pki/cert/$(vault list -format=json pki/certs | jq -r '.[0]') | jq -r .data.certificate > root_ca.crt
vault write pki/config/urls \
issuing_certificates="$VAULT_ADDR/v1/pki/ca" \
crl_distribution_points="$VAULT_ADDR/v1/pki/crl"
Your root CA is created,
and your root CA certificate PEM is saved in root_ca.crt.
3. Create your intermediate CA:
Now let's create and sign the intermediate CA using the root CA.
We'll call the intermediate PKI int1.
We may later want to sign additional intermediaries (int2, int3, etc.) from our root CA.
In this example, we'll create a 5 year intermediate certificate.
Run:
INTERMEDIATE_CA_COMMON_NAME="Vault Intermediate CA"
INTERMEDIATE_CA_TTL="43800h"
vault secrets enable -path=pki_int1 pki
vault secrets tune -max-lease-ttl=$INTERMEDIATE_CA_TTL pki_int1
vault write -format=json pki_int1/intermediate/generate/internal \
common_name="$INTERMEDIATE_CA_COMMON_NAME" \
ttl=$INTERMEDIATE_CA_TTL | jq -r .data.csr > int1.csr
vault write -format=json pki/root/sign-intermediate \
csr=@int1.csr \
format=pem_bundle \
ttl=$INTERMEDIATE_CA_TTL | jq -r .data.certificate > int1.crt
cat int1.crt root_ca.crt > intermediate_ca.crt
vault write pki_int1/intermediate/set-signed \
certificate=@intermediate_ca.crt
vault write pki_int1/config/urls \
issuing_certificates="$VAULT_ADDR/v1/pki_int1/ca" \
crl_distribution_points="$VAULT_ADDR/v1/pki_int1/crl"
Your intermediate CA is created,
and your root and intermediate CA PEM bundle is saved in intermediate_ca.crt.
3. Create Vault roles and policy
Now let's create Vault roles that your RA server will use to sign certificates.
In this example, Vault will only sign certificates that last 72h or less.
Adjust LEAF_MAX_TTL as needed for your PKI.
To create the roles, run:
LEAF_MAX_TTL=72h
vault write pki_int1/roles/ec-role key_type=ec allow_any_name=true enforce_hostnames=false max_ttl=$LEAF_MAX_TTL
vault write pki_int1/roles/rsa-role key_type=rsa allow_any_name=true enforce_hostnames=false max_ttl=$LEAF_MAX_TTL
vault write pki_int1/roles/ed25519-role key_type=ed25519 allow_any_name=true enforce_hostnames=false max_ttl=$LEAF_MAX_TTL
You'll also need Vault access policies for each role. To create those, run:
echo 'path "pki_int1/sign/ec-role" {
capabilities = ["create", "update"]
}
path "pki_int1/sign/rsa-role" {
capabilities = ["create", "update"]
}
path "pki_int1/sign/ed25519-role" {
capabilities = ["create", "update"]
}
path "pki_int1/revoke" {
capabilities = ["create", "update"]
}' > policy.hcl
vault policy write smallstep policy.hcl
In this example, Vault will sign certificates of all three key types for the RA server: EC, RSA, and Ed25519.
EC must always be enabled, because it's required for step-ca's internal TLS certificate.
However, if your PKI will not use RSA or Ed25519, please restrict your Vault policy to the key types you will use.
Vault's Policy documentation describes the policy langauge used by Vault.
4. Enable Vault authentication for your RA.
For the last part of our Vault setup, we need to configure Vault authentication. Run:
vault auth enable -description="SmallStep RA AppRole" approle
vault write auth/approle/role/approle \
bind_secret_id=true \
local_secret_ids=false \
secret_id_num_uses=0 \
secret_id_ttl=0s \
token_explicit_max_ttl=0s \
token_max_ttl=0s \
token_no_default_policy=false \
token_num_uses=0 \
token_period=0s \
token_policies="smallstep" \
token_ttl=0s \
token_type=default
VAULT_ROLE_ID=$(vault read -field=role_id auth/approle/role/approle/role-id)
VAULT_SECRET_ID=$(vault write -field=secret_id -f auth/approle/role/approle/secret-id)
We'll need the VAULT_ROLE_ID and VAULT_SECRET_ID to configure our RA in the next step.
Configuring step-ca RA mode
5. Configure the RA server
In this section, we'll initialize a basic CA, and then convert it into an RA.
First, run step ca init as described in Getting Started.
Configure the DNS names, address, and JWK provisioner password.
Once the PKI is initialized, let's update ca.json to enable RA functionality.
Run:
VAULT_URI=http://127.0.0.1:8200
VAULT_CA_FINGERPRINT=$(step certificate fingerprint root_ca.crt)
cat <<< $(jq --arg vault_role_id "$VAULT_ROLE_ID" \
--arg vault_secret_id "$VAULT_SECRET_ID" \
--arg vault_uri "$VAULT_URI" \
--arg vault_ca_fingerprint "$VAULT_CA_FINGERPRINT" \
'(.authority += {
"type": "vaultcas",
"certificateAuthority": $vault_uri,
"certificateAuthorityFingerprint": $vault_ca_fingerprint,
"config": {
"pkiMountPath": "pki_int1",
"pkiRoleRSA": "rsa-role",
"pkiRoleEC": "ec-role",
"pkiRoleEd25519": "ed25519-role",
"authType": "approle",
"authMountPath": "approle",
"namespace": "custom/vault/enterprise/namespace",
"authOptions": {
"roleID": $vault_role_id,
"secretID": $vault_secret_id,
"isWrappingToken": false
}
}
})' $(step path)/config/ca.json) > $(step path)/config/ca.json
Here are the config options for vaultcas authorities:
-
pkiMountPath: the vault mount path for the pki engine you want to use, defaults to
pki -
pkiRoleDefault: the default pki role you want to use to issue certificates if the specific roles are not set, defaults to
default -
pkiRoleRSA: the pki role used to issue RSA certificates, defaults to pkiRoleDefault
-
pkiRoleEC: the pki role used to issue EC certificates, defaults to pkiRoleDefault
-
pkiRoleEd25519: the pki role used to issue Ed25519 certificates, defaults to pkiRoleDefault
-
authType: required. the authentication method used to login to the vault, one of
approle,kubernetesoraws -
authMountPath: the vault mount path for the auth method you want to use, if not set the default mount path for that auth type is used (usually the same name as the auth method)
-
namespace: optional. if using Vault Enterprise, the namespace to which requests should be scoped. Note: this value will apply to both the
pkiMountPathand theauthMountPath, effectively prefixing them -
authOptions: required. a set of options specific to the selected auth method type
-
For [authType=
approle]:-
roleID: required. the approle role-id to use
-
secretID: the approle secret-id to use
-
secretIDFile: the path to a file containing a secret-id (recommended method in production environments)
-
secretIDEnv: the name of an environment variable that contains the secret-id
-
isWrappingToken: set true if the secret-id is wrapped
-
-
For [authType=
kubernetes]:-
role: required. the kubernetes role to use
-
tokenPath: the path to a token used to authenticate (default to the service account token path in a k8s pod)
-
-
For [authType=
aws]:-
role: required. the AWS role to use
-
awsAuthType: required. the AWS authentication type to use, one of
iamorec2 -
region: optional. the AWS region to use
-
iamServerIdHeader: [awsAuthType=
iam] optional. the additional header sent to Vault to mitigate replay attack -
signatureType: [awsAuthType=
ec2] optional. the type of signature used to verify EC2 auth logins, one ofpkcs7,identity, orrsa2048 -
nonce: [awsAuthType=
ec2] optional. the nonce sent to Vault to mitigate replay attack, a randomly generated nonce will be used if not provided
-
-
Finally, remove the "root", "key", and "crt" values from your $(step path)/config/ca.json, and the associated files. These are generated by step ca init but are not used by RA servers.
Run:
cat <<< $(jq 'del(.key, .crt, .root)' `step path`/config/ca.json) > $(step path)/config/ca.json
rm $(step path)/certs/root_ca.crt $(step path)/certs/intermediate_ca.crt $(step path)/secrets/intermediate_ca_key
Your RA server will read your root from Vault when it starts up.
6. Start your RA server
$ step-ca $(step path)/config/ca.json
badger 2022/04/25 16:12:14 INFO: All 1 tables opened in 1ms
badger 2022/04/25 16:12:14 INFO: Replaying file id: 0 at offset: 9073
badger 2022/04/25 16:12:14 INFO: Replay took: 129.694µs
2022/04/25 16:12:14 Starting Smallstep CA/0.21.0 (linux/amd64)
2022/04/25 16:12:14 Documentation: https://u.step.sm/docs/ca
2022/04/25 16:12:14 Community Discord: https://u.step.sm/discord
2022/04/25 16:12:14 Current context: vault-test
2022/04/25 16:12:14 Config file: /home/awesome/.step/config/ca.json
2022/04/25 16:12:14 The primary server URL is https://localhost:4443
2022/04/25 16:12:14 Root certificates are available at https://localhost:4443/roots.pem
2022/04/25 16:12:14 X.509 Root Fingerprint: 2a0d4fe2b633301f02161bb667cf3d75939e32fee64642d73b16f76b7cdd1ea3
2022/04/25 16:12:14 Serving HTTPS on :4443 ...
At boot, step-ca's will automatically send a CSR to Vault for the RA's internal TLS certificate.
Let's look up and verify the certificate:
CERT_PATH=pki_int1/cert/$(vault list -format=json pki_int1/certs | \
jq -r '.[0]' | \
sed -e 's/:/-/g')
vault read -field=certificate $CERT_PATH | step certificate inspect
Output:
Certificate:
Data:
Version: 3 (0x2)
Serial Number: 181870544504760955575180789200133046316293037181 (0x1fdb5b761da50e99dac7dd1ce11eda0c6a921c7d)
Signature Algorithm: SHA256-RSA
Issuer: CN=Vault Intermediate CA
Validity
Not Before: Apr 25 23:14:26 2022 UTC
...
7. Issue a test certificate
Now, in another window, let's bootstrap the step client with your RA and get a test certificate:
$ step ca bootstrap --ca-url https://localhost:4443 \
--fingerprint 2a0d4fe2b633301f02161bb667cf3d75939e32fee64642d73b16f76b7cdd1ea3
The root certificate has been saved in /home/awesome/.step/certs/root_ca.crt.
The authority configuration has been saved in /home/awesome/.step/config/defaults.json.
$ step ca certificate example.com example.crt example.key
✔ Provisioner: carl@smallstep.com (JWK) [kid: oRxlIgpwI00GZUPZDMF-cASlh-sbmbdHS0pQOpNXszU]
Please enter the password to decrypt the provisioner key:
✔ CA: https://localhost:4443
✔ Certificate: example.crt
✔ Private Key: example.key
Last updated on February 3, 2026
Introducing
Device Identity
Ensure that only company-owned devices can access your enterprise's most sensitive resources.