Deploy EAP-TLS Wi-Fi certificates to Apple devices with Smallstep and Jamf Pro
Introduction
This tutorial focuses on deploying client certificates to your devices via Jamf Pro and your Smallstep Authority, using SCEP with dynamic challenges.
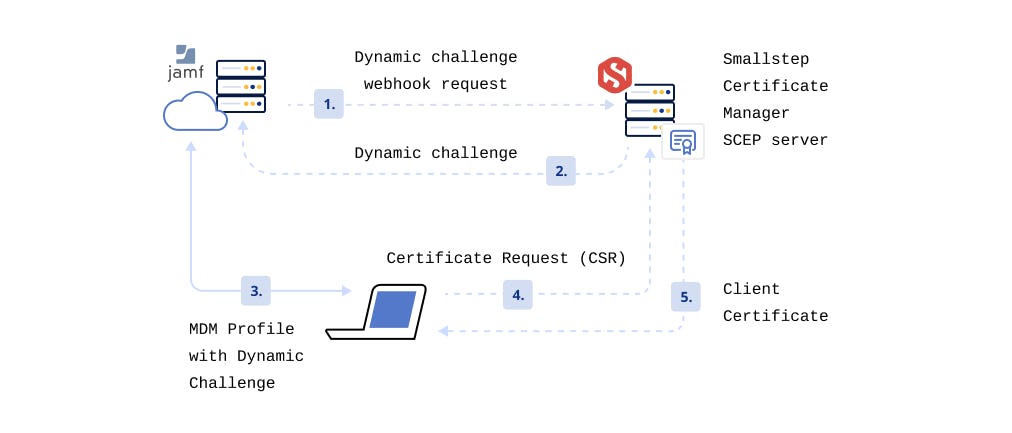
Use this workflow to set up an MDM enrollment process that looks like this:
This tutorial is for Device or Computer Level MDM profiles, not User Level profiles.
Will I need a Jamf SCEP Proxy?
Because your Smallstep hosted CA is reachable from the public internet, you do not need a Jamf SCEP proxy.
Before you begin
You will need:
- A Smallstep Certificate Manager team. Don’t have one yet? Sign up.
- A Jamf Pro instance. For this tutorial, use a staging or testing Jamf environment, or create a group of test devices or users.
- A test device or VM to enroll in MDM.
- A Jamf user for testing enrollment.
Video walkthrough
Step-by-step instructions
In this section, we will set up an MDM profile that instructs devices to establish CA trust with your Smallstep CA, and to get a client certificate via Smallstep’s SCEP server.
Configure Smallstep for Jamf
- In the Devices tab, add a device collection and choose Jamf Computers for macOS devices, or Jamf Devices for other Apple devices
- Fill in your Jamf instance URL and choose Confirm
- Choose WiFi, then Continue
- Enter your public IP and Wi-Fi SSID. Smallstep needs your public IP address in order to identify your network requests.
- The other fields are optional. Select Continue when done.
- Choose the Configuration Profile link on the top right of the accounts page to download a
.mobileconfigtemplate that you'll import into Jamf.
Resist the temptation to manually install the .mobileconfig file for testing; it won’t work.
For the next step, you will need the Jamf Settings shown on this page.
These include a webhook URL, username and password to be used when configuring a Jamf SCEP Challenge webhook, below.
Configure Jamf to use Smallstep
Configure a SCEP challenge webhook
First, you'll need to add a SCEP Challenge webhook to your Jamf tenant configuration. You'll only need to do this once.
-
In the Jamf console, go to
Settingsand search forWebhooks -
Click + New
-
Fill out the form as follows:
-
Set a descriptive name, e.g.
SCEP Challenge -
Select ✅ Enabled
-
Use
Basic Authentication -
Populate the webhook URL, username, and password with what you were given by Smallstep
-
Select JSON as the Content Type
-
Select
SCEPChallengeas the webhook event -
Here's an example of the completed form:

-
-
Choose Save in the bottom right
Upload and test the configuration profile
Next, upload the Configuration Profile you downloaded from Smallstep, and map it to a test device.
- In the Jamf console, go to Configuration Profiles (for Computers or Devices)
- Choose Upload.
- Choose File and select the
.mobileconfigtemplate you downloaded from Smallstep - Choose the Scope tab, and select a device or user for testing. For the device to appear, the device should already be enrolled with a basic Jamf MDM profile.
Enrolled devices will immediately receive the configuration profile updates from Jamf and will be ready to join the network. If you need to make changes, you can change the settings in Smallstep and download a new Configuration Profile template.
Deploying production profiles
As you plan to deploy your configuration profile, it is recommended to stage your changes. Here's one approach:
- Clone your production profile in Jamf
- Exclude your test computer or device from your production profile
- Add your test computer or device to the cloned profile
- Make and test changes to the cloned profile
- Apply your changes back to the production profile
- Re-add your test device to the production profile scope
- Finally, remove the cloned profile
Running your own RADIUS server?
If you run your own RADIUS server, you'll need to modify your Configuration Profile to match your setup.
Link the Certificate Trust settings for your Wi-Fi Payload to your RADIUS server's Root CA certificate instead of Smallstep's. You may need to add an additional Certificate payload for your RADIUS server's Root CA.
If you’re planning to deploy Wi-Fi and EAP-TLS using a JumpCloud RADIUS server, you will need to use an RSA CA.
This requires creating an Advanced Authority.
When creating the Authority, use key type RSA_SIGN_PKCS1_2048_SHA256 for both root & intermediate CAs.
Troubleshooting
- Check the expected certificates have been deployed to the right stores on macOS: user vs. device; trusted roots; personal certificates.
- Jamf does show some states in the console and there’s a bit of logging available, but they don’t provide many details, and sometimes they’re not up-to-date.
- Logging can be found by navigating to the Configuration Profile and looking for the
Logsoption in the bottom right. You can then navigate to the right device. Check out theHistory→Management Historytab for the device.
- Use the macOS Console application to diagnose issues. SCEP related (error) logs can be found by searching for “scep” (won’t catch all related log entries, but usually does the job). It’s also possible to follow these logs in realtime.
- The
.mobileconfigfile is a text file and sometimes it can be useful to inspect it for debugging purposes. - If all else fails: Have you tried turning it off and on again? This can sometimes help a device to do things again.
Last updated on February 3, 2026
Introducing
Device Identity
Ensure that only company-owned devices can access your enterprise's most sensitive resources.