Deploy EAP-TLS Wi-Fi certificates to Windows devices with Smallstep and Intune
Introduction
In this tutorial, you will configure Smallstep and Microsoft Intune to establish device trust with your CA and to orchestrate the issuance of TLS certificates for Enterprise Wi-Fi (EAP-TLS / WPA3 Enterprise), VPN, web browsers, or other applications on Windows devices.
You will:
- Connect Microsoft Entra ID to Smallstep via an Entra ID App Registration.
- Configure an Intune Integration in Smallstep
- Configure Intune to use Smallstep as a CA
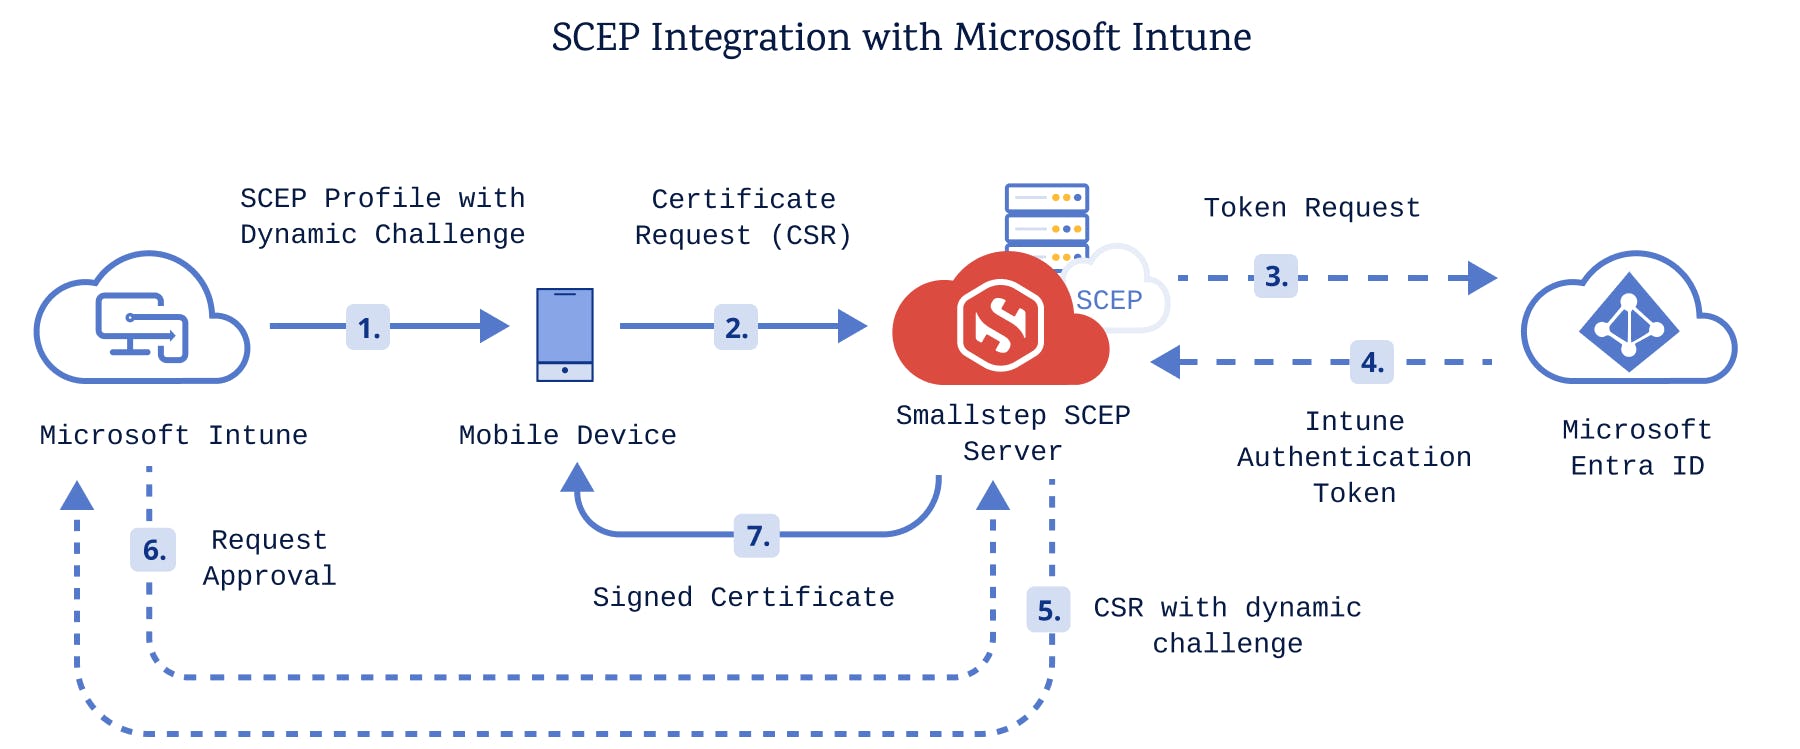
Once you've completed this tutorial, your Intune certificate enrollment process will look like this:
Prerequisites
You will need:
- A Smallstep team
- A Microsoft Azure / Entra ID Tenant
- A Microsoft Intune Tenant
- A test device to enroll for management by Intune
- This can be a Windows VM, but you may need a physical device or additional Wi-Fi adapter for testing an Enterprise Wi-Fi connection
- An Entra ID user for enrollment, that is known in Intune
Step-by-step instructions
0. Gather Entra ID tenant details
In your Entra ID Tenant Overview, copy your tenant’s Primary Domain, eg. contoso.onmicrosoft.com. You will register this with Smallstep later.
1. Register an Entra ID application
You’ll need to register an Application in Entra ID that connects Smallstep to Intune, for the purpose of exchanging SCEP tokens. A SCEP token is a single-use password that's used by devices to get a certificate from Smallstep.
In the Entra Admin Center, Register an Application with the following properties:
- Name the application “Smallstep SCEP Connector”
- Leave all other values alone
- Select Register
In your new App Registration, copy the Application (client) ID value, which you will register with Smallstep later.
Next, visit the Certificates & secrets blade.
Select + New client secret, and use the following properties:
- Name the secret “Smallstep SCEP Secret”
- Select Add to create the secret
Copy the Client Secret Value, which you will register with Smallstep later.
2. Grant API permissions
Now we’ll connect the App Registration to Intune by adding application permissions.
In the App Registration, visit the API Permissions blade.
Add the following permissions:
- Microsoft Graph → Application permissions →
Application.Read.All - Microsoft Graph → Application permissions →
DeviceManagementManagedDevices.Read.All - Intune → Application permissions →
scep_challenge_provider - Intune → Application permissions →
get_data_warehouse
Finally, select ✓ Grant admin consent on the API permissions page.
Here’s how the Configured permissions should look:
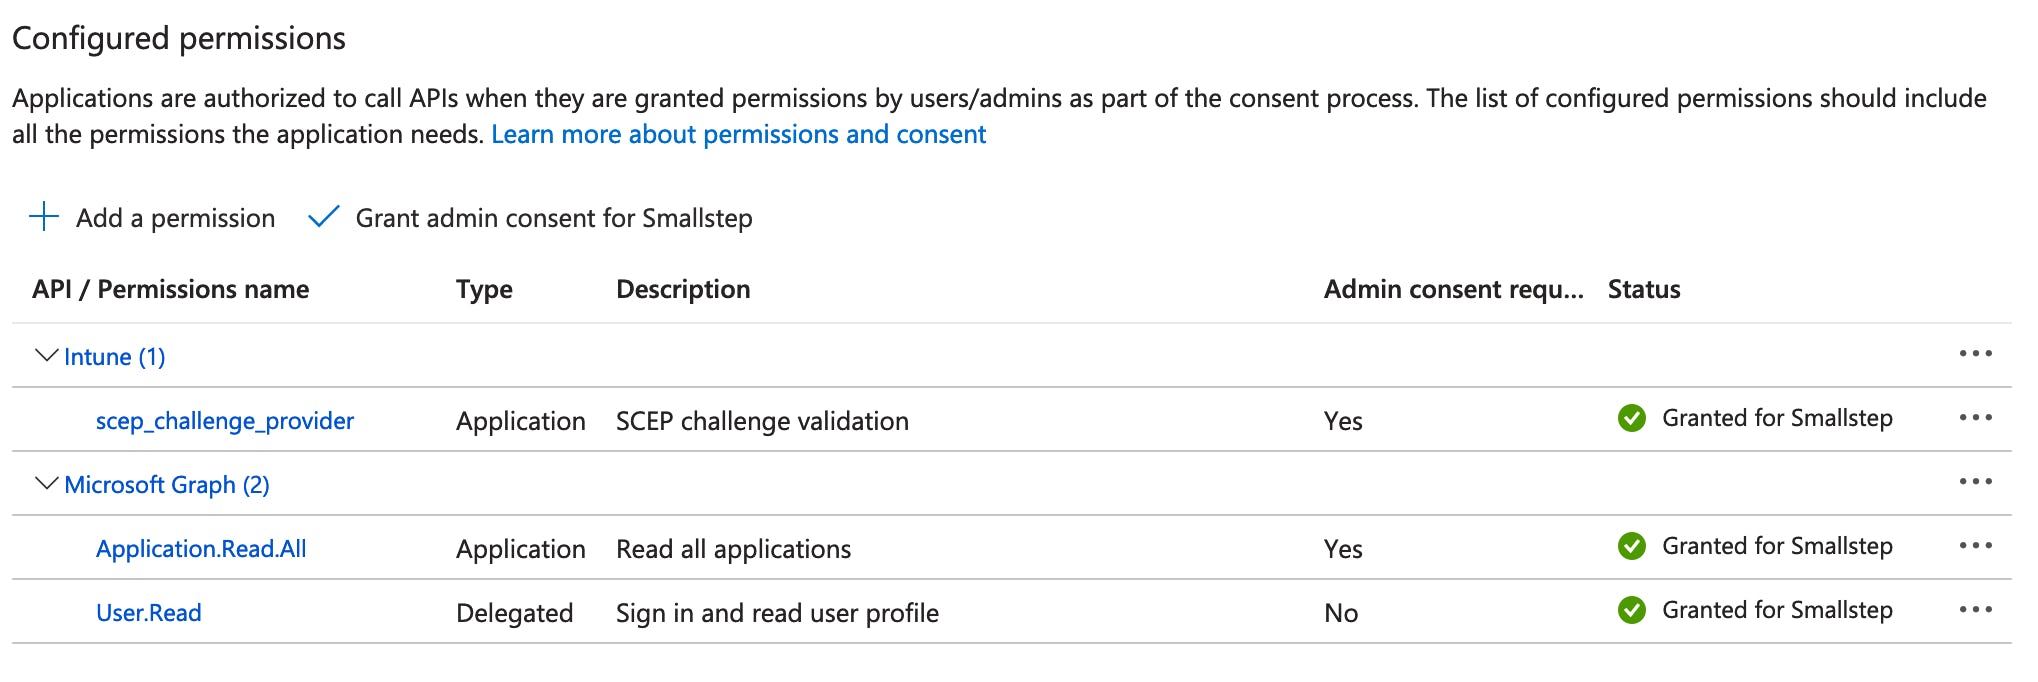
You’ve completed the App Registration setup.
3. Configure Smallstep
In your Smallstep console, visit the Integrations tab, and choose Intune.
Configure the integration with the values you gathered above:
- The App Registration Application (client) ID
- The App Registration Secret Value
- The Intune Tenant Name (this is the tenant's primary domain)
Once the integration is added, go to the Protect tab. Choose either Wi-Fi or VPN, depending on what you need, and add a Wi-Fi or VPN resource. This tutorial assumes you are configuring EAP-TLS Wi-Fi network access. Once you've created the Wi-Fi resource, open the Wi-Fi resource details page. You can keep this tab open as you configure Intune.
To prepare for the next section:
- Download your Root CA Certificate
- Download your Intermediate CA Certificate
- Copy your SCEP URL
4. Configure Intune
Microsoft recommends a staged approach to Intune enrollment. Create an evaluation Group, if you don’t already have one, so that any breaking changes are limited to the group.
In Intune, we’re going to create three Configuration Profiles to deploy to your devices:
- Trusted certificate profile for your Root CA
- Trusted certificate profile for your Intermediate CA
- SCEP Certificate profile, for issuing device certificates from Smallstep
Create a trusted certificate profile for your root CA
Create a new Trusted certificate profile with the following properties:
- Name: Smallstep Root CA
- Certificate file: Upload your Smallstep Root CA certificate
- Destination store: Computer certificate store - root
- Included groups: Include the users or groups you are using for your staged enrollment. As you roll out into production, you will expand this list.
- Create the profile
Create a Trusted certificate profile for your intermediate CA
Create a new Trusted certificate profile with the following properties:
-
Name: Smallstep Intermediate CA
-
Certificate file: Upload your Smallstep Intermediate CA certificate
-
Destination store: Computer certificate store - root
Careful! Add your intermediate CA to the computer’s root store. Do not choose the intermediate certificate store — it will cause enrollment errors.
-
Included groups: Include the users or groups you are using for testing.
-
Create the profile
Create a SCEP Certificate profile
Create a new SCEP certificate profile with the following properties:
-
Name: Smallstep SCEP Certificate
-
Certificate type: Device
-
The certificate properties may vary depending on your use case and threat model. Here are some good starting points:
- Subject name / SANs: For a test deployment, use the default values.
- Certificate validity period: Use the same duration you configured with Smallstep
- Key storage provider: Enroll to TPM KSP if available, Software KSP if not
- Key usage: ✓ Digital certificate and ✓ Key encipherment
- Key size: 2048
- Hash algorithm: SHA-2
- Extended key usage: Under Predefined values, select Client Authentication
- Renewal Threshold (%): Select 20%
-
Root Certificate: Select your Intermediate CA
Careful! Select your intermediate CA here. An enrolling device’s SCEP client will check the fingerprint of the intermediate, not the root.
-
SCEP Server URL: Use the SCEP URL you copied from Smallstep
5. Test and verify your profile
Now try enrolling or syncing a device.
These instructions may vary depending on your enrollment method. We assume you’ve enabled Automatic Enrollment in Intune’s Windows enrollment blade.
- For a new device: Go to Windows Settings → Accounts → Access work or school. Then , under Add a work or school account, choose Connect to sign in to your tenant.
- For a previously enrolled device: Go to Windows Settings → Accounts → Access work or school. Expand the box for the signed-in account and select Info. Select Sync.
After the sync completes, it may take a minute for the certificate to appear in your Windows trust store.
Check the reports in Intune to ensure your devices have enrolled without errors.
Adding wi-fi support
Now that we have a basic working profile with CA trust and a client certificate, we’ll configure an EAP-TLS certificate Wi-Fi connection.
For this section, you will need a RADIUS server that your users will authenticate against.
-
In your Intune Device Configuration Profiles, create a + New Policy.
-
Choose your Platform, select Templates, and choose the Wi-Fi template.
-
Select Create to continue, and give your template a clear name.
-
For Wi-Fi type, choose Enterprise.
-
Configure your SSID and other basic network settings.
-
For EAP type, choose EAP - TLS.
-
Under the Certificate server names, enter the Common Name that's on your RADIUS server certificate. Typically, will match the FQDN of your RADIUS server.
-
Under the Trust tab, add a Trusted Certificate for your RADIUS server.
If your RADIUS server certificate is managed by Smallstep, add the Smallstep RADIUS Root CA PEM here.
If your RADIUS server certificate is from a different PKI, you’ll need to add a new Certificate payload containing your RADIUS server’s Root CA certificate.
-
Under Client Authentication, for Authentication method choose SCEP Certificate.
-
Select the client certificate profile you created earlier.
-
Choose Review + save.
Once you've saved your profile, you'll be ready to test and verify your Wi-Fi connection.
Troubleshooting
- Check the expected certificates have been deployed to the right stores on Windows: user vs. device; trusted roots; trusted intermediates; personal certificates.
- Intune does show states in the console, and you can generate reports, but they don’t provide many details, and sometimes they’re not up-to-date.
- On the client side, use Settings → Accounts → Access work or school → Info to check the last sync status.
- You can also trigger a Sync on this screen
- Sometimes restarting Windows is required to trigger (re-)enrollment / profile deployment. This can happen if the machine has been online for a while, has been suspended for a while, etc. It may have been disconnected from WNS in this case, resulting in no notifications being received.
- There’s an option to generate an MDM report with some basic information that describes which profiles are to be applied.
- Use Windows Event Viewer to diagnose issues. SCEP related (error) logs can be found in Applications and Services Logs → Microsoft → Windows → DeviceManagement-Enterprise-Diagnostics-Provider.
- See also: Microsoft’s SCEP Troubleshooting Documentation
Last updated on February 3, 2026
Introducing
Device Identity
Ensure that only company-owned devices can access your enterprise's most sensitive resources.