ACME Registration Authority for Smallstep Certificate Manager
When public ACME Certificate Authorities (CA) like Let's Encrypt issue certificates to clients in the Web PKI, the CA depends heavily on DNS for client verification. To get a certificate, a client must prove to the CA that it either directly controls the public DNS records for a domain (for the DNS-01 challenge type)—or that it controls the IP address pointed to by public DNS records (for the HTTP-01 and TLS-ALPN-01 challenge types).
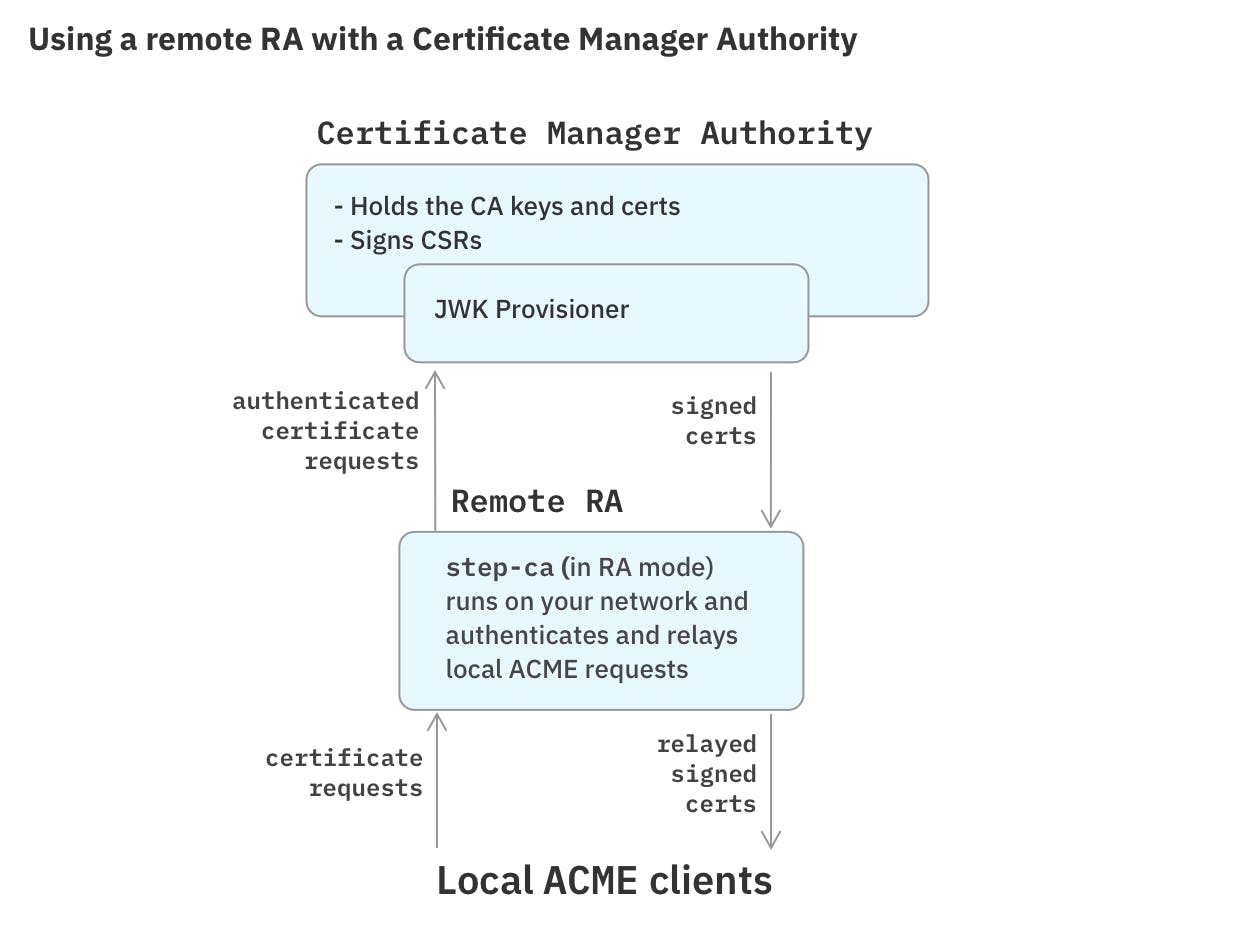
When deploying ACME internally, the same constraints are true: a server that authorizes certificate requests must be able to query internal DNS servers or reach internal hosts. This is why we created a Registration Authority (RA) for Certificate Manager. An RA is a service you run on your own network that authenticates ACME challenges (or other certificate requests). It does not issue certificates or hold CA keys. Instead, it relays authenticated certificate requests to Certificate Manager, which then issues certificates.
In this tutorial, you'll configure a Remote RA that you can run to authenticate requests for Certificate Manager certificates.
Before you begin
You will need:
- An account on the Smallstep platform. Need one? Register here
- An Authority in Certificate Manager that will act as your upstream CA
- A host or Kubernetes cluster where you can run the Registration Authority
Table of contents
Option 1: Use our Linux RA install script
0. Before you begin
Create a JWK provisioner in Certificate Manager. Your RA will use this provisioner to get certificates.
1. Create your RA
Our setup script will install an RA on a Linux host (Debian-based distros).
The script will:
- Install the
stepandstep-cabinaries in/usr/bin - Connect to your Certificate Manager CA
- Help you choose a JWK provisioner on your CA to link your RA to
- Create RA configuration files in
/etc/step-ca - Create a
stepuser and group - Add a systemd service called
step-ca.service - Enable and start
step-ca.service - Export a
STEPPATHvariable in/root/.bash_profile
The script has the following requirements:
- It must be run on a machine that uses systemd
- It must be run as
root - It requires
jq,curl, andtarcommands
To run the script:
# curl -sSLO https://files.smallstep.com/install-step-ra.sh
# Bash install-step-ra.sh \
--ca-url https://example.mycompany.ca.smallstep.com \
--fingerprint b4fc6b547ca4610b69cfcc53c6933e7a37170476dfe13EXAMPLE92c403f5 \
--provisioner-name "acme-ra-jwk" \
--dns-names "ra.example.com" \
--listen-address :443
Your RA service should now be running. It is configured with a single ACME provisioner, but you can add other provisioners as needed.
Then follow the prompts to configure and start your RA.
Check that your RA server is running properly:
# journalctl -fu step-ca.service
-- Logs begin at Wed 2021-07-28 18:57:26 UTC. --
Jul 28 19:05:34 ip-172-31-28-100 systemd[1]: Started step-ca service.
Jul 28 19:05:35 ip-172-31-28-100 step-ca[2013]: badger 2021/07/28 19:05:35 INFO: All 0 tables opened in 0s
Jul 28 19:05:35 ip-172-31-28-100 step-ca[2013]: badger 2021/07/28 19:05:35 INFO: No head keys found
Jul 28 19:05:35 ip-172-31-28-100 step-ca[2013]: 2021/07/28 19:05:35 Using root fingerprint 'b4fc6b547ca4610b69cfcc53c6933e7a37170476dfe13EXAMPLE92c403f5'
Jul 28 19:05:35 ip-172-31-28-100 step-ca[2013]: 2021/07/28 19:05:35 Serving HTTPS on :443 ...
You have completed the basic setup of your RA.
2. Distribute your root CA certificate and start issuing certs. 🥳
To download your root certificate from anywhere on your network, run the following, substituting your RA's URL and the root CA fingerprint:
$ step ca root root_ca.crt --ca-url https://example.mycompany.ca.smallstep.com --fingerprint b4fc6b547ca4610b69cfcc53c6933e7a37170476dfe13EXAMPLE92c403f5
You can then get a certificate manually, using step with the RA's ACME provisioner:
$ step ca certificate my-hostname.example.com server.crt server.key
3. Configure your local ACME clients to use your RA (instead of Let's Encrypt)
We've written a tutorial for configuring popular ACME clients to use internal ACME.
Option 2: Manual RA setup
Setting up an RA manually involves the following steps:
-
Create an Authority in Certificate Manager with a JWK provisioner
First, create a hosted Authority in the Certificate Manager console if you haven't already, and configure your local
stepCLI to access this Authority, usingstep ca bootstrap.Now, as a Super Administrator, add a JWK provisioner to the Authority, and give it a name (eg.
acme-ra-jwk):$ step ca provisioner add acme-ra-jwk --type JWK --create
You'll be asked for a password for the JWK encryption key. Provide a strong password and store it somewhere safe. You'll need it later in this setup process.
-
Setup a local instance of
step-cathat can act as a registration authority (RA).You'll need to configure the RA to work with your hosted Authority in Certificate Manager, using the JWK provisioner you just created for the RA to Authority connection.
Create a
/.step/config/ca.jsonconfiguration file with the following contents:{ "address": ":443", "dnsNames": ["ra.example.com"], "db": { "type": "badgerV2", "dataSource": "./.step/db" }, "logger": {"format": "text"}, "authority": { "type": "stepcas", "certificateAuthority": "https://example.mycompany.ca.smallstep.com", "certificateAuthorityFingerprint": "b4fc6b547ca4610b69cfcc53c6933e7a37170476dfe13EXAMPLE92c403f5", "certificateIssuer": { "type" : "jwk", "provisioner": "acme-ra-jwk" }, "provisioners": [{ "type": "ACME", "name": "acme" }] }, "tls": { "cipherSuites": [ "TLS_ECDHE_ECDSA_WITH_CHACHA20_POLY1305", "TLS_ECDHE_ECDSA_WITH_AES_128_GCM_SHA256" ], "minVersion": 1.2, "maxVersion": 1.3, "renegotiation": false } }
Substitute your own values for the following:
address: The address and port you would like your RA to listen on (eg.10.20.30.104:9000or just:443to bind to0.0.0.0:443.certificateAuthority: the URL of your upstream CAcertificateAuthorityFingerprint: the CA fingerprint of your upstream CAcertificateIssuer.provisioner: Your JWK provisioner name
-
Next, put the issuing JWK provisioner password into a file (eg.
$(step path)/password.txt). When starting upstep-cain RA mode, you must pass the issuing JWK provisioner password filename:$ step-ca /.step/config/ca.json --issuer-password-file password.txt
-
Distribute your root CA certificate and start issuing certs. 🥳
In another terminal run the following to download your root certificate from anywhere on your network, substituting your RA's URL and the root CA fingerprint:
$ step ca root root_ca.crt --ca-url https://ra.example.com --fingerprint b4fc6b547ca4610b69cfcc53c6933e7a37170476dfe13EXAMPLE92c403f5
You can then get a certificate manually, using
stepwith the RA's ACME provisioner:$ step ca certificate my-hostname.example.com server.crt server.key
-
Configure your local ACME clients to use your RA (instead of Let's Encrypt)
We've written a tutorial for configuring popular ACME clients to use internal ACME.
If you're running Kubernetes, you can run an ACME Registration Authority in your cluster. We have a Helm Chart for deploying an RA to Kubernetes.
TL;DR: there's a setup script showing all of the steps together in this README.
-
Create an Authority in Certificate Manager with a JWK provisioner
First, create a hosted Authority in the Certificate Manager console if you haven't already, install the
stepCLI locally (brew install step), and configurestepto access your Authority, usingstep ca bootstrap.Now, as a Super Administrator, add a JWK provisioner to the Authority, and give it a name (eg.
registration-authority):$ step ca provisioner add registration-authority --type JWK --create
You'll be asked for a password for the JWK encryption key. Provide a strong password and store it somewhere safe. You'll need it later in this setup process.
-
Configure the Helm Chart
Download the
step_values.yml$ curl -o step_values.yml -sSL https://raw.githubusercontent.com/smallstep/helm-charts/master/step-certificates/examples/registration_authority/values.yml
You will need to change the following fields in this YAML file to match your configuration:
certificateAuthority— your Certificate Manager Authority URLcertificateAuthorityFingerprint— your Certificate Manager Authority fingerprintcertificateIssuer.provisioner— the name of your JWK provisionerdnsNames— the DNS names you'd like your RA to be available on (these values will be added to the RA's TLS certificate subject)ca-url— your Certificate Manager Authority URLfingerprint— your Certificate Manager Authority fingerprintsecrets.certificate_issuer.password— the base64 encoded JWK encryption key password. (echo 'your-jwk-password-here' | base64)
-
In Helm, add the Smallstep Helm charts repository
$ helm repo add smallstep https://smallstep.github.io/helm-charts/
$ helm repo update smallstep
-
Install the Helm chart
$ helm install -f step_values.yml smallstep/step-certificates
-
Configure your local ACME clients to use your RA (instead of Let's Encrypt)
We've written a tutorial for configuring popular ACME clients to use internal ACME.
Last updated on February 3, 2026
Introducing
Device Identity
Ensure that only company-owned devices can access your enterprise's most sensitive resources.