Okta Quickstart
Prerequisites
You will need:
- An account on the Smallstep platform Need one? Register here
- Okta Super Administrator privileges
- Okta Lifecycle Management Subscription
- Two (or more) Okta groups:
- A group whose members should be allowed to SSH (we'll refer to this as the
sshgroup, but you can call it whatever you want) - A group whose members should be allowed to
sudo(we'll refer to this as thesudogroup, but you can call it whatever you want) - You can use existing groups or create new ones (Directory → Groups → Add Group)
- Make sure you add users that should be allowed to ssh/sudo to the respective groups (Directory → Groups → select group → Manage People)
- For more granular access, you can create multiple groups and grant access to a subset of Smallstep managed hosts.
- A group whose members should be allowed to SSH (we'll refer to this as the
Features
The following provisioning features are supported:
- Push Groups and New Users
- New users created through OKTA will also be created in the third party application.
- Push Profile or Group Updates
- Updates made to the user's profile through OKTA will be pushed to the third party application.
- Push User Deactivation
- Deactivating the user or disabling the user's access to the application through OKTA will deactivate the user in the third party application.
- Note: For this application, deactivating a user means removing access to login, but maintaining the user's ssh access information as an inactive user.
- Reactivate Users
- User accounts can be reactivated in the application.
Overview
In this quickstart, we will:
- Create a new OIDC application in Okta, for single sign-on
- Enter OIDC details into the Smallstep SSH UI
- Add and configure the Smallstep application from the Okta Application Directory, for user sync via SCIM
- Check logs to confirm users and groups are syncing to Smallstep SSH
Step by step instructions
Step 1. Create Okta OIDC Application
-
Start at your Okta admin console (access via "Admin" button next to "+ Add Apps" after successful log in)
-
Go to Applications → Create App Integration
-
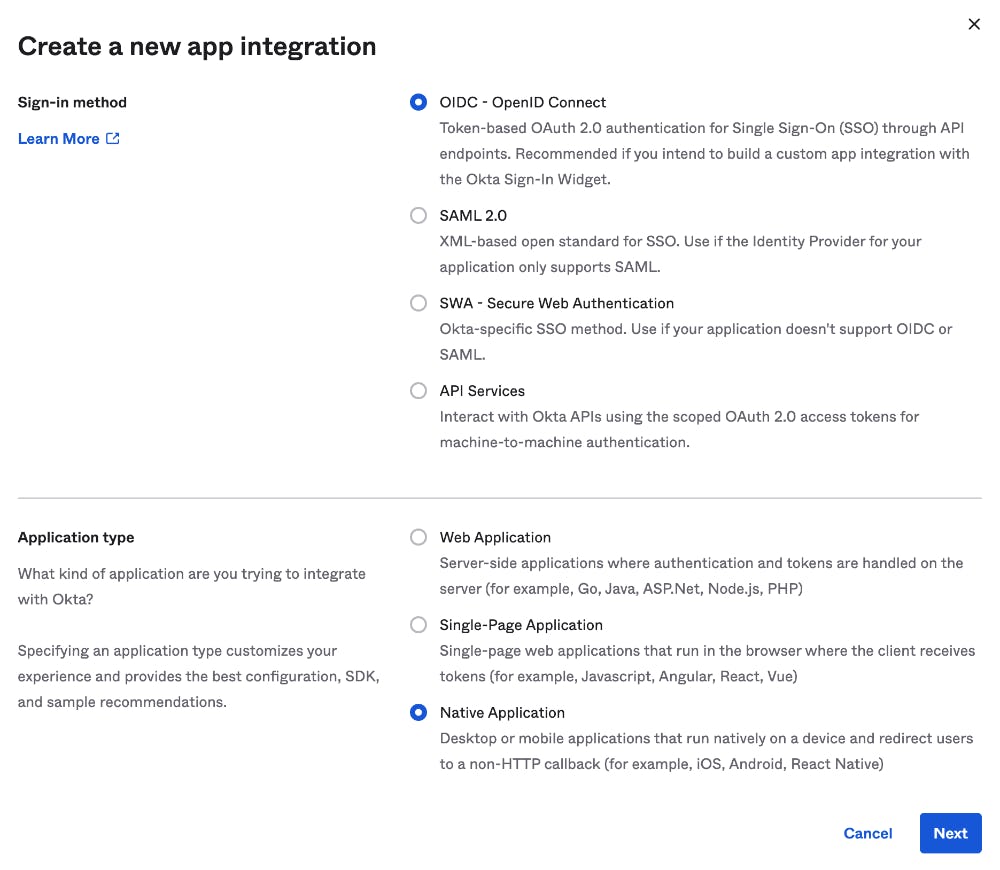
In the pop up select "OIDC - OpenID Connect" as the sign-in method and specify "Native Application" for the Application type.
-
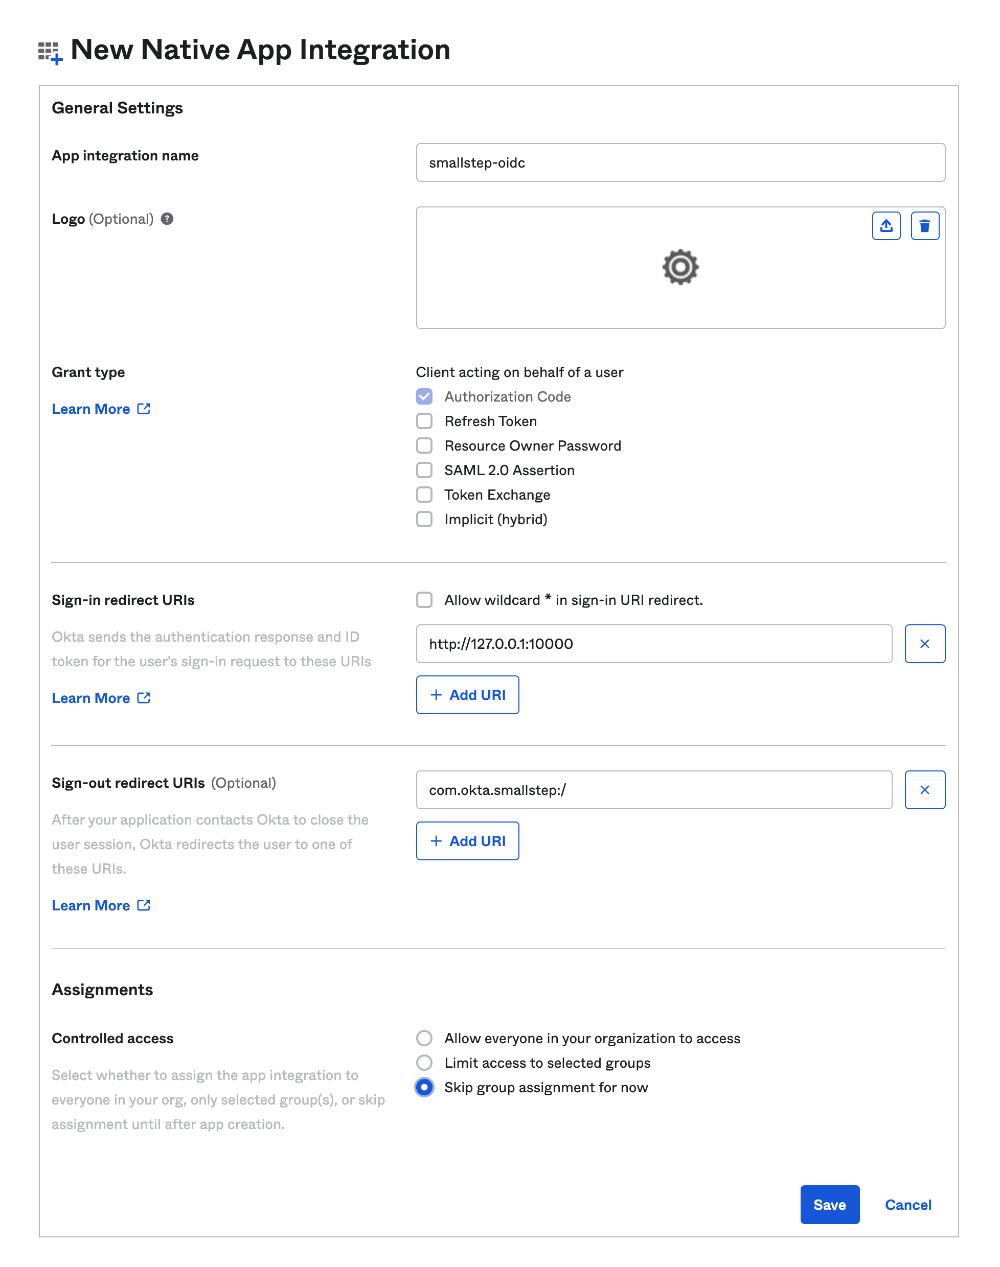
New Native App Integration Page
- App integration name:
smallstep-oidc - Sign-in redirect URIs:
http://127.0.0.1:10000 - Select "Skip group assignment for now"
- All other value leave as default
- click save
- App integration name:
-
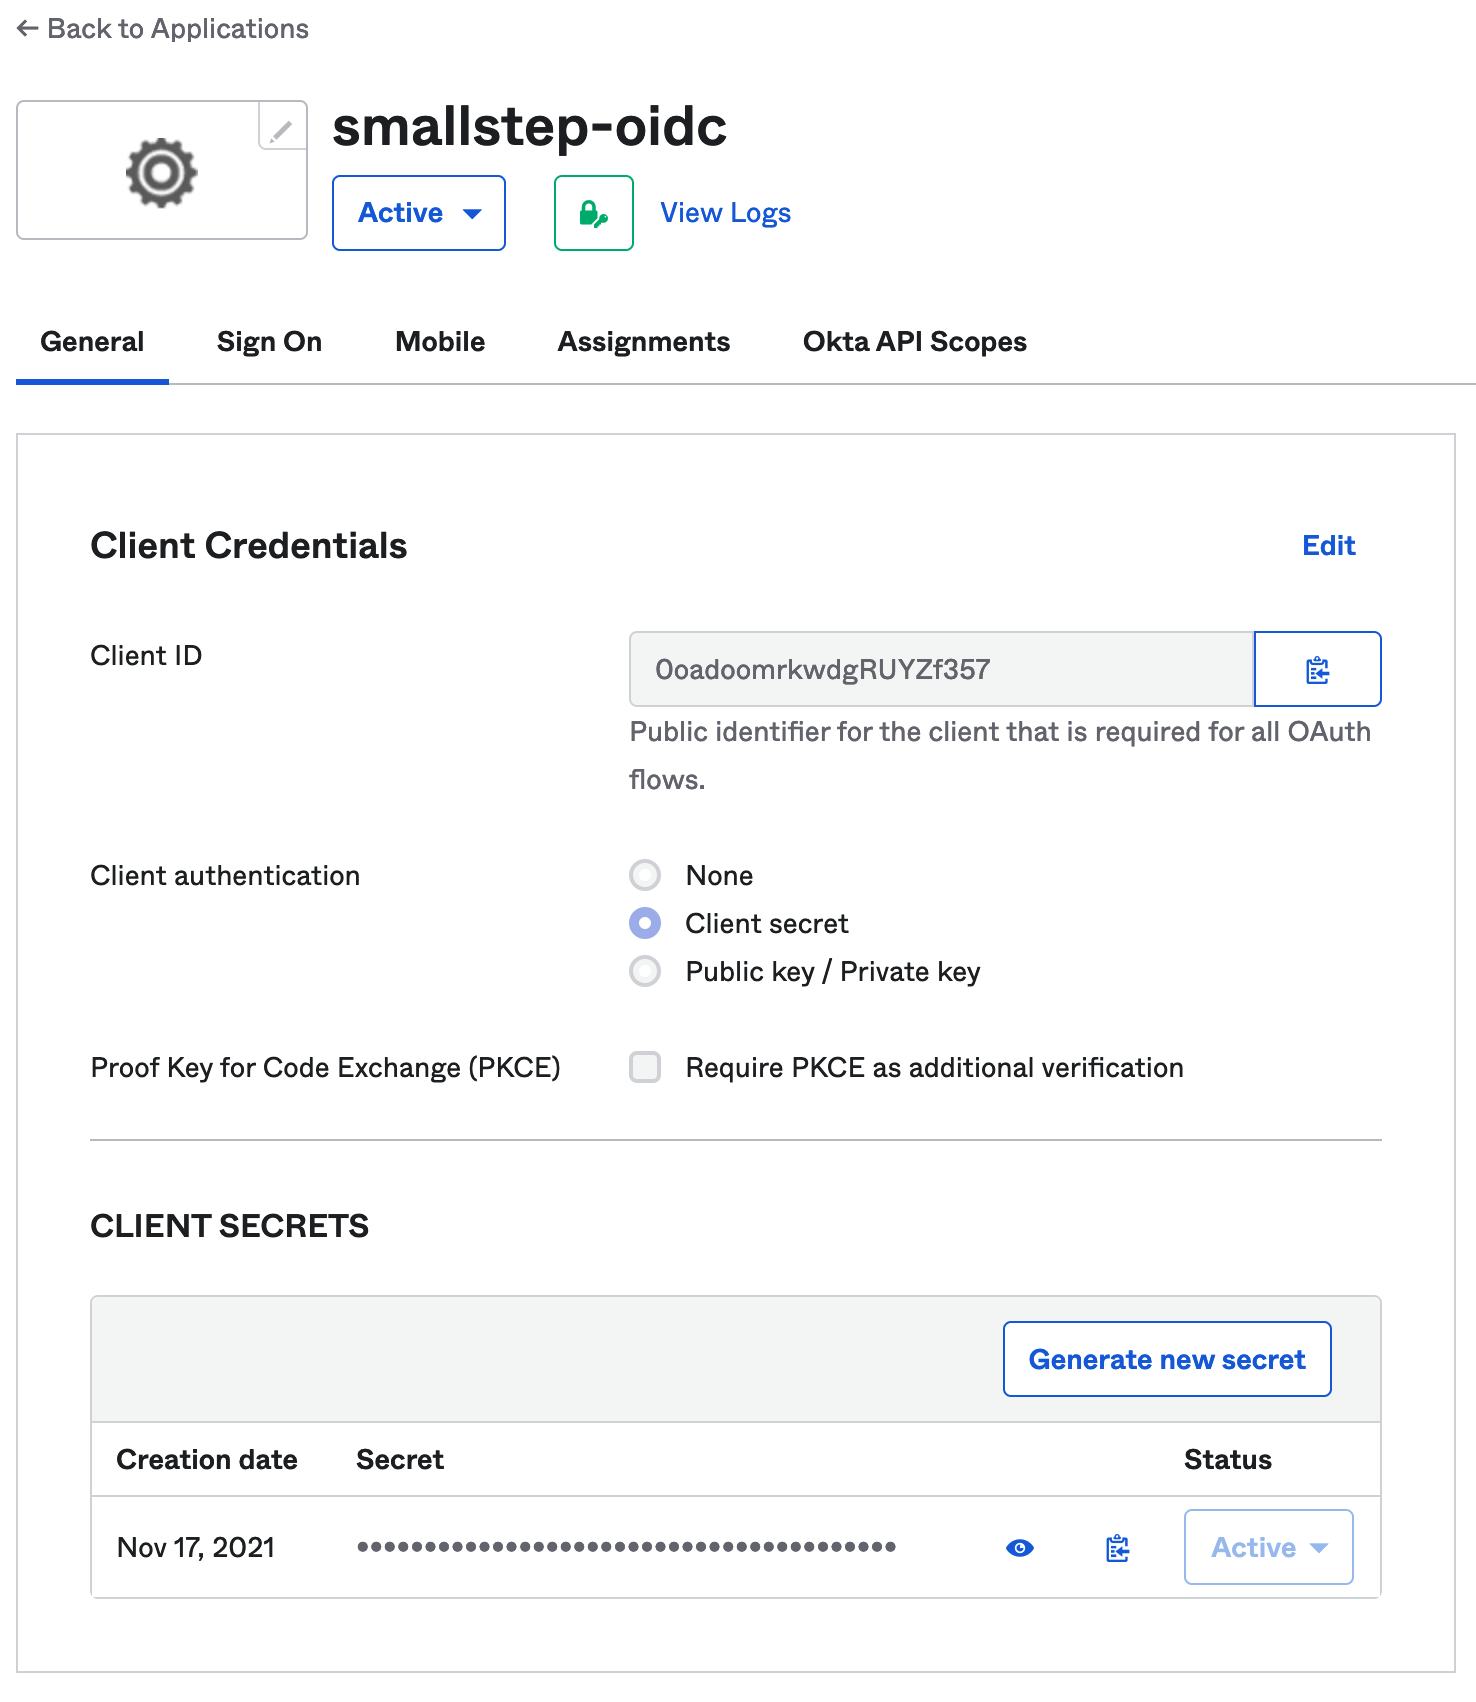
Go to the General tab → Scroll down to "Client Credentials" and choose "Edit"
- Select "Use Client Authentication" radio button
- Save
-
Go to the Assignments tab.
- Assign any groups that will need either
sudoand/orsshaccess to hosts to thesmallstep-oidcapp:- Assignments → Assign → Assign to Group → Click "Assign" for
ssh - Assignments → Assign → Assign to Group → Click "Assign" for
sudo - Repeat this process for any other groups you created for controlling SSH/sudo access
- Assignments → Assign → Assign to Group → Click "Assign" for
- Assign any groups that will need either
-
Go back to General tab and scroll down to "Client Credentials." You'll refer to these values in the next step.
Step 2. Enter your OIDC details into the Smallstep console
-
Open a new browser tab and log in to Smallstep:
https://smallstep.com/app/[TEAM-NAME] -
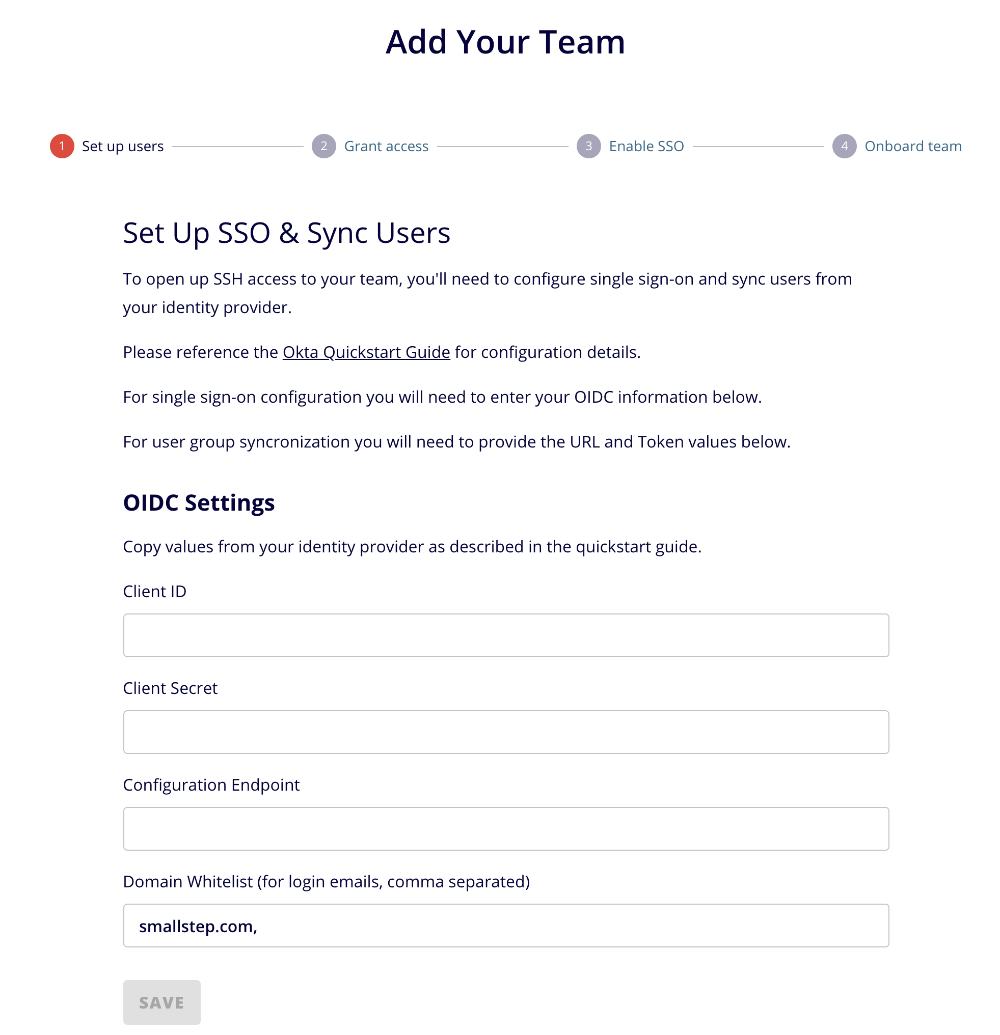
Navigate the Onboarding Dialog. If the dialog is not open, you can relaunch it by visiting the Users tab.
-
Copy and paste your Client ID and Client Secret from Okta.

-
The configuration endpoint is derived from your Okta domain. Fill your Okta domain into the following URL:
https://{your Okta domain}/.well-known/openid-configuration
This is your Configuration Endpoint. For example, if you normally sign into Okta at https://example.okta.com/, then your configuration endpoint is https://example.okta.com/.well-known/openid-configuration
You can copy your Okta domain from the OIDC application Sign On settings tab

- Click "SAVE"
- You've completed this portion of the setup.
Step 3. Add the Smallstep app integration and configure user sync in Okta
-
In the OKTA admin console, add the Smallstep application
- Applications → Browse App Catalog
-
Search for
Smallstep -
Select the Smallstep app:
-
- Applications → Browse App Catalog
-
Click "Add"
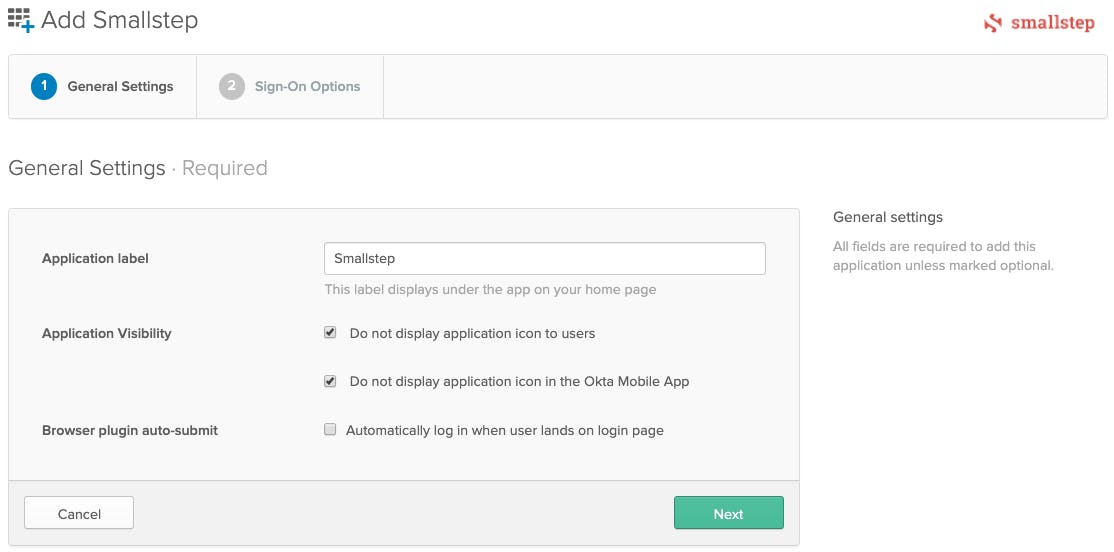
-
Select "Do not display application icon to users"
-
Select "Do not display application icon in the Okta Mobile App"
-
De-select "Automatically log in when user lands on login page"
-
Click Next
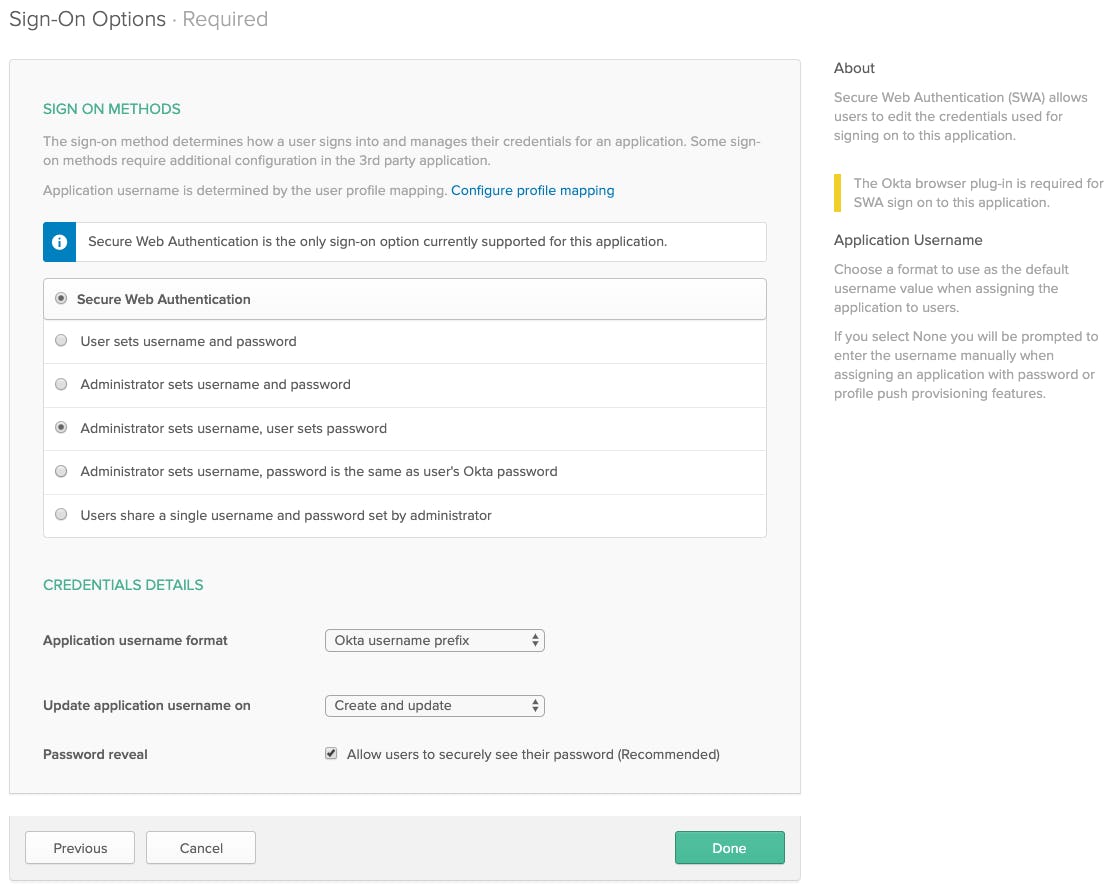
-
Select "Administrator sets username, user sets password"
-
Application username format: "Okta username prefix"
-
Update application username on "Create and update"
-
Done
-
Provisioning
- Select the "Provisioning" tab
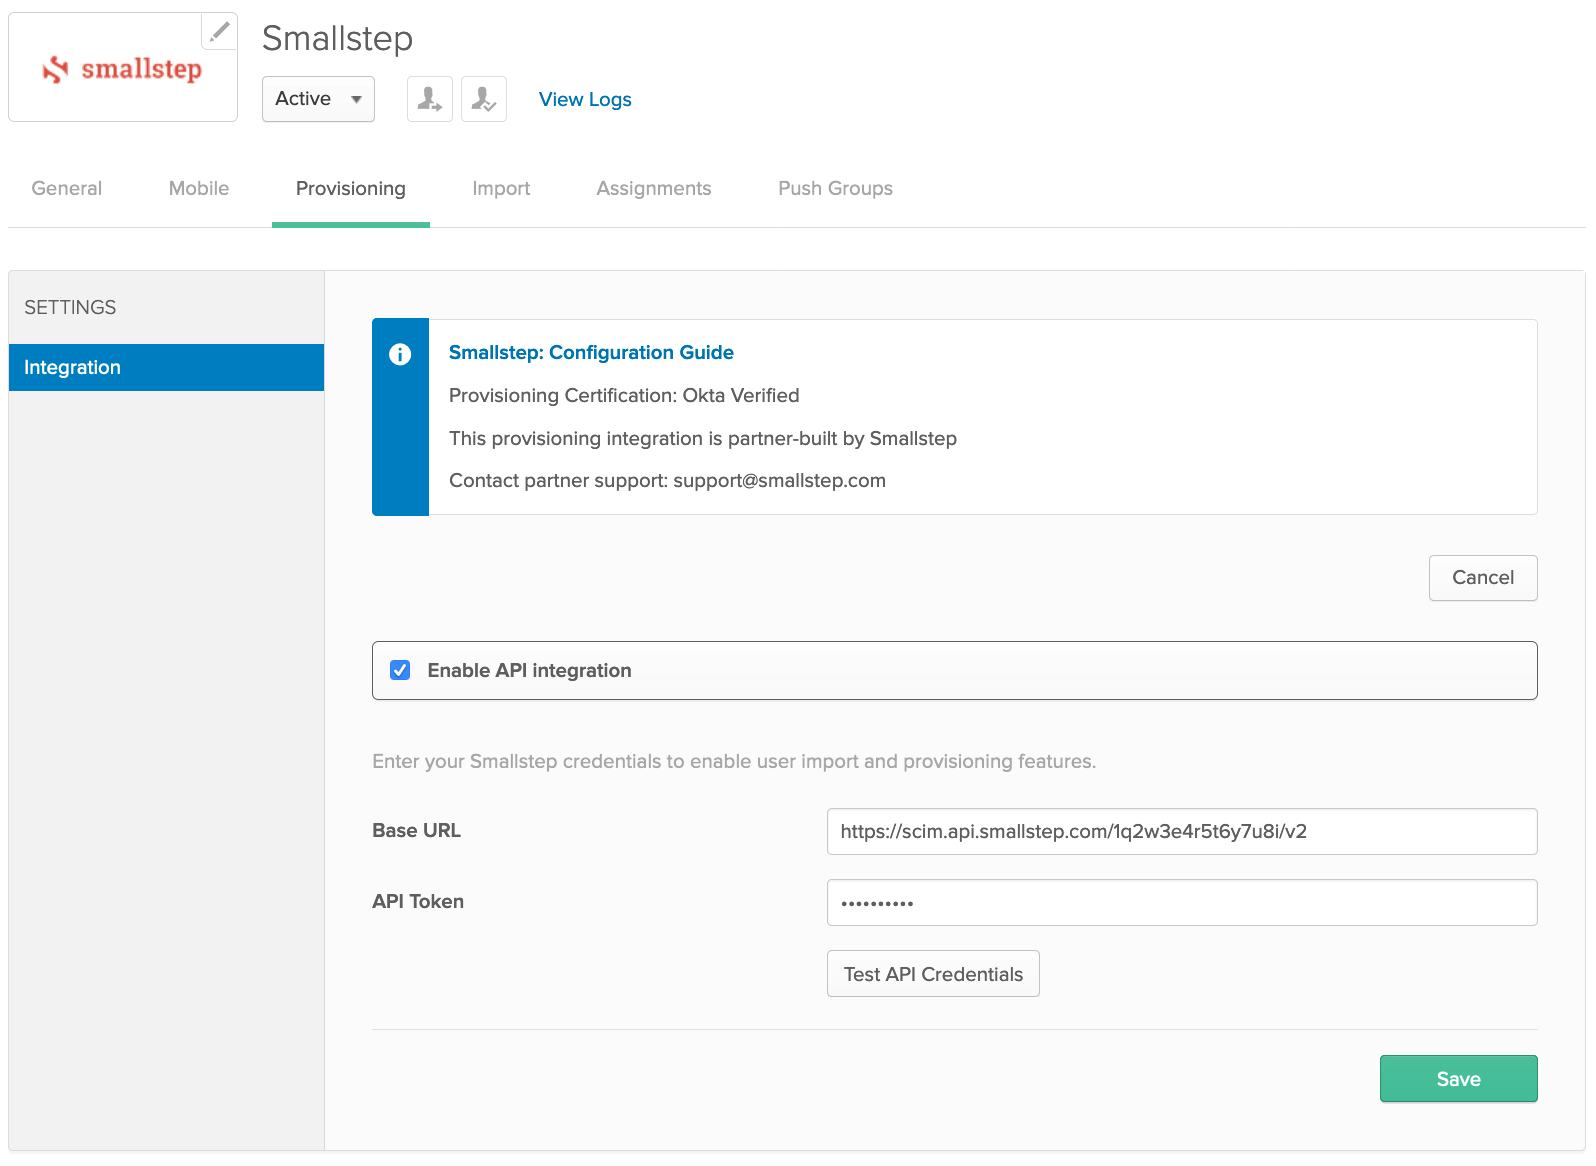
- Click "Configure API Integration" and select the checkbox next to "Enable API integration"
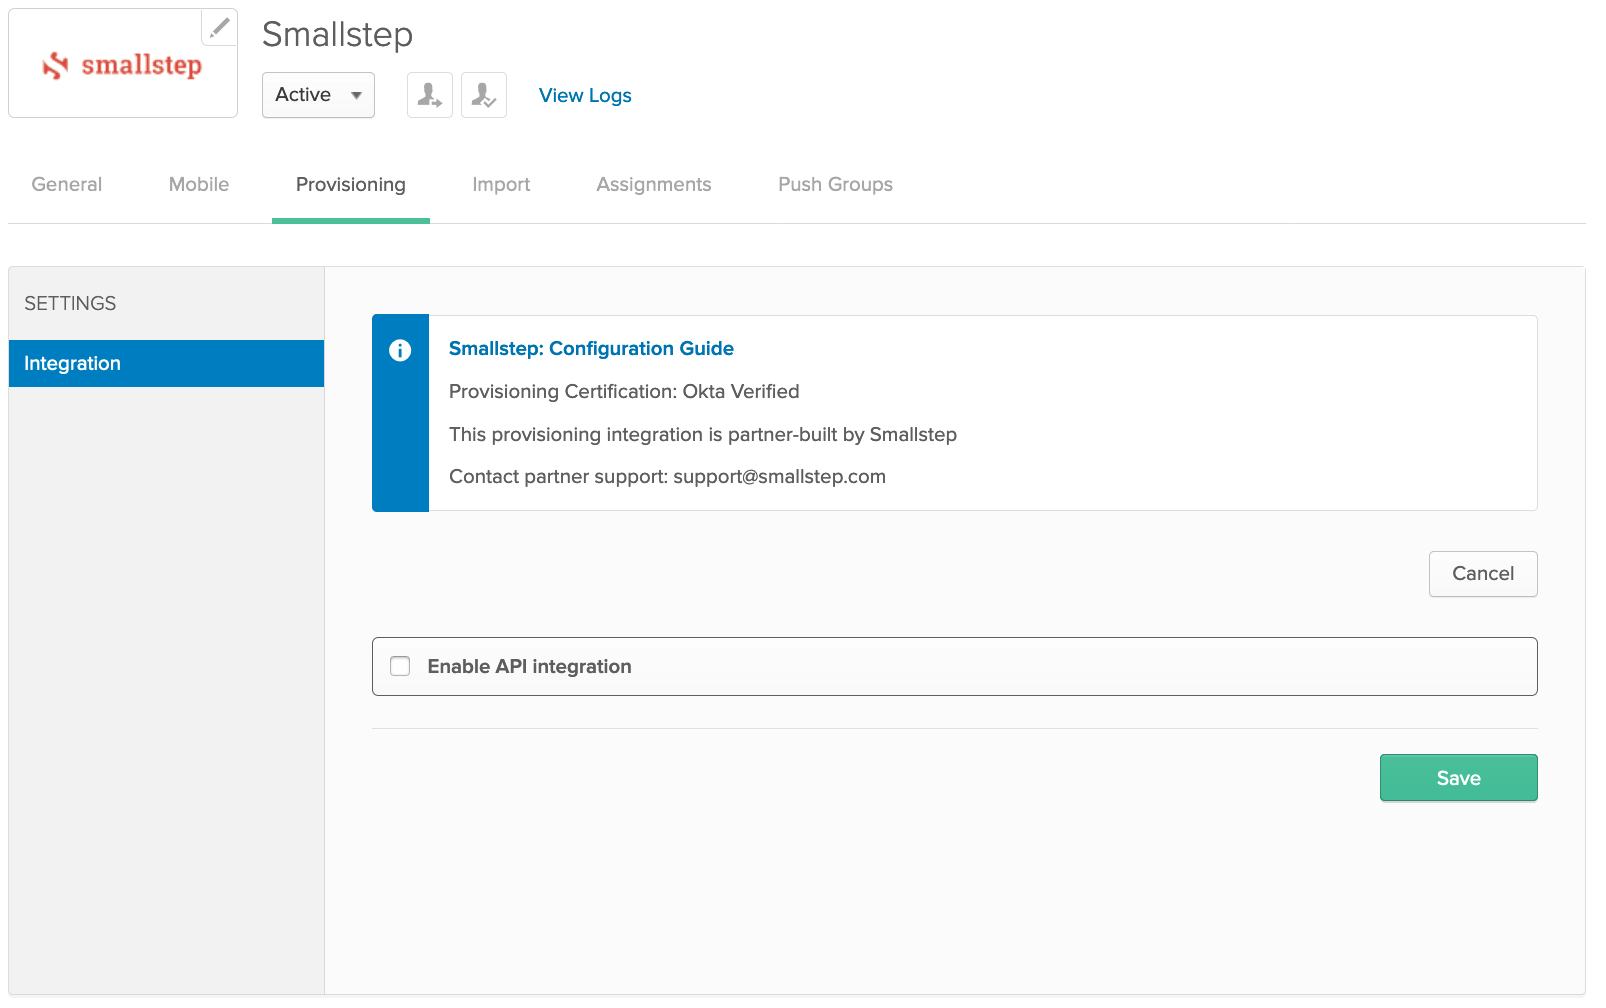
-
Return to the Smallstep console, or open a new browser tab and sign into the Smallstep console:
https://smallstep.com/app/[TEAM-NAME] -
Navigate to the Onboarding UI → Add Your Team → SCIM Details
-
Copy Base URL, and API Token from Smallstep console, and paste into Okta Provisioning form.
-
In Okta, choose Test API Credentials. After successful verification, choose Save.
-
Reload the provision tab
-
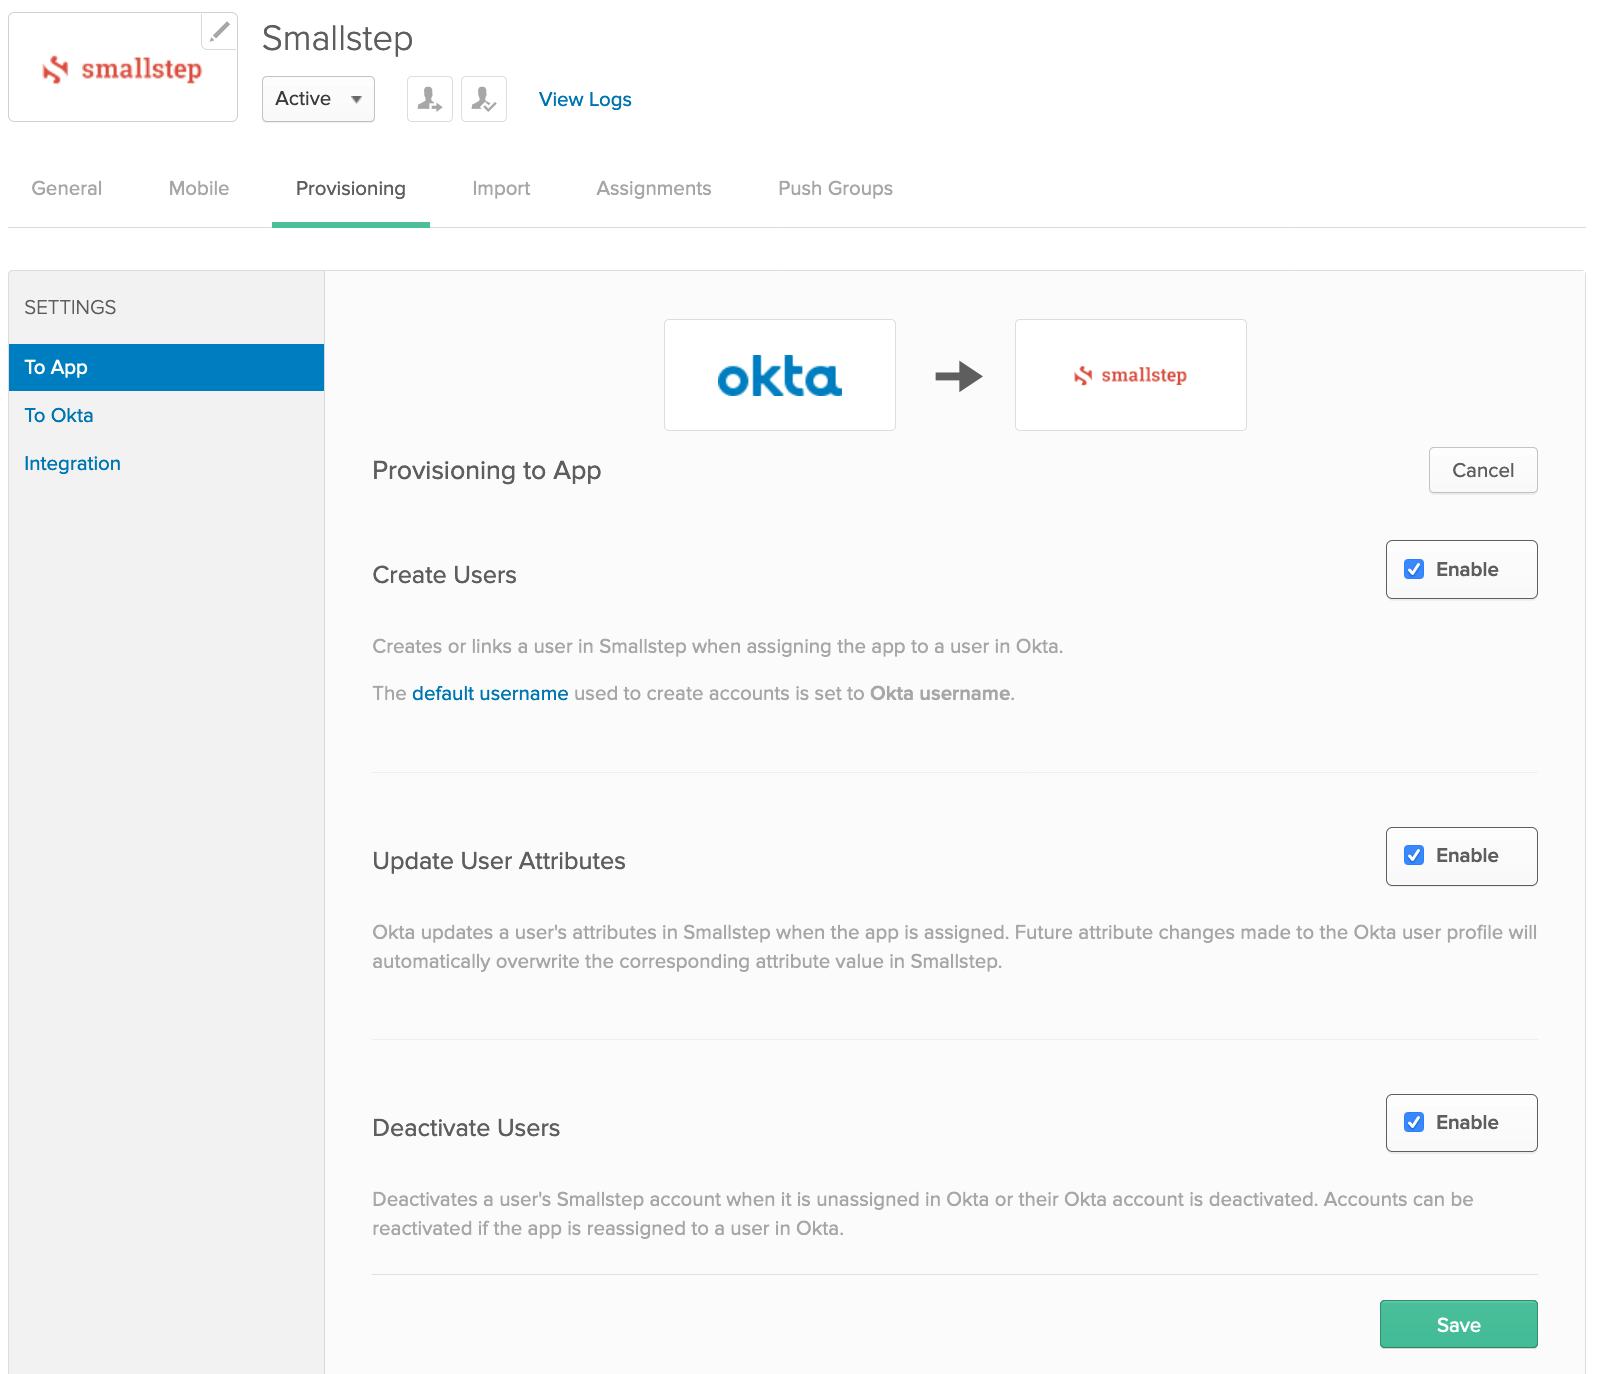
Under Provisioning → Settings → To App, choose Edit and enable
- Create Users
- Update User Attributes
- Deactivate Users
-
Save.
-
Assignments
- Select the Assignments tab → Click Assign → Assign to Groups
- Search by group → Assign any groups that will need either
sudoand/orsshaccess to hosts - Group names that contain a
/are not supported in this release.
-
Push Groups
- Select the Push Groups tab → Push Groups → Find Groups By Name
- Search for the same groups that will need either
sudoand/orsshaccess to hosts. - Save.
- Repeat for each desired group.
Step 4. Sign in to the Smallstep UI
Sign in at https://smallstep.com/app/[Team ID]
-
Select the Logs tab. You should see a list of success messages associated with
SCIM-SYNCcategory items.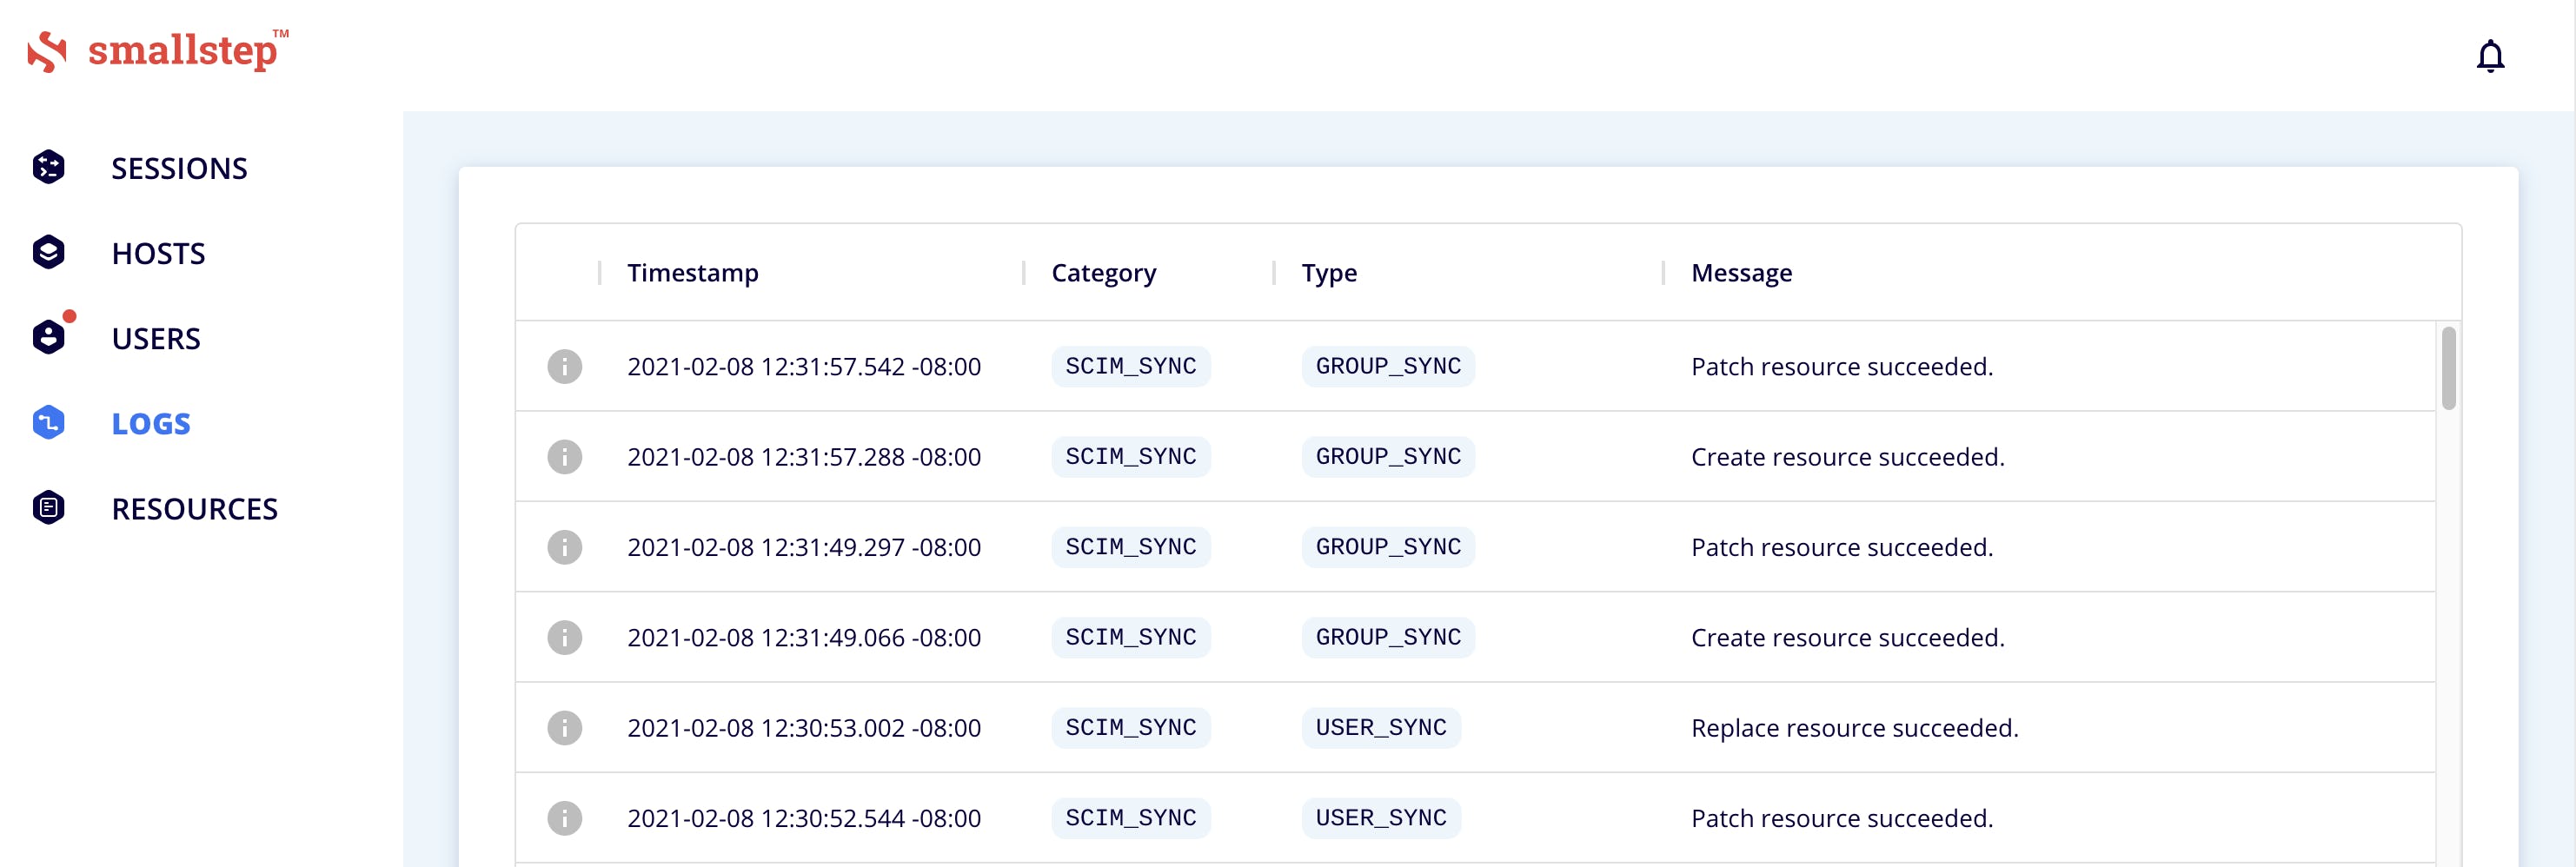
-
Select the Users tab. If the onboarding dialog is open, press
Escto close. -
You should see your Users and Groups synced over from Okta.
Okta configuration complete
Troubleshooting tips
- Initial activation of Okta OIDC provisioning in Smallstep SSH requires entering your Client ID, Client Secret, and base domain of your Okta instance. Contact Smallstep support with any questions | support@smallstep.com
- UIDs and GIDs. By default, Smallstep will auto-assign POSIX UIDs and GIDs for your users. Alternatively, you can sync POSIX UIDs and GIDs values from your Okta directory to Smallstep.
- See our guide How to sync UIDs and GIDs from Okta.
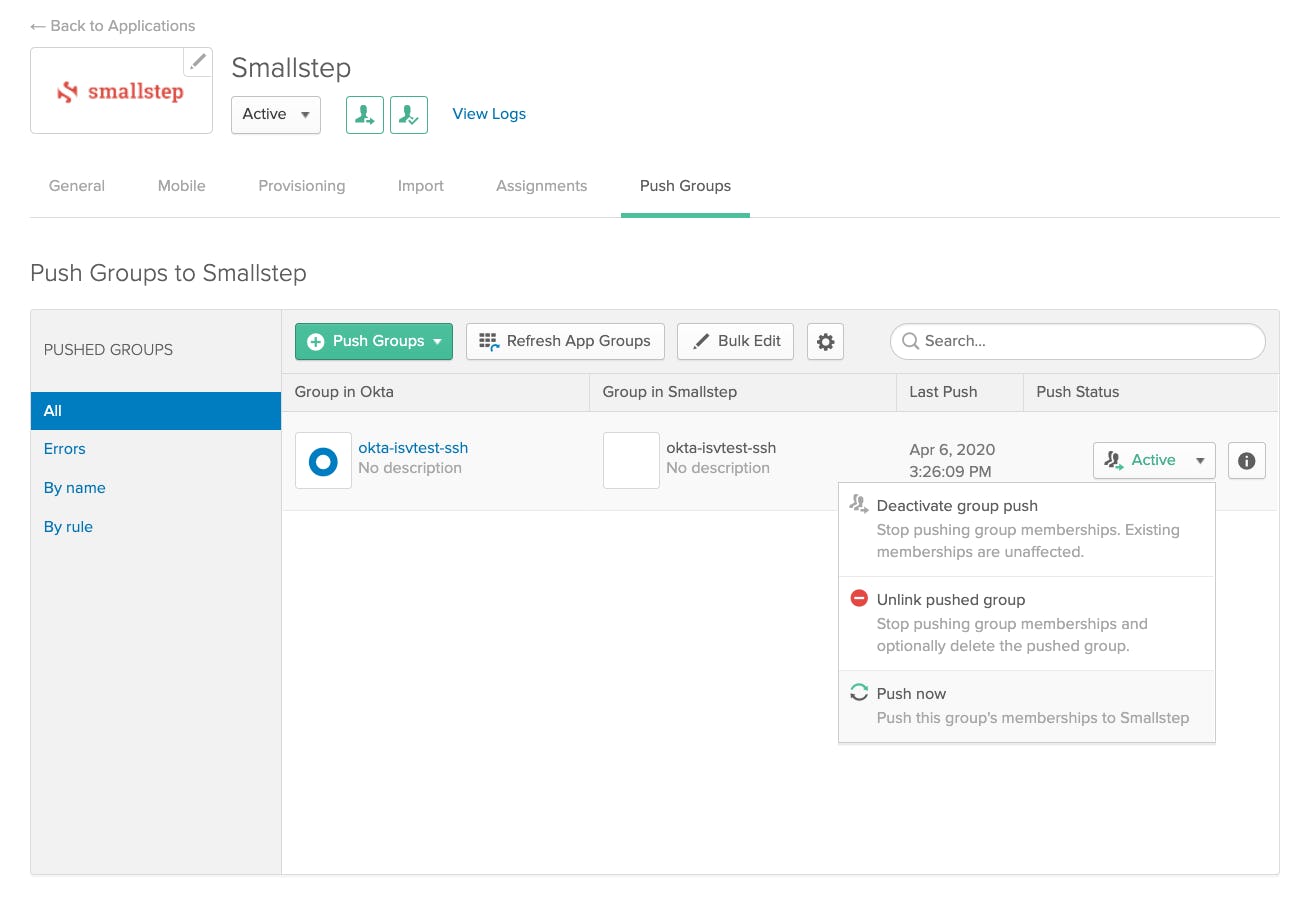
- If you are having trouble synchronizing users or groups, it's always recommended to resynchronize the information manually:
- Applications → Smallstep → Push Groups → Find Group → "Push Now'
- When users are deactivated in Okta, they will be deactivated in Smallstep. Users will not be able to SSH to servers, but their user accounts will remain on Smallstep managed hosts. To permanently delete user data on Smallstep managed hosts, contact Smallstep support | support@smallstep.com
Last updated on February 3, 2026
Introducing
Device Identity
Ensure that only company-owned devices can access your enterprise's most sensitive resources.