Connect Intune to Smallstep
Smallstep can integrate with Microsoft Intune to synchronize your device inventory, to exchange SCEP tokens, and to enroll your fleet with Smallstep using the Smallstep Agent. A SCEP token is a single-use password that's used by devices to get a certificate from Smallstep for bootstrapping.
In this document, we will configure your Microsoft Intune instance for use with your Smallstep team and any Windows endpoints.
To configure the connection, let's first set up an Application in Entra ID. Then, we'll add the client credentials to Smallstep.
Prerequisites
You will need:
- A Smallstep team
- A Microsoft Azure / Entra ID Tenant. A Global Administrator role is required to grant tenant-wide API consent.
- A Microsoft Intune Tenant. An Intune Administrator role is required.
- A test device to enroll for management. This can be a Windows VM, but you may need a physical device or additional Wi-Fi adapter if you are testing an Enterprise Wi-Fi connection.
Client requirements:
- The agent will need to reach the following domains:
smallstep.com api.smallstep.com gateway.smallstep.com control.infra.smallstep.com *.[team-name].ca.smallstep.com auth.smallstep.com att.smallstep.com
- Windows 10 (Anniversary Edition) or higher is supported. Windows Home is not supported.
Step-by-step instructions
1. Register an Entra ID application
You’ll need to register an Application in Entra ID that connects Smallstep to Intune.
In the Entra Admin Center, Register an Application with the following properties:
- Name the application “Smallstep”
- Leave all other values alone
- Select Register
Find your new App Registration, and copy the Application (client) ID value, which you will register with Smallstep later.
Next, visit the Certificates & secrets blade.
Select + New client secret, and use the following properties:
- Name the secret “Smallstep Secret”
- Choose a validity period that matches your security policies. When you rotate the client secret, you will need to update it in your Smallstep settings.
- Select Add to create the secret
Copy the Client Secret Value, which you will register with Smallstep later.
2. Grant API permissions
Now we’ll connect the App Registration to Intune by adding application permissions.
In the App Registration, visit the API Permissions blade.
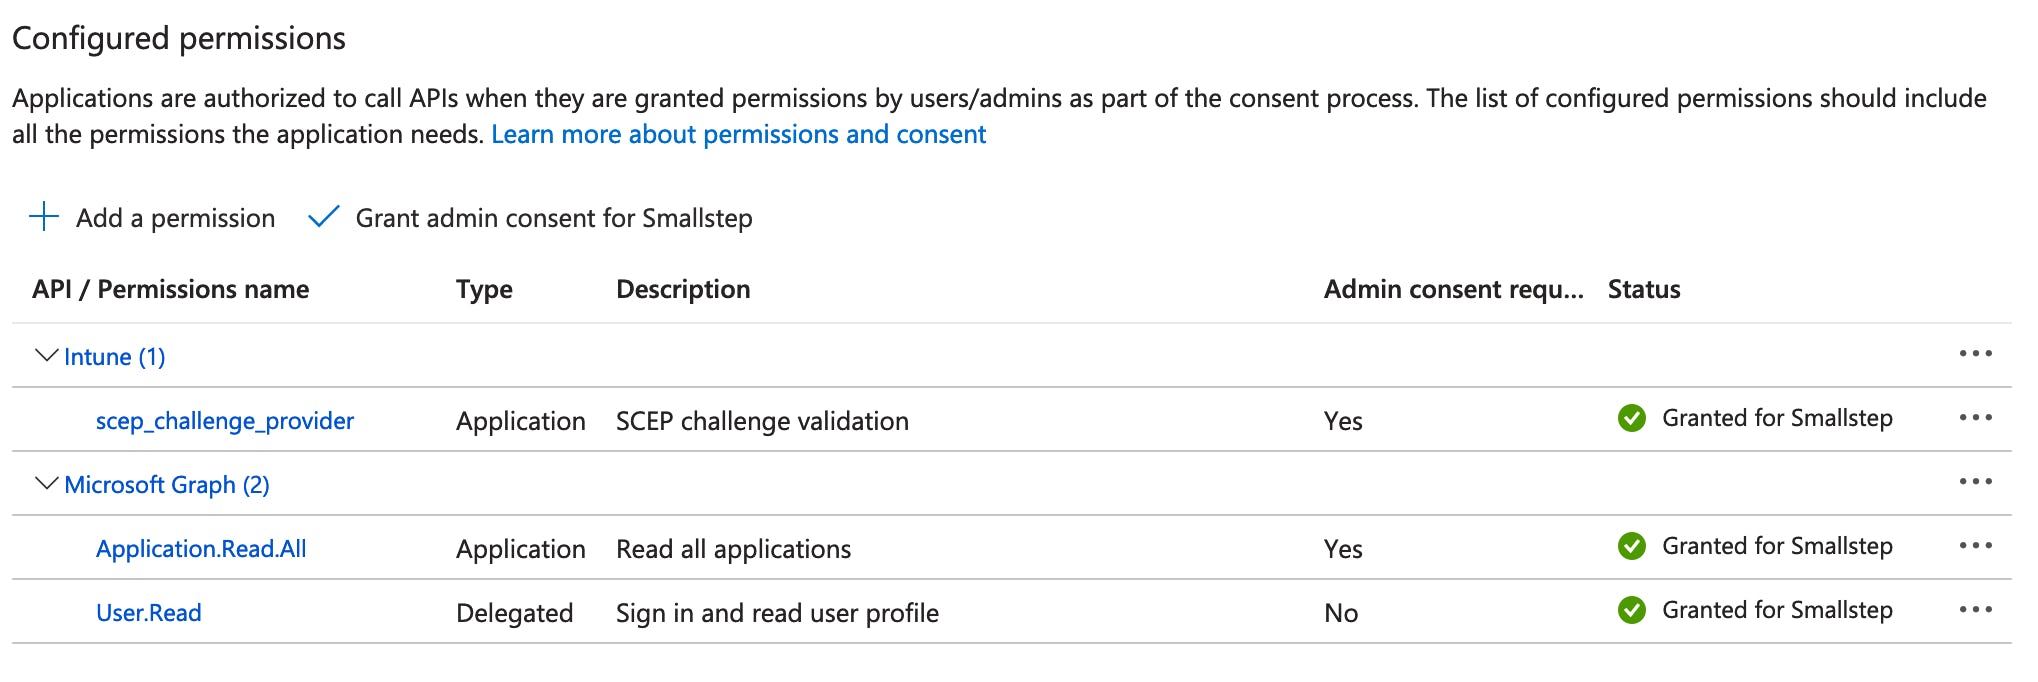
First, add the following permissions:
- Microsoft Graph → Application permissions →
Application.Read.All - Microsoft Graph → Application permissions →
DeviceManagementManagedDevices.Read.All - Intune → Application permissions →
scep_challenge_provider - Intune → Application permissions →
get_data_warehouse
Next, select ✓ Grant admin consent on the API permissions page, and confirm.
Here’s how the Configured permissions should look:
You’ve completed the App Registration setup.
3. Configure Smallstep
In Smallstep, navigate to Settings → Device Management.
Configure the Integration with the values you gathered above:
- The Entra ID tenant Primary domain, from your Entra ID Tenant Overview (eg.
contoso.onmicrosoft.com) - The App Registration Application (client) ID
- The App Registration Secret Value
Within a few minutes, you will see all of your Intune devices in the Devices tab. Your Smallstep device inventory is synced approximately every four hours.
4. Add the Smallstep agent for app distribution
Note: if you do not want to install the agent via Intune, see our Smallstep Agent Manual Installation guide.
In this step, we’ll add the Smallstep Agent to Intune for distribution to devices.
- In Intune,
- Start at Windows Apps
- Choose + Create, and then select Windows App (Win32)
- Download the Smallstep agent
.intunewinpackage foramd64and select it for upload in Intune. (Contact Smallstep if you need anarm64installer).
- For the App Information tab:
- For Publisher, use “Smallstep”
- Note the version number. You'll need it below.
- Choose “Next”
- Continue to the Requirements tab
- For the Requirements tab:
- For Check Operating System Architecture, choose "Yes"
- Select "Install on x64 systems"
- Use minimum operating system: Windows 10 1607
- Choose "Next"
- For the Detection rules tab:
- Rules format: Manually configure detection rules
- Choose + Add
- Rule Type: MSI
- MSI product version check: Yes
- Operator: Greater than or equal to
- Value: Paste in the version number you noted earlier
- Choose “Ok”
- Continue to the Assignments tab
- For the Assignments tab:
- Assign the app to devices as desired.
- On “Review and Create” click Create
5. Configure agent enrollment policy set
In this step, we’ll tie everything together by creating Windows policy to enroll devices using the Smallstep Agent.
- In the Smallstep console, visit Device Settings and choose your Intune connection.
- Select the Settings tab from the left-
- Download the Root Certificate
- Download the Intermediate Certificate
- Copy and temporarily save the SCEP server URL shown on the page, eg.
https://agents.example.ca.smallstep.com/scep/integration-intune-b967f507
- Visit Team Settings
- Copy and temporarily save the Team Name and Team ID values
6. Create a policy in Intune
- In Intune, choose 🖥️ Devices
- Under the Manage Devices tab, Choose Configuration
- From the tabs at the top, select Import ADMX
- Select Import
- ADMX file: (upload smallstep.admx)
- ADML file for the default language: (upload smallstep-en-US.adml)
- Click Next
- On “Review and Create”, click Create
- From the tabs at the top, select Policies
- Click Create and then select New Policy
- Select Platform
- Windows 10 and Later
- Select Profile Type
- Templates
- Select Template Name:
- Imported Administrative templates (Preview)
- Configure the policy
- Name: “Smallstep Agent”
- Choose “Next”
- Choose Setting Name: Smallstep → Settings → Smallstep Enrollment Settings
- Within the settings pane:
- Supported on: Enabled
- Team Slug: (paste the Team ID you saved earlier)
- Certificate URI:
capi:store-location=machine;store=My;issuer=Smallstep (<team-name>) Agents Intermediate CA;cn=step-agent-bootstrap
<team-name>in the “Certificate URI” with your full team name. If your team was created before October, 2024, your issuer CA may have a common name without the team name ("Smallstep Agents Intermediate CA"). Not sure? Check your Authority list. - Leave the other settings as is.
- Choose “OK”
- In the Assignments tab:
- Assign the same devices that you deployed the Smallstep app to.
- Click Next
- On “Review and Create”, click Create
- Select Platform
- Again, select New Policy
- Select Platform
- Windows 10 and Later
- Select Profile Type
- Templates
- Select Template Name
- Trusted Certificate
- Choose “Create”
- Configure the policy
- Name: Smallstep Agents Authority Root
- In Configuration Settings
- Certificate file: (upload the Root certificate you downloaded earlier)
- Set assignments
- Set the assignments as desired
- Click Next until “Review and Create”
- Click Create
- Select Platform
- Again, select New Policy
-
Select Platform
- Windows 10 and Later
-
Select Profile Type
- Templates
-
Select Template Name
- Trusted Certificate
-
Choose “Create”
-
Configure the policy
- Name: Smallstep Agents Authority Intermediate
- In Configuration Settings
-
Certificate file: (upload the Intermediate certificate you downloaded earlier)
-
Destination store: Computer Certificate Store—Root
For legacy reasons, even though we are uploading an Intermediate CA here, we want to store it in the Root store, not the Intermediate store.
-
-
Set assignments
- Set the assignments as desired
-
Click Next until “Review and Create”
-
Click Create
-
- Click Create and then select New Policy
- Select Platform
- Windows 10 and Later
- Select Profile Type
- Templates
- Select Template Name
- SCEP Certificate
- Configure the policy
- Name: Smallstep SCEP
- Under Configuration Settings
- Certificate Type: Device
- Subject name format:
CN=step-agent-bootstrap - Certificate validity period: 1 year (default)
- Key storage provider (KSP): Enroll to Trusted Platform Module (TPM) KSP (if present), or Software KSP
- Key usage: Digital Signature, Key Encipherment
- Key Size: 2048
- Hash Algorithm: SHA-2
- Root Certificate: Smallstep Agents Authority Intermediate
- Extended Key Usage:
- Choose “Client Authentication” in the Predefined Values column
- SCEP Server URLs: (paste the SCEP server URL you saved earlier)
- Set assignments
- Set the assignments as desired
- Click Next until “Review and Create”
- Click Create
- Select Platform
Your Smallstep team is now linked to Intune. The devices that you scoped will receive a certificate and have the agent installed and running.
Confirmation
There's two ways to confirm installation on an endpoint:
- In the Smallstep UI, go to the device's profile page. In the Device Registration section, you'll see an Enrolled At timestamp.
- When viewing a Windows/Intune device in the Smallstep UI, you can review device logs to confirm connectivity to the platform and issued certificates.
Uninstall Smallstep on Intune
In Intune, go to Apps and choose the Smallstep agent app.
Under the Assignments tab, remove all devices from Required and Available sections, and add all devices to the Uninstall section.
Last updated on February 3, 2026
Introducing
Device Identity
Ensure that only company-owned devices can access your enterprise's most sensitive resources.