Connect Intune to Smallstep (macOS)
Smallstep can integrate with Microsoft Intune to synchronize your device inventory, to exchange SCEP tokens, and to enroll your macOS fleet with Smallstep using the Smallstep Agent. A SCEP token is a single-use password that's used by devices to get a certificate from Smallstep for bootstrapping.
In this document, we will configure your Microsoft Intune instance for use with your Smallstep team and any macOS endpoints.
To configure the connection, let's first set up an Application in Entra ID. Then, we'll add the client credentials to Smallstep.
Prerequisites
You will need:
- A Smallstep team
- A Microsoft Azure / Entra ID Tenant. A Global Administrator role is required to grant tenant-wide API consent.
- A Microsoft Intune Tenant. An Intune Administrator role is required.
- A test macOS device to enroll for management.
Step-by-step instructions
1. Register an Entra ID application
You'll need to register an Application in Entra ID that connects Smallstep to Intune.
In the Entra Admin Center, Register an Application with the following properties:
- Name the application "Smallstep"
- Leave all other values alone
- Select Register
Find your new App Registration, and copy the Application (client) ID value, which you will register with Smallstep later.
Next, visit the Certificates & secrets blade.
Select + New client secret, and use the following properties:
- Name the secret "Smallstep Secret"
- Choose a validity period that matches your security policies. When you rotate the client secret, you will need to update it in your Smallstep settings.
- Select Add to create the secret
Copy the Client Secret Value, which you will register with Smallstep later.
2. Grant API permissions
Now we'll connect the App Registration to Intune by adding application permissions.
In the App Registration, visit the API Permissions blade.
First, add the following permissions:
- Microsoft Graph → Application permissions →
Application.Read.All - Microsoft Graph → Application permissions →
DeviceManagementManagedDevices.Read.All - Intune → Application permissions →
scep_challenge_provider - Intune → Application permissions →
get_data_warehouse
Next, select ✓ Grant admin consent on the API permissions page, and confirm.
Here's how the Configured permissions should look:
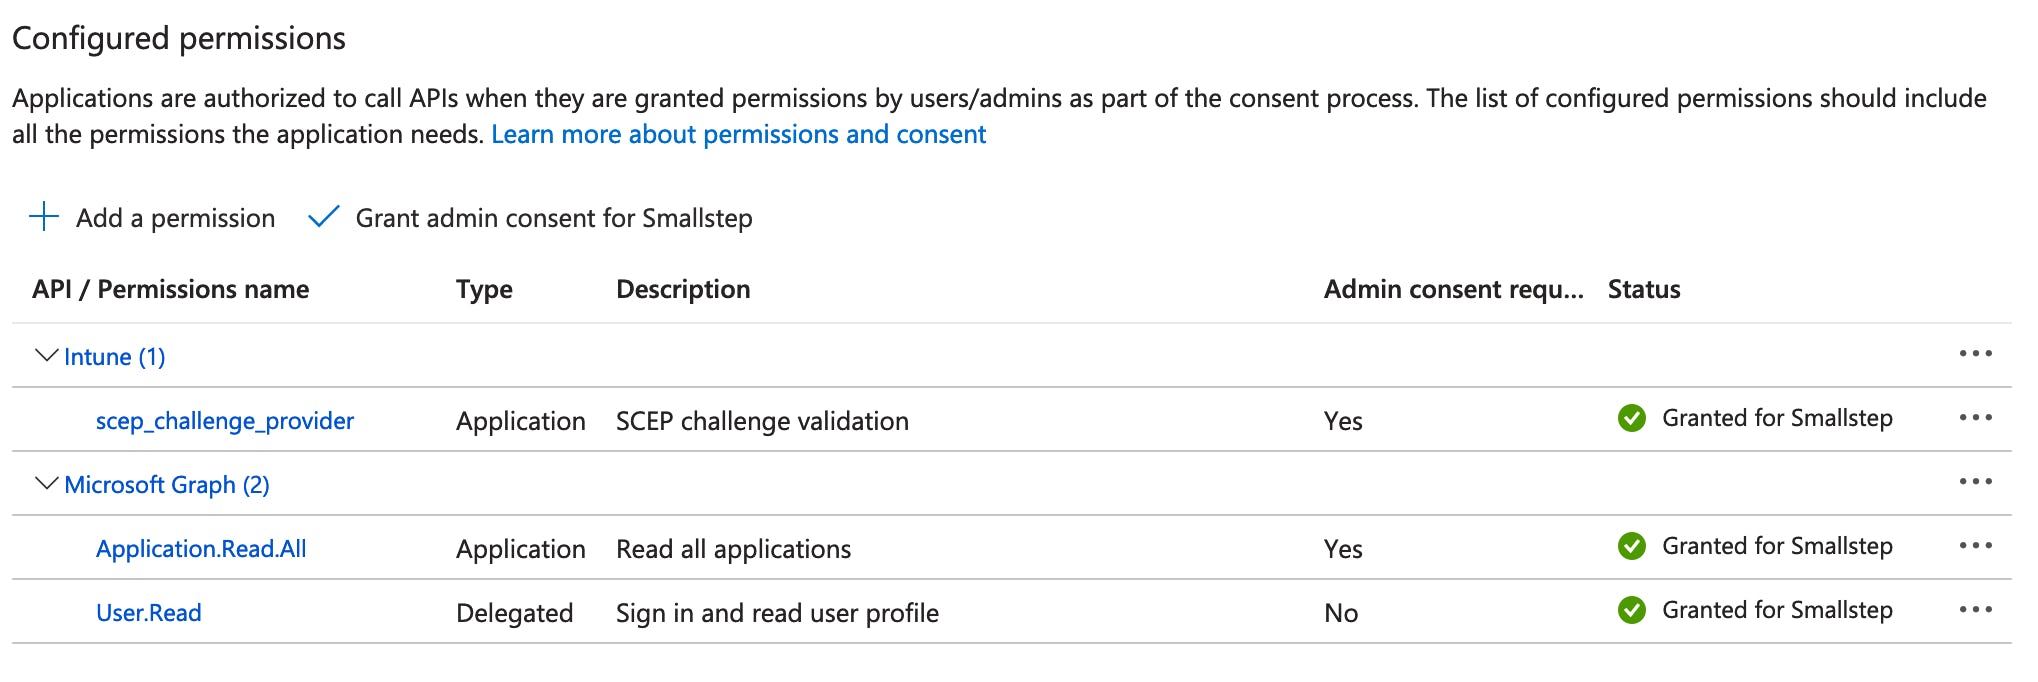
You've completed the App Registration setup.
3. Configure Smallstep
In Smallstep, navigate to Settings → Device Management.
Configure the Integration with the values you gathered above:
- The Entra ID tenant Primary domain, from your Entra ID Tenant Overview (eg.
contoso.onmicrosoft.com) - The App Registration Application (client) ID
- The App Registration Secret Value
Within a few minutes, you will see all of your Intune devices in the Devices tab. Your Smallstep device inventory is synced approximately every four hours.
4. Configure agent enrollment
In this step, we'll gather the values needed to configure macOS devices to enroll with Smallstep.
- In the Smallstep console, visit Device Settings and choose your Intune connection.
- Select the Settings tab from the left
- Download the Root Certificate
- Download the Intermediate Certificate
- Copy and temporarily save the SCEP server URL shown on the page, eg.
https://agents.example.ca.smallstep.com/scep/integration-intune-b967f507
- Visit Team Settings
- Copy and temporarily save the Team Slug value
5. Create configuration profiles in Intune
In this step, we'll create macOS configuration profiles in Intune to enroll devices using the Smallstep Agent.
-
In Intune, start at Devices → macOS → Configuration
-
Choose Create → New Policy
- Platform: macOS
- Profile type: Templates
- Template name: Trusted certificate
- Choose Create
- Configure the profile:
- Name: Smallstep Agents Authority Root
- In Configuration Settings:
- Certificate file: (upload the Root certificate you downloaded earlier)
- Assign the profile to your desired device groups
- Choose Next until "Review + create"
- Choose Create
-
Again, select Create → New Policy
- Platform: macOS
- Profile type: Templates
- Template name: Trusted certificate
- Choose Create
- Configure the profile:
- Name: Smallstep Agents Authority Intermediate
- In Configuration Settings:
- Certificate file: (upload the Intermediate certificate you downloaded earlier)
- Assign the profile to your desired device groups
- Choose Next until "Review + create"
- Choose Create
-
Again, select Create → New Policy
- Platform: macOS
- Profile type: Templates
- Template name: SCEP certificate
- Choose Create
- Configure the profile:
- Name: Smallstep SCEP
- In Configuration Settings:
- Certificate type: Device
- Subject name format:
CN=step-agent-bootstrap - Certificate validity period: 1 Year (default)
- Key size (bits): 2048
- Hash algorithm: SHA-2
- Root certificate: Select Smallstep Agents Authority Intermediate
- Extended key usage:
- Select Client Authentication in the Predefined values column
- SCEP Server URLs: (paste the SCEP server URL you saved earlier)
- Assign the profile to your desired device groups
- Choose Next until "Review + create"
- Choose Create
-
Finally, select Create → New Policy
- Platform: macOS
- Profile type: Templates
- Template name: Custom
- Choose Create
- Configure the profile:
- Name: Smallstep Agent Settings
- In Configuration Settings:
-
Custom configuration profile name: Smallstep Agent
-
Deployment channel: Device channel
-
Configuration profile content: Create a file named
smallstep-agent.mobileconfigwith the following content:Replace
<team-slug>with your Team Slug value.<?xml version="1.0" encoding="UTF-8"?> <!DOCTYPE plist PUBLIC "-//Apple//DTD PLIST 1.0//EN" "http://www.apple.com/DTDs/PropertyList-1.0.dtd"> <plist version="1.0"> <dict> <key>PayloadContent</key> <array> <dict> <key>PayloadType</key> <string>com.smallstep.Agent</string> <key>PayloadVersion</key> <integer>1</integer> <key>PayloadIdentifier</key> <string>com.smallstep.Agent.settings</string> <key>PayloadUUID</key> <string>A1B2C3D4-E5F6-7890-ABCD-EF1234567890</string> <key>PayloadDisplayName</key> <string>Smallstep Agent Settings</string> <key>TeamSlug</key> <string><team-slug></string> <key>Certificate</key> <string>mackms:label=$PROFILE_IDENTIFIER;se=false;tag=</string> </dict> </array> <key>PayloadDisplayName</key> <string>Smallstep Agent</string> <key>PayloadIdentifier</key> <string>com.smallstep.Agent</string> <key>PayloadType</key> <string>Configuration</string> <key>PayloadUUID</key> <string>12345678-1234-1234-1234-123456789ABC</string> <key>PayloadVersion</key> <integer>1</integer> </dict> </plist>
-
- Assign the profile to your desired device groups
- Choose Next until "Review + create"
- Choose Create
Your Smallstep team is now linked to Intune, and the devices that you scoped will receive a certificate and have the agent configured.
Installing the Smallstep agent
The Intune configuration profiles above configure the agent settings, but you will also need to install the Smallstep Agent application on your macOS devices.
For agent installation, see the Smallstep Agent Installation Guide. You can use Intune's macOS app deployment capabilities or another software distribution tool like Munki to deploy the agent package.
Confirmation
There's two ways to confirm installation on an endpoint:
- In the Smallstep UI, go to the device's profile page. In the Device Registration section, you'll see an Enrolled At timestamp.
- Alternatively, on the device itself, run
/Applications/SmallstepAgent.app/Contents/MacOS/SmallstepAgent versionto see that the agent is installed. And, in System Settings, check Login Items to confirm that there is a Smallstep Agent entry.
Last updated on February 3, 2026
Introducing
Device Identity
Ensure that only company-owned devices can access your enterprise's most sensitive resources.