Connect Workspace One UEM to Smallstep
Smallstep can integrate with Omnissa Workspace ONE UEM to keep your device inventory in sync and to exchange SCEP tokens. A SCEP token is a single-use password that's used by devices to get a certificate from Smallstep.
Prerequisites
You will need:
- A Smallstep team
- A Workspace ONE UEM tenant
- A test device to enroll for management
- This can be a Windows VM, but you may need a physical device or additional Wi-Fi adapter for testing an Enterprise Wi-Fi connection. Windows Home edition is not supported.
Step-by-step instructions
1. Connect Smallstep to Workspace ONE via OAuth
First, we’ll create a scoped API role for Smallstep:
-
In Workspace ONE UEM, navigate to Accounts → Admin Roles and choose + Add Role
-
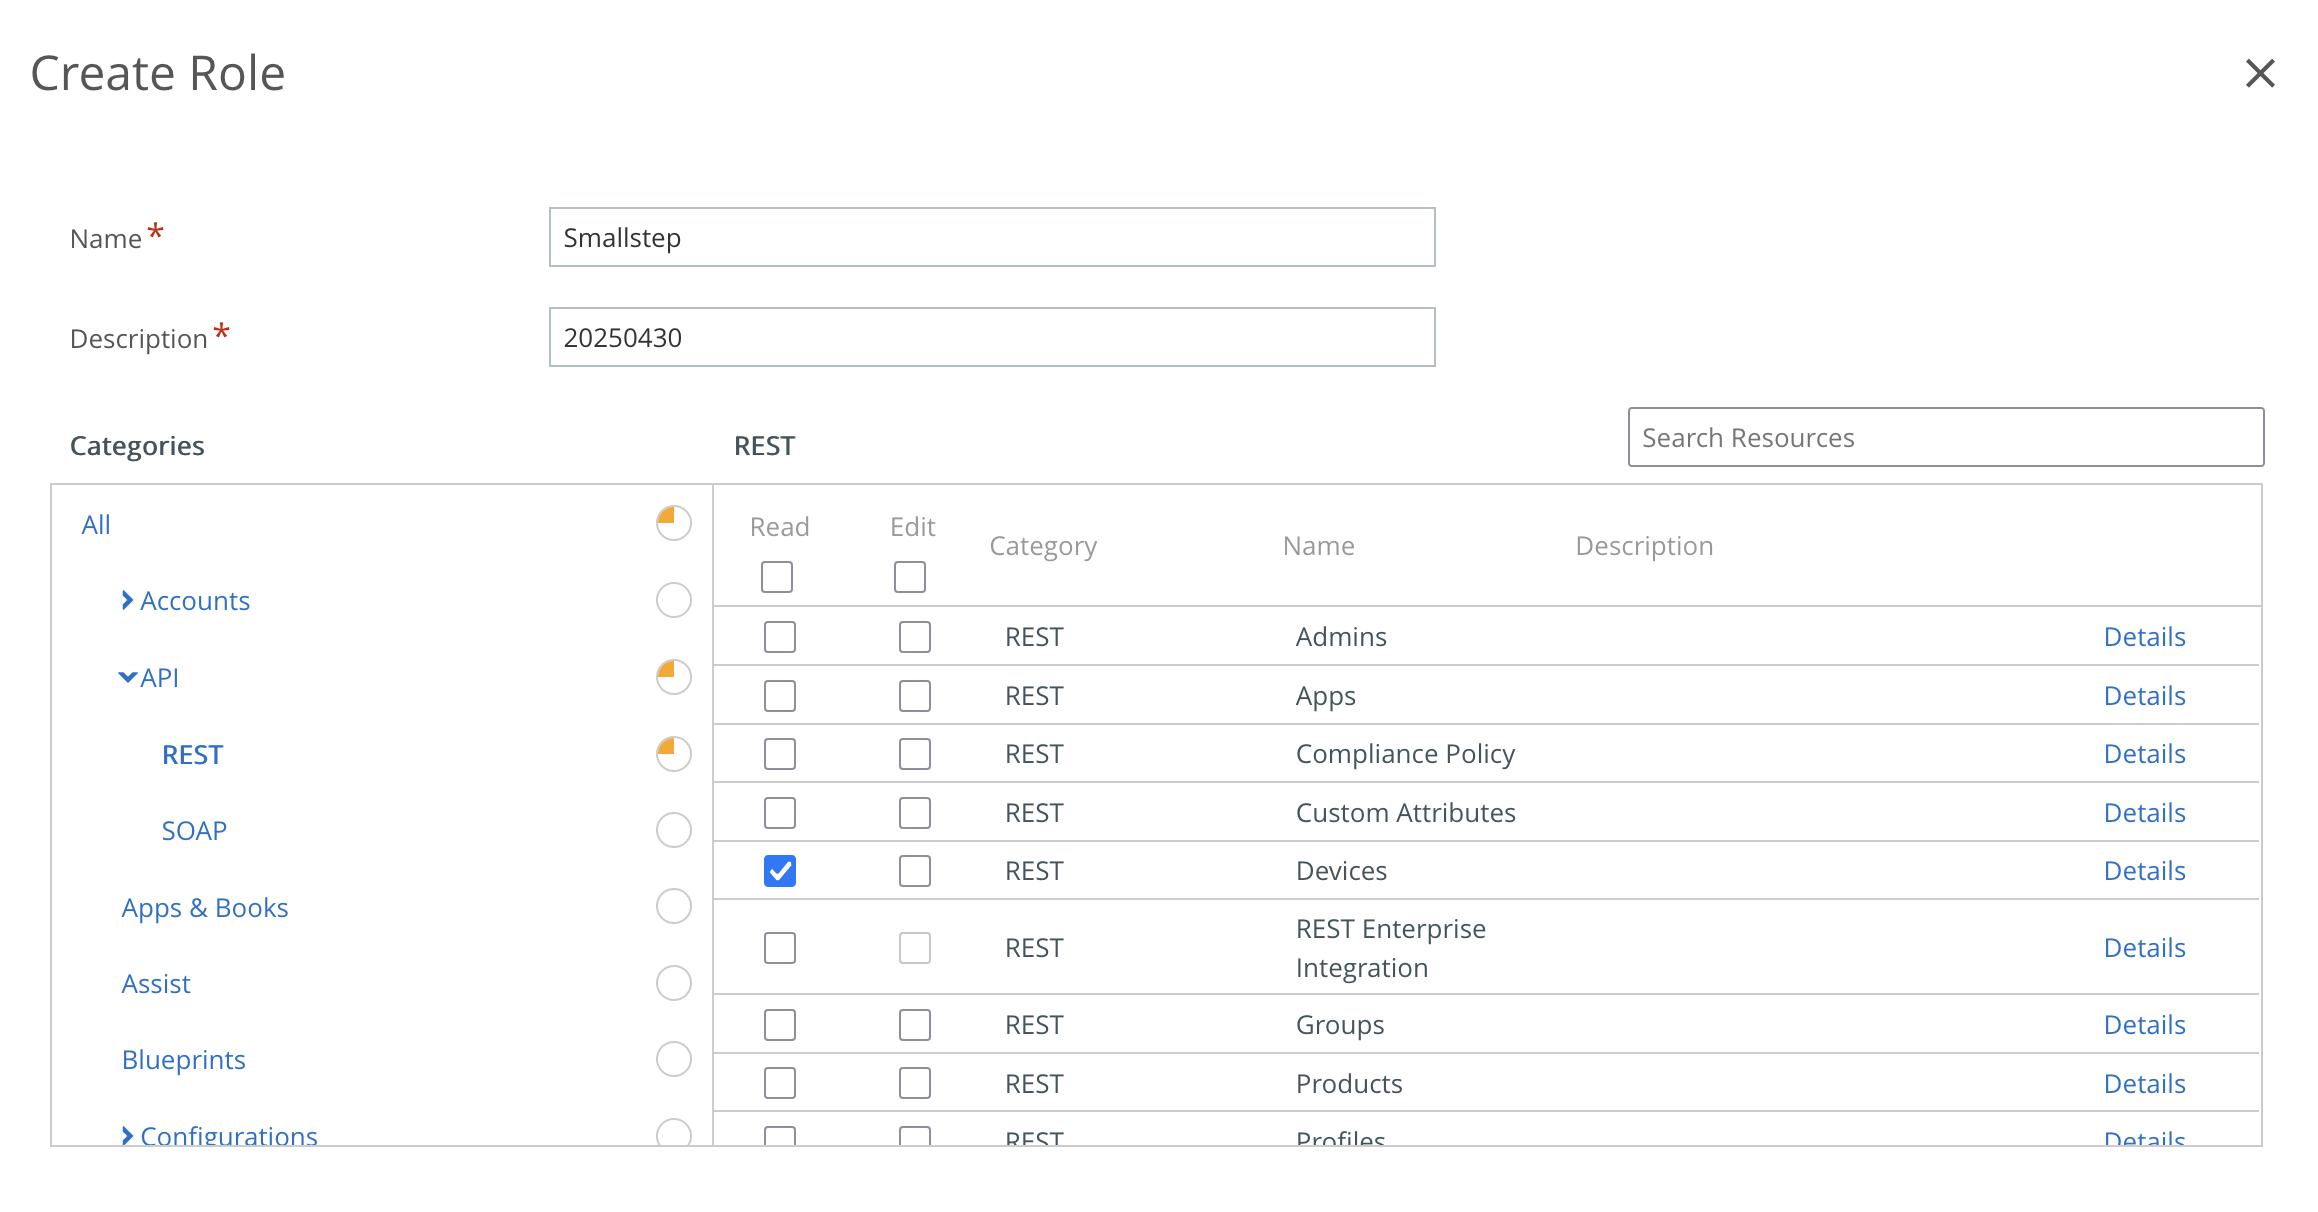
Create a role named “Smallstep” with a description of “Smallstep Integration”
-
Smallstep needs Read access to Devices, using the REST API. Choose API → REST on the left, and choose ✅ Read for the row “Devices”
-
Choose Save
Next, we’ll create an OAuth client for Smallstep:
- In Workspace ONE UEM, navigate to Groups & Settings → Configurations and find OAuth Client Management in the list
- Choose Add and add a new client with a name of “Smallstep” and description of “Smallstep MDM Integration for Device Sync”
- For Organization Group, select the group most appropriate for managing your desired device inventory
- For Role, choose Smallstep
- Choose Save
- Save the resulting client ID and secret value to a temporary location
2. Configure Smallstep OAuth settings
In Smallstep, navigate to Settings → Device Management.
Configure a new Omnissa Workspace ONE Integration with the values you gathered above:
- The Workspace ONE UEM REST API URL for your tenant.
- This URL is shown in UEM’s settings. Navigate to
Groups and Settings → All Settings → System → Advanced → API → Rest API - Copy the REST API URL from that page
- This URL is shown in UEM’s settings. Navigate to
- The Workspace ONE UEM OAuth 2.0 Token URL for your region
- The OAuth client ID and secret you saved in Step 1
After saving the Workspace ONE connection, you will see settings for your integration. Copy the following details for later:
- SCEP URL
- SCEP Challenge URL
- Challenge Basic Authentication Username
- Challenge Basic Authentication Password
Within a few minutes after adding the connection, you should see all of your Workspace ONE devices in the Devices tab. Device inventory is synced approximately every four hours.
3. Create a script for Smallstep agent configuration
Note: if you don't want to use Workspace ONE UEM to install the agent, see the Smallstep Agent Manual Installation guide.
- In Workspace One UEM, visit Resources → Scripts
- Choose Add and then Windows
-
In the General tab, provide a name for the script, such as “Smallstep Agent Enrollment”
-
On the Details tab, ensure the Language is “Powershell” and the Execution Context & Privileges is “System Context”
-
Use the following snippet as the Code, making sure to replace
<team-id>with the Team ID value you copied from the Smallstep UI earlier.<team-name>should be replaced with your full Team name shown in the Smallstep dashboard.$RegistryPath = "HKLM:\Software\Policies\Smallstep" If (-NOT (Test-Path $RegistryPath)) { New-Item -Path $RegistryPath } Set-ItemProperty -Path "HKLM:\Software\Policies\Smallstep" -Name "TeamSlug" -Value "<team-id>" Set-ItemProperty -Path "HKLM:\Software\Policies\Smallstep" -Name "Certificate" -Value "capi:store-location=machine;store=My;issuer=Smallstep (<team-name>) Agents Intermediate CA;cn=$env:DEVICE_ID"If your team was created before October, 2024, your issuer CA may have a common name without the team slug ("Smallstep Agents Intermediate CA"). Not sure? Check your Authority list.
-
In the Variables tab, click Add. Set the variable Key to
DEVICE_IDand the variable Value to{DeviceUuId} -
Click Save to save the script.
-
Select the newly created script and click the Assign button.
-
Name the assignment as desired and select the appropriate Smart Group. Click Next.
-
For Deployment, select "Run Once Immediately" for the Triggers. Click Add.
-
Click Save and Publish. Click Publish on the additional prompt if one is shown.
-
4. Deploy and configure the Smallstep agent
In this step, we’ll add the Smallstep Agent to Workspace One UEM for distribution to devices.
- Download the Smallstep Agent for x64 (MSI)
- Download the Smallstep Agent for Arm64 (MSI)
- See all versions
- In Workspace One UEM,
- Go to Resources → Native Apps.
- Choose Add → Application File.
- Download the latest version of the agent from the links above and select it for upload to UEM.
- Choose Continue
- In the Add Application panel’s Details tab,
- Set Supported Processor Architecture to
64-bit(orARM64if used) - For Minimum OS, select Windows 10 (10.0.15063)
- Set Supported Processor Architecture to
- In the Add Application panel’s Deployment Options tab,
- Set Install Context to Device
- Finally, choose Save & Assign
Got ARM64 devices?
If you also are deploying to ARM-based devices, add another Native App for the arm64 version of our MSI installer. Workspace ONE will try to distribute both installers to both arm64 and amd64 devices. To avoid this, segregate your devices by OS and CPU Architecture. To do this, create two new Smart Groups in Groups & Settings → Assignment Groups—one for arm64 devices, and one for amd64 devices. Assign each application to the appropriate Smart Group.
Assigning the application
After saving the Native App, you'll see the Application Assignment panel.
- Give the Assignment a name
- Choose the groups you’d like to assign the application to. Assign the app to a single devices or a small group of test devices for a staged rollout.
- Select App Delivery Method: Auto
- Create the Assignment.
- Choose Save
- Choose Publish to begin distributing the app.
5. Configure agent enrollment profiles
In this step, we’ll tie everything together by creating Windows policy to enroll devices using the Smallstep Agent.
Gather required details
You’ll need the following values from when you configured your Workspace ONE connection:
- SCEP URL
- SCEP Challenge URL
- Challenge Basic Authentication Username
- Challenge Basic Authentication Password
If you need to retrieve these again, you can always visit: Settings → Device Management → Omnissa Workspace ONE
Add a Workspace ONE CA resource
For compatibility with Workspace ONE, Smallstep emulates the Microsoft ADCS’s Dynamic SCEP and NDES enrollment protocols.
- In Workspace One UEM, visit Resources → Certificate Authorities
- Choose + Add
- Provide a name for the CA connection, for example, Smallstep Agents CA
- For Authority Type, choose
Microsoft ADCS - For Protocol, choose
SCEP - For Version, choose
NDES 2008/2012(NDES for SCEP) - Provide the SCEP URL
- For Challenge Type, choose
Dynamic - Provide the Challenge Username and Password
- No client certificate is needed
- Provide the SCEP Challenge URL
- Choose Show Advanced Options
- For SCEP Challenge Length, choose
32
- For SCEP Challenge Length, choose
- Choose Test Connection and wait for a ✅ success modal
- Choose Save and Add Template
Add a Workspace ONE certificate request template
A new modal screen will be presented with the empty Request Template configuration
- Provide a name for the Template, for example,
Smallstep Agents - For Certificate Authority, choose the Smallstep CA you just connected
- For the subject name, use a value of
CN={DeviceUuid} - For Private Key Length, use 2048
- For Private Key Type, choose both Signing and Encryption
- Add a new SAN Type of type URL, and set the value to
deviceid://{DeviceUuid} - For Automatic Certificate Renewal, choose Enabled
- Pick an appropriate Auto Renewal Period (5 days is common)
- Ensure Publish Private Key is Disabled
- Choose Save
Create a Windows profile
- In Workspace One UEM,
- Go to Resources → Profiles.
- Click Add, and pick Add Profile from the drop-down
- Click Windows, and then select Windows again
- Click Device Profile
- Under General, Provide a name (for example, "Smallstep Device Enrollment")
- Select the All Devices group in the Smart Groups select list
- Other options can be left as-is
- Optionally, click the View Device Assignment button to see the devices to which the profile will be distributed
- Select the Credential payload type on the left and choose Configure. Set the following settings:
- Credential Source: Defined Certificate Authority
- Certificate Authority: Choose the CA connection you created earlier
- The certificate template should be selected automatically. If not, select an appropriate one.
- Key Location: TPM Required
- Certificate Store: Personal
- Click Save and Publish to finalize the configuration of the profile.
- A modal screen will be shown with the devices to which the profile will be distributed. Click Publish if the assignment looks OK.
Confirmation
In the Smallstep console, find your device. In the Device Registration section, you'll see an Enrolled At timestamp. Workspace ONE's device UI also shows both the installed apps and issued certificates on the device.
Last updated on February 3, 2026
Introducing
Device Identity
Ensure that only company-owned devices can access your enterprise's most sensitive resources.