Configure F5 SSL VPN with Smallstep
This tutorial describes how to configure an F5 VPN server for certificate-based authentication with Smallstep. The Smallstep app can then configure and issue certificates to your clients.
Intended audience: enterprise IT administrators Estimated time commitment: 1 hour
Introduction
In this tutorial, we will configure an F5 SSL VPN on F5 BIG-IP® APM to use Smallstep certificate-based authentication with mutual TLS.
Client certificate management is not documented here. Client certificates could be issued to the F5 Access or Edge Client by the Smallstep app or by an MDM.
You will need a BIG-IP® instance with Local Traffic (LTM) and Access Policy (APM) resources provisioned.
This tutorial was tested on BIG-IP® VE v17.1.1 Build 0.2.6.
Overview of the setup
For a complete setup, you will add the following to your F5 BIG-IP® configuration:
-
An Access Profile with an Access Policy that performs certificate authentication and assigns resources to clients that successfully authenticate.
The Access Profile also contains configuration for the VPN itself, including IP lease pools and DNS settings.
-
A Virtual Server which will serve your VPN traffic. This is where you’ll configure the mutual TLS handshake for your VPN server. The Virtual Server will accept client certificates from Smallstep, and use a server certificate from Smallstep.
Step-by-step instructions
Access profile
The Access Profile defines the certificate authentication flow and VPN settings for F5 BIG-IP®.
This is just an example policy. After importing, please review and modify it as needed. You may want a fallback authentication method, for instance, in case certificate authentication fails. Or you may want a different set of resource assignments after successful certificate authentication.
-
Download this profile: smallstep-vpn-profile.conf.tar.gz
-
Go to Access → Profiles / Policies and choose Import…
- Profile name:
smallstep - Config File Upload: Upload smallstep-vpn-profile.conf.tar.gz
- Profile name:
-
Choose “Import”
Here’s what the Access Policy will look like once imported:

After import, you’ll need to customize your Access Profile to align with your VPN needs. Users commonly customize things like:
- IP Lease Pool address ranges
- Compression settings (in the Network Access List)
- DNS servers and domain suffix (in the Network Access List)
Configuring TLS
Next, you’ll configure the TLS handshake for your VPN. You’ll add the following:
- CAs and Certificates for your Virtual Server
- F5 Menu: System → Certificate Management → Traffic Certificate Management → SSL Certificate List
- A Client SSL Profile
- F5 Menu: Local Traffic → Profiles → SSL → Client
- Virtual Server Configurations for ports 80 and 443
- F5 Menu: Local Traffic → Virtual Servers
Now let’s configure CAs and Certificates on the BIG IP.
First, you’ll add a root of trust that will verify client certificates:
- Go to System → Certificate Management → Traffic Certificate Management → SSL Certificate List
- Choose “Import…” and on the next screen, choose:
- Import Type: Certificate
- Certificate Name:
smallstep-accounts-root-intermediate - Certificate Source: Browse for the Intermediate and Root Cert Bundle from your Smallstep Accounts CA
- Choose Import
- You should now see a new Certificate Bundle in the list.
Next, you’ll configure a server certificate and private key for your virtual server’s Client SSL profile. This certificate must be issued by a root CA that will be trusted by your VPN clients when they connect.
-
Create the server certificate and private key. You can do this in the Smallstep UI, or locally by running
step ca certificate. For example:$ step ca certificate vpn.example.com server.crt server.key \ --not-after 8160h \ --san vpn.example.com \ --san 14.13.12.10
-
Combine the certificate + intermediate CA certificate and the private key into a PKCS 12 archive. You can generate a PKCS 12 archive with
step. For example, ifserver.crtcontains your server certificate and intermediate CA PEM blocks, andserver.keycontains your server private key, run:$ step certificate p12 server.p12 server.crt server.key
You’ll be asked to provide a password to encrypt the file.
-
Next, in F5 BIG IP, go to System → Certificate Management → Traffic Certificate Management → SSL Certificate List
-
Choose “Import…” and on the next screen, choose:
- Import Type: PKCS 12 (IIS)
- Certificate and Key Name:
smallstep-vpn-server - Certificate and Key Source, browse for your
server.p12PKCS 12 archive - Enter the password you used to encrypt the PKCS 12 archive
-
Choose Import
You should now see the EC Certificate & Key you uploaded, in the SSL Certificate List.
Virtual servers
Now you’ll associate your Access Policy to a Virtual Server
You’ll need two Virtual Server configurations:
- For port 80, to redirect to port 443 using the built-in redirect iRule
- For port 443, with attached profiles
To get started, create a Client SSL profile:
- Go to Local Traffic → Profiles → SSL → Client
- Create a new Client SSL Profile
- Use the following values:
- Name:
smallstep-clientssl - Certificate Key Chain: Add the
smallstep-vpn-serverserver certificate and private key you imported earlier - Client Certificate: Request
- Trusted Certificate Authorities: Choose the
smallstep-accounts-root-intermediateCA Bundle that you imported earlier. Your client certificates must be issued by this CA. - Advertised Certificate Authorities: Same value as Trusted Certificate Authorities
- Name:
- Save the Profile
Next, create a Connectivity Profile:
- Go to Local Traffic → Profiles → Services → Connectivity
- Choose “Add…”
- Name:
smallstep-connectivity - Parent profile:
/Common/connectivity
- Name:
- Ok
Next, create the Virtual Server for port 80
- Go to Local Traffic → Virtual Servers
- Choose “Create…”
- Use the following properties:
- Name:
smallstep-vpn-redirect - Provide your source address mask, eg.
0.0.0.0/0 - Provide your destination address/mask. This may be the internal IP addresses of your F5 BIG IP.
- Service port: 80 / HTTP
- HTTP Profile (Client): http
- Add iRule
_sys_https_redirect
- Name:
Finally, create a Virtual Server for port 443:
- Go to Local Traffic → Virtual Servers
- Choose “Create…”
- Use the following properties:
- Name:
smallstep-vpn - Provide your source and destination addresses/masks
- Service port: 443 / HTTPS
- HTTP Profile (Client): http
- SSL Profile (Client): Add the Client SSL Profile you created above
- Access Profile: Select the Access Profile you imported above
- Connectivity Profile: Select the Connectivity Profile you created above
- Name:
Your VPN configuration is now ready for testing.
Further reading
- F5: Configuring an HTTP virtual server to redirect to HTTPS using an iRule
- F5’s Dev/Central Community support
Addendum: Creating an access profile manually
This is an optional, alternative approach to creating the Access Profile. If you want to create an Access Profile manually instead of importing ours, do the following:
Add a network access list
- Go to Access → Connectivity / VPN → Network Access (VPN) → Network Access Lists
- Choose “Create…”
- Name:
smallstep-na-res - Description:
Smallstep VPN Access - Customize the Customization Settings as desired
- Name:
- Choose “Finished”
Add an IPv4/IPv6 lease pool
Add at least one lease IPv4 or IPv6 lease pool:
- Go to Access → Connectivity / VPN → Network Access (VPN) → IPv4 Lease Pools
- Choose “Create…”
- Name:
smallstep-lp - Start IP:
192.168.133.2, for example - End IP:
192.168.133.254, for example
- Name:
Add an access profile
-
Go to Access → Profiles / Policies and create an Access Profile
- Name:
smallstep-vpn - Profile Type: All
- Languages: Add a language
- Choose “Finish”
- Name:
-
Open the access policy you just created. In the Access Policy tab, open the visual policy editor
-
Import the following Access Policy:
If you want to create this policy manually, do the following:
-
Authentication → On-Demand Cert Auth: Dynamically initiate an SSL re-handshake and validate the received client certificate
- Choose Auth Mode: “Require”
- Leave all other settings as default
-
On the “Successful” branch after “On-Demand Cert Auth”, add Authentication → Client Cert Inspection: Check the result of client certificate authentication by the Local Traffic Client SSL profile
- Leave all settings as default
-
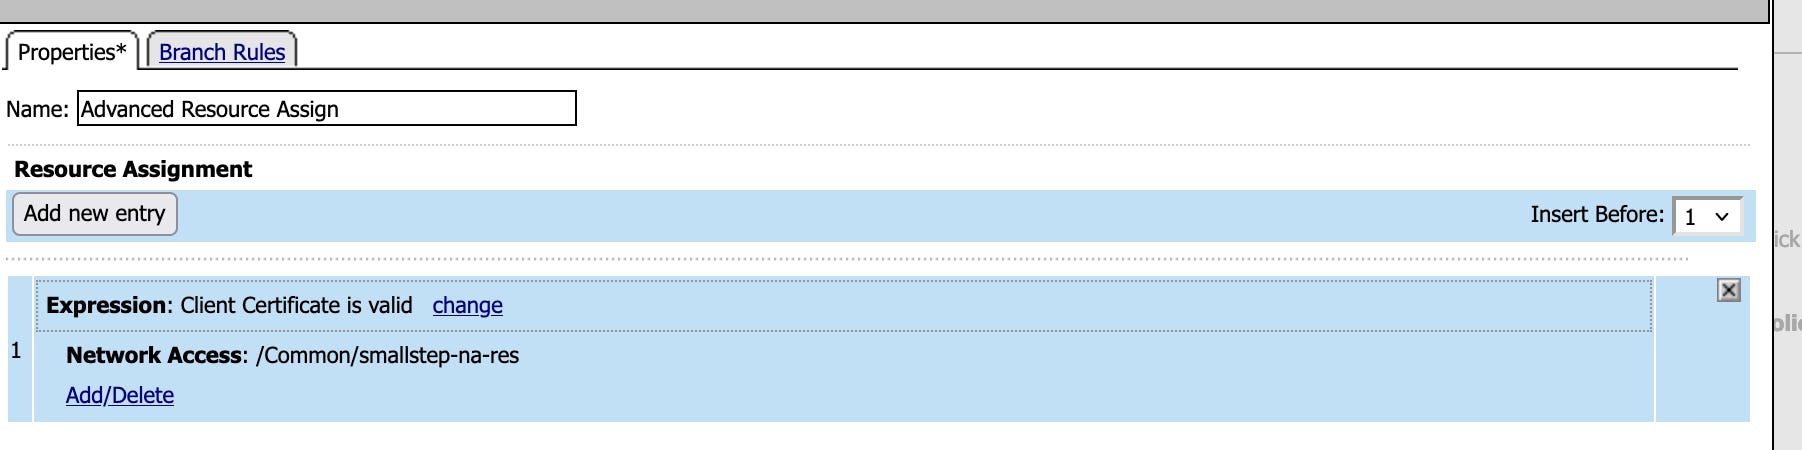
On the “Successful” branch after “Client Cert Inspection”, add Assignment → Advanced Resource Assign:
- Use the Simple Expression “Client Cert is valid”
- Add a new Resource Assignment entry
- Assign your Network Access Profile
- Save
The Advanced Resource Assign properties should look like this:
-
Finally, change the fallback Ending from Advanced Resource Assign to Allow
-
Last updated on February 3, 2026
Introducing
Device Identity
Ensure that only company-owned devices can access your enterprise's most sensitive resources.